|
|
|
|
|
Saving a Project |
|
|
|
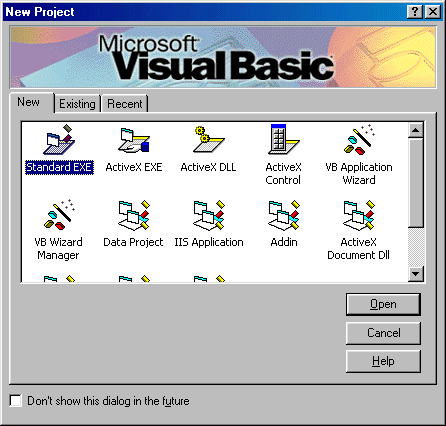
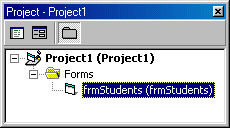
A program you create in Microsoft Visual Studio (of course, this includes VB) is called a project. A Microsoft Visual Basic project is made of various objects that you create or add as your program grows. Therefore, when saving a program, you have to save the main project and its objects. There are two categorical pieces of information you should provide when saving a program: the project's location and a name for each object or file. The location is a folder where you store the program for easy retrieval when needed. A name for each component allows you to identify it as compared to other objects of the same program. An object's name can contain a combination of up to 255 characters. Refrain from using fancy characters. Assign a name made of characters a to z, A to Z, and digits 0 to 9. |
Saving the Project
|
|
|
|
|
Introduction to Windows Controls |
|
|
|
|
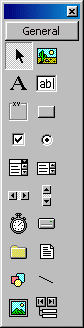
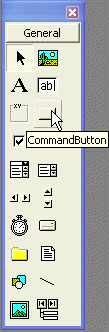
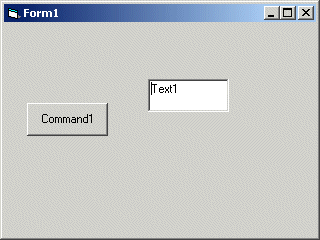
To provide the necessary functionality for your application, you will use controls from the Toolbox and add them to another component such as a form. The control you pick up from the Toolbox is also referred to as a child control. the control or object on which you add a child control is referred to as its parent or host. This can be a form or another object that has the capacity to host other controls. To identify a control on the Toolbox, you can position the mouse on it. A tool tip would appear:
From now on, we will call each control by the tool tip that appears on it. To add a control to a host, on the toolbox, you can double-click it. Alternatively, you can click the control on the toolbox and then "draw" it on the host. You can keep adding controls to a host as necessary. If you want to add a control over and over again, you can press and hold Ctrl, click the control on the Toolbox, then draw it in the desired area on the host. Every time you draw, the control would be added to the form or host. Once you have added enough controls, you can release Ctrl. If you select a control by mistake, you can simply click
another. The new one would become selected. If you clicked a control but
don't want any control at all, you can click the Pointer button You cannot select more than one control to add to a host. |
|
|
|
|
|
|
|
|
|
Selecting Controls |
|
|
|
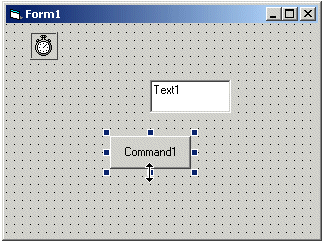
Most of the time, before doing anything on a control, you must first select it. In the same way, to perform an action on a group of controls, you must first select them. To select one control on the form, you can just click it. Alternatively, you can click and hold the mouse somewhere on the form but close to the control. Then drag as if you were drawing a line. Once you have touched the control, you can release the mouse. The control would be selected. To select more than one control at random, click one of them, press and hold Shift or Ctrl, then click each of the desired controls. Once you are satisfied with the group, release the key you were pressing. To select more than one control in a range, click and drag to draw a rectangle. Any control that would be touched by the fake rectangle would be included in the group. |
|
|
|
|
|
|
Deleting Controls |
|
|
|
If you have one of more controls that you don't need anymore, you can remove them from your form. To remove one control, select it and press Delete. To remove many controls, first select them, then press Delete. You can also select a control or a group of control, then right-click and click Cut. |
|
|
|
|
|
|
Properties of Controls |
|
|
|
Introduction |
|
|
|
If you access a code when designing the application, it is said that you are working at design time. If you access a control with code, it is said that you are at run time. Therefore, design time refers to the form being designed while displaying in Visual Basic. Run time refers to the time the control is displaying to the user. After adding a control to the application, you can customize it. For example, you can change some parts of its appearance. You can also give it assignments. These are done from two parts: the Properties window and the Code editor. Controls are broadly classified in two groups. A control is referred to as graphical if the user can see it. There are other controls that will work behind the scenes at run time. Such control are not graphical (an example is the Timer). They can be referred to as static. The user never sees these controls. There are some other controls not considered graphical because the user cannot directly change their values. For example, a control that displays only text (such is the case for the Label) is not considered graphical. A Windows control is an object that imitates a real world object. As such, it is made of characteristics that define it. A characteristic is also called a property. A property is any aspect that describes an object. Once you have a control, you can change its properties in the Properties window. This is considered that you are controlling the properties at "design time". To change the properties of a control, first select it, then proceed with changing the desired properties in the Properties window. To control a form's properties with code, you will refer to itself. A form refers to itself using the Me keyword. To change the properties of a control with code, you refer to it by its name. Whether dealing with a form or a control, after typing Me for the form, or the name of the control, type a period. A list of the properties (and possibly other objects that we will know eventually) will appear. You can continue typing or simply select from the list. And continue with your coding. Not all properties can be changed with code. |
|
Controls Names |
|
|
|
Everything on a computer must have a name. In the same way, to refer to a control in your code, you must give it a name. When you add a new control to your application, it receives a default name. When necessary, which will be almost all the time, you should change that name to a more recognizable one. To change the name of a control, first select it. Then, in the Properties window, click (Name) and type the desired name. Refrain from changing the name of a control with code. |
|
|
|
|
|
|
The Control's Location |
|
|
|
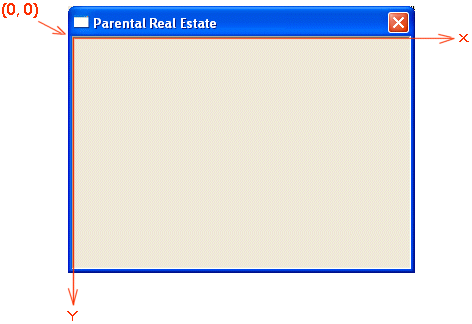
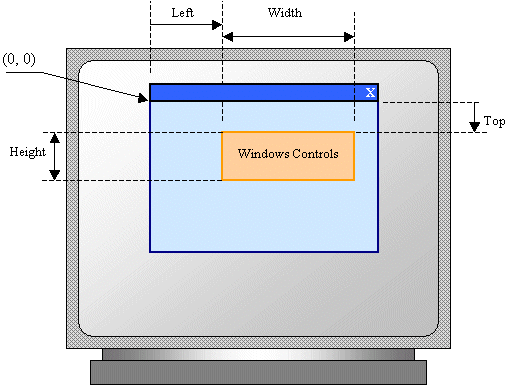
We saw that when you double-click a control from the Toolbox, it gets positioned on the form or host. We also mentioned that you can draw it, which also gives it a position. The position of a control is important for the operating system to always know where the control is. The position of a control is also referred to as its location. The location of a control uses a coordinate system whose origin is located on the top-left corner of its parent. For a form, this origin is located in its top-left section just under the title bar:
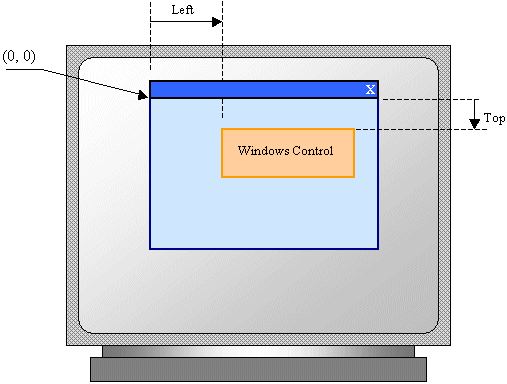
Any control positioned on the form bases its location on this origin. After adding or drawing a control, its positioned is set so its left border has a distance called Left from the origin of its parent. In the same way, the distance from its top border to the top border of its parent is called Top. This can be represented as follows:
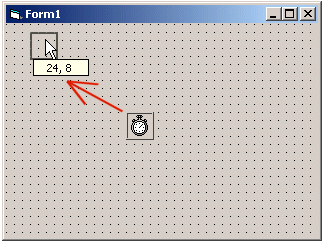
There are various ways you can change the location of a control. After adding it to its host, to change its coordinates, click and drag it to the desired location. You can also move a control using the keyboard. To do this, click the control to select it. Then press and hold Ctrl. While the Ctrl key is down, press:
Once you get to the desired location, release the Ctrl key. To be more precise, you can also change the values of the Left and/or the Top properties in the Properties window. To programmatically change the location of a control, in the Code Editor, in response to an action, type the control's name followed by the period operator, the desired property Left or Top, the assignment operator, and the new value. |
|
|
|
|
|
|
The Control's Dimensions |
|
|
|
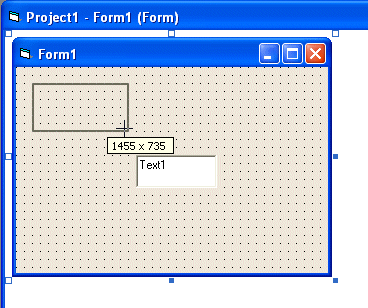
Because its location, a control is also visibly identified by its dimensions. The width is the distance from its left border to its right border. This dimension is represented by the Width property. The height is the distance from its top to its bottom border. This dimension is represented by the Height property:
As done with the location, there are various ways you can specify or control the dimensions of an object. If you click a control on the Toolbox, you can click and hold the mouse on the form then drag. While dragging, a rectangle would guide you with a tool tip that display the dimensions, live. Once you get the desired dimensions, you can release the mouse. If the control is already located on the form, to change its dimensions, after clicking it, position the mouse on one of its 8 handles. You would get one of the following cursors depending on where the mouse is located: |
|
|
You can also resize a control using the keyboard. To do this, click the control to select it. Then press and hold Shift. While holding Shift, press:
Once you reach the desired dimension, release Shift. You can also change the dimensions of a control to known values. To do this, after selecting the control on the form, in the Properties window, change the values of the Width and/or the Height fields. To change the dimensions programmatically, assign the desired values to its Width and/or Height properties. Not all controls can be resized. The controls that don't appear to the user, such as the Timer cannot be resized. |
|
|
|
|
|
|
Controls Text and Caption |
|
|
|
Some controls are meant to display or sometimes request
text from the user. For such controls, this text is referred to as caption
while it is simply called text for some other controls. This property is not
available for all controls. |
|
|
|
|
|
|
Control's Visibility |
|
|
|
For the user to directly use a control, he or she must be able to see that control. For example, the user cannot type an employee's name if there is not control to receive that text. Based on this, objects provide the ability to control their visibility or absence. This characteristic is controlled by the Visible property. The default visibility of graphical controls have their Visible property set to True. To hide a control, set its Visible property to False. You can change this value at design time using the Properties window. You can also change it programmatically. |
|
|
|
|
|
|
Control's Availability |
|
|
|
Even if a control is visibility, it doesn't necessary make its services available to the user. This means that a control can enable its role or lock them. When a control is enabled, the user can click it or type in it. You can also prevent this type of action by disabling the control. The ability to enable or disable an object is controlled by the Enabled property. If you set it to True, which is its default value, the service of the control are available to the user. If you set this property to False, the control appears gray. |
|
|
|
|
|
|
Tab Sequence |
|
|
|
When a form contains many controls, the user can navigate to different ones by clicking them. Alternatively, the user can press Tab to move the focus from one control to another. The controls that can be accessed using the Tab key belong to a group. For a control to participate to this group, it must have its TabStop property set to True. All graphical controls are automatically added to this group by default when they are picked from the Toolbox and added to a form. If you don't want a control to receive focus as a result of the user pressing Tab, set its TabStop to False. Each control in the Tab sequence group has a unique incremental number. This number is called TabIndex. The first control added receives a number of 0. The second receives 1, etc. The control whose TabIndex is the lowest would receive focus when the form comes up. If you want, you can change the default sequence by changing the TabIndex values of the controls. |
|
|
|
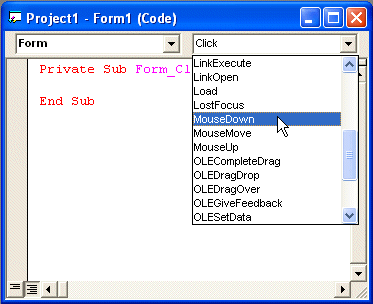
Controls Messages and Events |
|
|
|
|
|
|
|
2. The Type of Message |
|
|
|
After the sender of a message has been identified, the operating system would need to know:
By convention, the name of the event is written after the name of the object that sent the message. To distinguish between a control's name and its event, Visual Basic uses a convention of displaying an underscore between them, like this: Private Sub MessageSender_Event |
|
3. The Message Accessories |
|
|
|
Once the operating system knows what object sent the message and what that message is, depending on the message, it may need to know:
While one message may appear easy, such as clicking an object, another message would need additional information such as where (the coordinates of the mouse cursor) the clicking occurred. Therefore, some events will need some values from you. In some situations it will be one value; in this case the accessory is called an argument. Another type of event may need more than one accessory, thus many arguments. Again, depending on the event, this could be one argument, or it could be as many arguments as necessary. When we move on, we will see what events need what argument(s) The argument or group of arguments that the event may need is listed in parentheses on the right side of the event name, like this: Private Sub MessageSender_Event(Argument1, Argument2, Argument_n)
Even if an event doesn't need an argument, you must provide empty parentheses, like this: Private Sub MessageSender_Event() |
|
The Body of an Event |
|
|
|
The subject of the assignment is called the body. It starts with the Private Sub line and ends with a line identified as End Sub. Between these two lines, you specify what the event is supposed to accomplish. Some events just need to know what you want them to do, for example, you can ask a button to close a form when that button is clicked. On the other hand, when the user clicks somewhere on an object, you could ask the object to display something depending on the button the user clicked. In this case, the event code would like to know what button was clicked. The above introduction was meant to show you what a coded event looks like. Microsoft Visual Basic will do a lot of work for you behind the scenes. For example, it will always set a beginning and end event for you. It will also specify the names (and types) of arguments for you. This means that Visual Basic always writes a skeleton code for your event; you can then customize it as you see fit. |
|
|
|
|
|

|
Categories of Events |
|
|
|
The Keyboard Events |
|
|
|
Word processing consists of manipulating text and characters on your computer until you get the fantastic result you long for. To display these characters, you press some keys on your keyboard. If the application is configured to receive text, your pressing actions will display characters on the screen. The keyboard is also used to perform various other actions such as accepting what a dialog box displays or dismissing one. When you press the keys on your keyboard, you are sending
keyboard events. |
|
The Click Event |
|
|
|
The mouse has become a very important object of computer use. It is used by pressing one of its buttons. |
|
The Double-Click Event |
|
|
|
When you press the left mouse button once, the event is called the Click event. Another action you can perform is to click the button twice but very fast. This is referred to as double-clicking. |
|
The Right-Click Event |
|
|
|
Since Microsoft Windows 95, the mouse buttons are intensely used and both buttons have become important object of the computer daily use. By default, the users click the left mouse button for all routine work. The other button, the right one, is used in various circumstances, such as displaying a context menu. The Right-Click action is performed by clicking the right mouse button. The actions that the right-clicking produce completely depend on the programmer. When writing code for the right-click button, you will have to find out what button was clicked, and then write code accordingly. |
|
The Focus Events |
|
|
|
Microsoft Windows operating systems allow you to work on more that one application at the same time. They also allow you to work on many forms as the computer can handle. But only one application can receive instructions at a given time. For example, although you can edit text on a word processor while a spreadsheet is running in the background, you can only perform one action at a time. You have the ability to display the desired application when needed. This applies to applications. Many dialog boxes have more than one input control, such as the Font dialog box we used earlier. Although all these controls are available, you can work from only one control at a time. If many applications are running on your computer while you are working, the program that is currently being edited or receiving input from you is said to have focus. If you have two forms, you can open both of them but at a given time, you can work on only one of them. On a form that is equipped with many controls, only one control can be changed at a time; such a control is said to have focus. The application or the form that has focus usually has its title bar with the active window color as set in Control Panel. In a form with many controls, the one that has focus will usually have a cursor or a dotted line around its selection. When an application, a form, or a control has focus, Microsoft Visual Basic applies the GotFocus event. If the focus shifts to another application, form, or control, Microsoft applies the LostFocus to the same component. |
|
Launching and Loading A Program |
|
|
|
Your computer is filled with a lot of programs, some of which you use all the time, some of which you use some time to time, and some of which you probably never or rarely use. Since the computer can't predict what you want to do, it keeps all these programs in a storage area called the hard drive. They simply stay there and wait. When you want to use one of these programs, you ask the computer to bring it to you. There is another, temporary, storage area in your computer called the memory (RAM). This is where the computer puts the programs you are using currently. When, you decide to use a program, the computer brings it up. When you have finished using the program, the computer puts it back into the hard drive. Of course, the computer can put as many programs as possible into the memory (or as many as the capacities of the computer allow it). To use a program, you have to "Load" it into memory (the computer will do it for you). And to load a program you have to select and start it. That's why you need to find it and... When a program starts, it is said to be launched. Visual Basic considers that the program is Opening. It takes just a few seconds for a program to launch or open. Some of them display a "Splash Screen" while they are launching. After the program has been launched, it is said to be Loaded. Once a program is loaded, it is said to be running. Actually, loaded and running would mean the same thing, especially in Visual Basic. |
|
Practical Learning: Loading a Program |
|
|
|
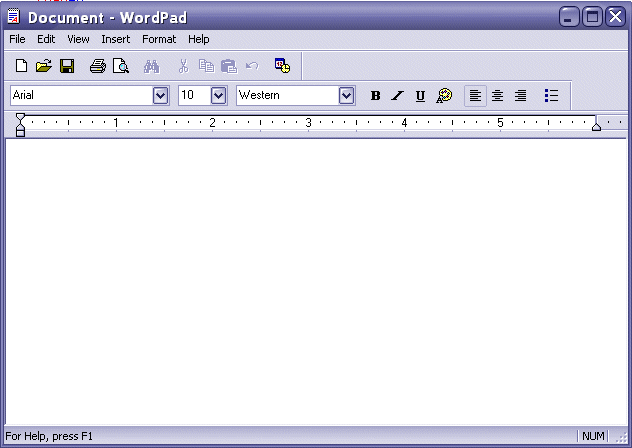
1. To start WordPad, click Start -> (All) Programs -> Accessories -> WordPad. 2.
While the program is Opening,
you should see a brief splash screen (since WordPad is a small application
(not by programming standard, but as far as the users are concerned), the
splash screen might not appear, or it would be very brief): 3.
Notice that after launching, WordPad is opened. Visual Basic
says that WordPad is Loaded: |
|
Variables and Data Types |
|
|
|
|
|
|
|
Variable Declaration |
|
|
|
Unlike languages referred to as strongly typed, Visual
Basic is so flexible you can use any variable just by
specifying its name. When you provide this name, the computer directly
creates an area in memory for it. Based on this, consider the following code
section:
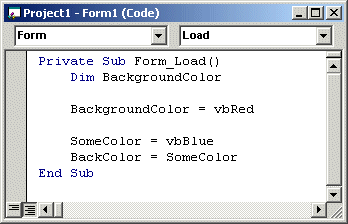
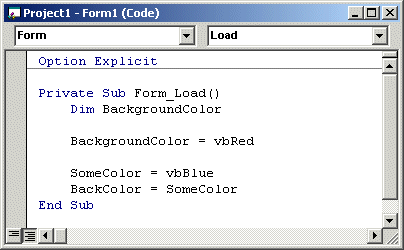
If you execute this program, when the form displays, it would be painted in red. If the user clicks the form, it would be painted in blue. If the user presses a key, the form would be painted in green. There is some confusion in the program. It uses a variable that seems to have a name but initialize three times with different colors. Visual Basic allows you to directly use any name for a variable as you see fit. Fortunately, to eliminate the possibility of this confusion, you can first let Visual Basic know that you will be using a certain variable. Informing Visual Basic about a variable prior to using that variable is referred to as declaring a variable. When a variable has been declared, just like the variable not declared, the computer reserves an area of memory for it. To declare a variable, type the Dim keyword, like this: Dim On the right side of Dim, you must type a name for the variable, following the same rules we reviewed above. Here is an example of declaring and using a variable: Private Sub Form_Load() Dim BackgroundColor BackgroundColor = vbRed BackColor = BackgroundColorEnd Sub Declaring a variable simply communicates to Visual Basic the name of that variable. You can still use a mix of declared and not-declared variable. This is demonstrated in the following event:
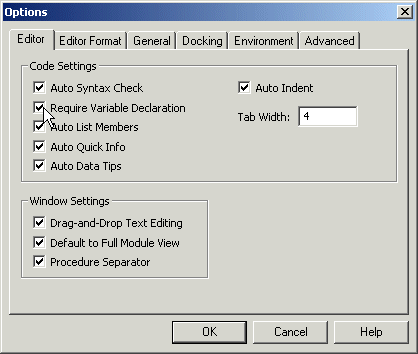
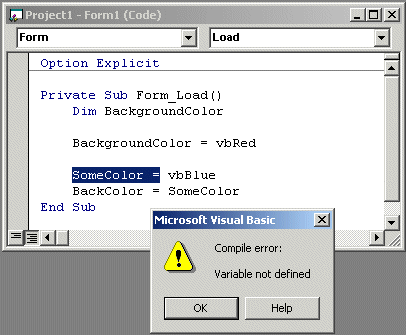
Once again, the compiler believes that you are using two variables; one is called BackgroundColor and the other is called SomeColor. This can still create a great deal of confusion because you may be trying to use the same variable referred to twice. The solution to this possible confusion is to tell Visual Basic that a variable cannot be used if it has not been primarily declared. To communicate this, on top of each file you use in the Code Editor, type Option Explicit This can also be done automatically for each file by checking the Require Variable Declaration in the Options dialog box. |
|
|
|
|
|
|
Introduction to Data Types |
|
|
|
Introduction |
|
|
|
When you decide to use a variable, you are in fact asking the computer to use a certain amount of space to hold that variable. Since different variables will be used for different purposes, you should specify the kind of variable you intend to use, then the computer will figure out how much space is needed for a particular variable. Each variable you use will utilize a certain amount of space in the computer's memory. Before declaring or using a variable, first decide what kind of role that variable will play in your program. Different variables are meant for different situations. The kind of variable you want to use is referred to as a data type. To specify the kind of variable you want to use, you type the As keyword on the right side of the variable's name. The formula to declare such a variable is: Dim VariableName As DataType Once you know what kind of variable you will need, choose the appropriate data type. Data types are organized in categories such as numbers, characters, or other objects. |
|
String |
|
|
|
A string is an empty text, a letter, a word or a group of words considered. To declare a string variable, use the String data type. Here is an example: |
Private Sub Form_Load()
Dim CountryName As String
End Sub
|
After declaring the variable, you can initialize. If you want its area of memory to be empty, you can assign it two double-quotes. Here is an example: |
Private Sub Form_Load()
Dim CountryName As String CountryName = ""
End Sub
|
If you want to store something in the memory space allocated to the variable, assign it a word or group of words included between double-quotes. Here is an example: |
Private Sub Form_Load()
Dim CountryName As String CountryName = "Great Britain"
End Sub
|
You can also initialize a string variable with another. |
|
Boolean |
|
|
|
A Boolean variable is one whose value can be only either True or False. To declare such a variable, use the Boolean keyword. Here is an example: |
Private Sub Form_Load()
Dim IsMarried As Boolean
End Sub
|
After declaring a Boolean variable, you can initialize by assigning it either True or False. Here is an example: |
Private Sub Form_Load()
Dim IsMarried As Boolean IsMarried = False
End Sub
|
Like any other variable, after initializing the variable, it keeps its value until you change its value again. |
|
Numeric Data Types |
|
|
|
Introduction |
|
|
|
A natural number is one that contains only one digit or a combination of digits and no other character, except those added to make it easier to read. Examples of natural numbers are 122, 8, and 2864347. When a natural number is too long, such 3253754343, to make it easier to read, the thousands are separated by a special character. This character depends on the language or group of language and it is called the thousands separator. For US English, this character is the comma. The thousands separator symbol is mainly used only to make the number easier to read. To support different scenarios, Microsoft provides different types of natural numbers |
|
Byte |
|
|
|
A byte is a small natural positive number that ranges from 0 to 255. A variable of byte type can be used to hold small values such as a person's age, the number of fingers on an animal, etc. To declare a variable for a small number, use the Byte keyword. Here is an example: |
Private Sub Form_Load()
Dim StudentAge As Byte
End Sub
|
Integer |
|
|
|
An integer is a natural number larger than the Byte.
It can hold a value between To declare a variable of type integer, use the Integer keyword. Here is an example: |
Private Sub Form_Load()
Dim MusicTracks As Integer
End Sub
|
Long Integer |
|
|
|
A long integer is a natural number whose value is between –2,147,483,648 and 2,147,483,642. Examples are the population of a city, the distance between places of different countries, the number of words of a book. To declare a variable that can hold a very large natural number, use the Long keyword. Here is an example: |
Private Sub Form_Load()
Dim Population As Long
End Sub
|
Decimal Data Types |
|
|
|
Introduction |
|
|
|
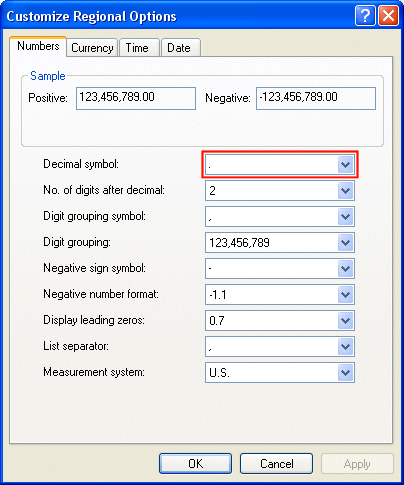
A real number is one that displays a decimal part. This means that the number can be made of two sections separated by a symbol that is referred to as the Decimal Separator or Decimal Symbol. This symbol is different by language, country, group of languages, or group of countries. In US English, this symbol is the period as can be verified from the Regional (and Language) Settings of the Control Panel of computers of most regular users:
On both sides of the Decimal Symbol, digits are used to specify the value of the number. The number of digits on the right side of the symbol determines how much precision the number offers. |
|
Single |
|
|
|
A single is a decimal number whose value can range from –3.402823e38 and –1.401298e-45 if the number is negative, or 1.401298e-45 and 3.402823e38 if the number is positive. To declare a variable that can hold small decimal numbers with no concern for precision, use the Single data type. Here is an example: |
Private Sub Form_Load()
Dim CountryName As String Dim IsMarried As Boolean Dim StudentAge As Byte Dim Tracks As Integer Dim Population As LongDim Distance As Single
End Sub
|
Double |
|
|
|
While the Single data type can allow large numbers, it offers less precision. For an even larger number, Microsoft Visual Basic provides the Double data type. This is used for a variable that would hold numbers that range from 1.79769313486231e308 to –4.94065645841247e–324 if the number is negative or from 1.79769313486231E308 to 4.94065645841247E–324 if the number is positive. To declare a variable that can store large decimal numbers with a good level of precision, use the Double keyword. |
|
|
In most circumstances, it is preferable to use Double
instead of Single when declaring a variable that would hold a decimal
number. Although the Double takes more memory spaces (computer memory
is not expensive anymore(!)), it provides more precision. |
Here
is an example of declaring a Double variable:
Private Sub Form_Load()
Dim Distance As Double
End Sub
|
Currency |
|
|
|
The Currency data type is used for a variable that can hold monetary values. To declare such a variable, use the Currency keyword. Here is an example: |
Private Sub Form_Load()
Dim CountryName As String Dim IsMarried As Boolean Dim StudentAge As Byte Dim Tracks As Integer Dim Population As Long Dim Distance As SingleDim StartingSalary As Currency
End Sub
|
Other Data Types |
|
|
|
Date |
|
|
|
A date is a numeric value that represents the number of days that have elapsed since a determined period. A time is a numeric value that represents the number of seconds that have elapsed in a day. To declare a variable that can hold either date values, time values, or both, use the Date keyword. After the variable has been declared, you will configure it to the appropriate value. Here are two examples: |
Private Sub Form_Load()
Dim CountryName As String Dim IsMarried As Boolean Dim StudentAge As Byte Dim Tracks As Integer Dim Population As Long Dim Distance As Single Dim StartingSalary As CurrencyDim DateOfBirth As Date
Dim KickOffTime As DateEnd Sub
|
Object |
|
|
|
An Object is almost anything else that you want to use in your program. If you don't specify a data type or can't figure out what data type you want to use, you can use the Variant keyword or let Visual Basic use the Variant data type. |
|
Variant |
|
|
|
A Variant can be used to declare any kind of variable. You can use a variant when you can't make up your mind regarding a variable but, as a beginning programmer, you should avoid it. Here is a table of various data types and the amount of memory space each one uses: |
|
|
|
Using Variables |
|
|
|
Details on Declaring Variables |
|
|
|
We have learned how to declare a variable as follows: Dim CountryName As String We also saw that we can declare different variables each on its own line as follows; Dim FirstName As String Dim LastName As String Dim Salary As Currency Dim AlreadyVisited As Boolean If you have many variables of the same data type, you can declare them on the same line, each separated with a comma. Remember to specify their common type. Here is an example: Private Sub Form_Load() Dim CountryName, Address, City, State As String Dim IsMarried As Boolean Dim StudentAge As Byte Dim Tracks As Integer Dim Population As Long Dim Distance As Single Dim StartingSalary, WeeklyEarnings As Currency Dim DateOfBirth, KickOffTime As Date End Sub When naming your variables, besides the above suggestions, you can start a variable's name with one to three-letter prefix that could identify the data type used. Here are a few suggestions: |
|
|
|
Constants |
|
|
|
Introduction |
|
|
|
A constant is a value that doesn't change. There are two types of constants you will use in your programs: those supplied to you and those you define yourself. |
|
The Carriage Return-Line Feed Constant |
|
|
|
Visual Basic provides the vbCrLf constant. It is used to interrupt a line of code and move to the next line. |
|
Built-in Constants: PI |
|
|
|
PI is a mathematical constant whose value is approximately equal to 3.1415926535897932. It is highly used in operations that involve circles or geometric variants of a circle: cylinder, sphere, cone, etc. |
|
||
|
Visual Basic Operators |
|
|
|
|
||
Private Sub Form_Load() Dim NumberOfTracks As Integer NumberOfTracks = 16End Sub
|
|
||||||||||||||||||||||||||||||||||||||||||||||||||||||||||||||||
|
|
|
|
|
|
Unary Operators: The Negative Operator - |
|
|
|
As you can see on the above ruler, in order to express any
number on the left side of 0, it must be appended with a sign, namely the -
symbol. Examples are -12, -448, -32706. A value accompanied by - is referred
to as negative. |
|
|
|
|
|
|
Arithmetic Operators |
|
|
|
The Addition + |
|
|
|
The addition is performed with the + sign. It is used to
add one value to another. The addition is also used to add the values of two variables. For example, you could use CDbl(txtMondayHours) + CDbl(txtTuesdayHours) to get a total number of hours worked on Monday and Tuesday. The result could be stored in another control. |
|
|
|
|
|
|
The Subtraction - |
|
|
|
The subtraction operation is performed using the - sign. This operation produces the difference of two or more numbers. It could also be used to display a number as a negative value. To subtract 28 from 65, you express this with 65-28. The subtraction can also be used to subtract the values of two values. |
|
|
|
|
|
|
The Multiplication * |
|
|
|
The multiplication operation allows you to add a number to itself a certain number of times set by another number. The multiplication operation is performed using the * sign. For example, to add 25 to itself 3 times, you would perform the operation as 25 * 3 |
|
|
|
|
|
|
The Integer Division: \ |
|
|
|
Dividing an item means cutting it in pieces or fractions of a set value. Therefore, the division is used to get the fraction of one number in terms of another. Microsoft Visual Basic provides two types of operations for the division. If you want the result of the operation to be a natural number, called an integer, use the backlash operator "\" as the divisor. The formula to use is: Value1 \ Value2 This operation can be performed on two types of valid numbers, with or without decimal parts. After the operation, the result would be a natural number. |
|
|
|
|
|
|
The Decimal Division: / |
|
|
|
The second type of division results in a decimal number. It is performed with the forward slash "/". Its formula is: Value1 / Value2 After the operation is performed, the result is a decimal number. |
|
|
|
|
|
|
The Exponentiation: ^ |
|
|
|
Exponentiation is the ability to raise a number to the power of another number. This operation is performed using the ^ operator (Shift + 6). It uses the following formula: yx In Microsoft Visual Basic, this formula is written as: y^x and means the same thing. Either or both y and x can be values, variables, or expressions, but they must carry valid values that can be evaluated. When the operation is performed, the value of y is raised to the power of x. |
|
|
|
|
|


|
The Remainder Operator: Mod |
|
|
|
The division operation gives a result of a number with or without decimal values, which is fine in some circumstances. Sometimes you will want to get the value remaining after a division renders a natural result. The remainder operation is performed with keyword Mod. Its formula is: Value1 Mod Value2 The result of the operation can be used as you see fit or you can display it in a control or be involved in another operation or expression. |
|
Visual Basic Operators |
|
|
|
Comments |
|
|
|
In the programming world, a comment is a piece of text in Visual Basic code that Visual Basic (in reality the compiler) would not consider when reading your code. As such a comment can be written any way you want. In Visual Basic, the line that contains a comment can start with a single quote. Here is an example: |
Private Sub Form_Load() ' This line will not be considered as part of the code End Sub |
|
Alternatively, you can start a comment with the Rem keyword. Anything on the right side of rem, Rem, or REM would not be read. Here is an example: |
Private Sub Form_Load() ' This line will not be considered as part of the codeRem I can write anything I want on this line End Sub |
|
Comments are very useful and you are strongly suggested to use comments regularly. They can never hurt your code and they don't increase the size of your application. Comments can help you and other people who read your code to figure out what a particular section of code is used for, which can be helpful when you re-visit your code after months or years of not seeing it. |
|
The Double Quotes: "" |
|
|
|
A string is an empty space, a character, or a group of characters that you type or provide to a control and you want this character or this group of characters to be considered "as is". In other words, the expression or the control that receives the string should keep it or them the way you supplied it or them unless you give other instructions regarding the string. A string can be an empty space or one character, such as $ or w; a group of characters, like home or Manchester United or Verbally speaking, I mean… Ah forget it. Most of the time, you will want the program to keep this character or group of characters exactly the way you or the user supplied them. In order to let the program know that this is a string, you must enclose it in double quotes. From our examples, our strings would be "$", "w", "home", "Manchester United", and "Verbally speaking, I mean… Ah forget it". To assign a string to an expression or a field, use the assignment operator as follows: Team = "Manchester United" In the same way, to initialize a variable with a string , use the assignment operator. Here is an example: |
Private Sub Form_Load()
Dim Address As String Address = "12404 Lockwood Drive Apt D4"End Sub
|
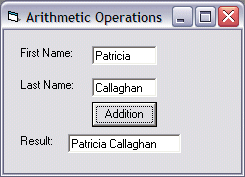
The String Concatenator: & |
|
|
|
The & operator is used to append two strings, the contents of two controls, or expressions. This is considered as concatenating them. For example, it could allow you to concatenate a first name and a last name, producing a full name. The general syntax of the concatenation operator is: Value1 & Value2
To display a concatenated expression, use the assignment operator on the field. To assign a concatenated expression to a variable, use the assignment operator the same way: |
Private Sub Form_Load()
Dim FirstName, LastName As String Dim FullName As String FirstName = "Francis " LastName = "Pottelson" FullName = FirstName & LastName Text0 = FullNameEnd Sub
|
To concatenate more than two expressions, you can use as many & operators between any two strings or expressions as necessary. After concatenating the expressions or values, you can assign the result to another variable or expression using the assignment operator. |
|
The Parentheses Operators: () |
|
|
|
Parentheses are used in two main circumstances: in an event (or procedures, as we will learn) or in an operation. The parentheses in an operation help to create sections in an operation. This regularly occurs when more than one operators are used in an operation. Consider the following operation: 8 + 3 * 5 The result of this operation depends on whether you want to add 8 to 3 then multiply the result by 5 or you want to multiply 3 by 5 and then add the result to 8. Parentheses allow you to specify which operation should be performed first in a multi-operator operation. In our example, if you want to add 8 to 3 first and use the result to multiply it by 5, you would write (8 + 3) * 5. This would produce 55. On the other hand, if you want to multiply 3 by 5 first then add the result to 8, you would write 8 + (3 * 5). This would produce 23. As you can see, results are different when parentheses are used on an operation that involves various operators. This concept is based on a theory called operator precedence. This theory manages which operation would execute before which one; but parentheses allow you to completely control the sequence of these operations. |
|
The Line Continuation Operator: _ |
|
|
|
You will sometimes need to expand your code on more than two lines. This happens regularly if you are writing an expression that involves many entities that must belong to a group. To continue a piece of code from one line to the next, type an empty space followed by an underscore symbol, then continue your code on the next line. |
|
The Period Operator: . |
|
|
|
To access the property of an object, type the name of the object, followed by a period, followed by the name of the property you need. The property you are trying to use must be part of the properties of the object. If you know the name of the property, you can start typing it. Once the desired property is highlighted, press the Space bar or Tab. If you see the name of the property in the list, you can double-click click it. If the list doesn't appear, press Ctrl + Space bar. If you don't want to use the list displayed by the Code Editor, press Esc. Once you have |
|
Logical Comparisons |
|
|
|
|
The result of a comparison can also be assigned to a Boolean variable. Here is an example: Private Sub Command1_Click() Dim value1 As Integer Dim value2 As Boolean value1 = 15value2 = (value1 = 32) Text1.Text = "Comparison of Value = 32 produces " & value2End Sub |
|
|
Logical Not |
|
|
|
When a variable is declared and receives a value (this could be done through initialization or a change of value) in a program, it becomes alive. It can then participate in any necessary operation. The compiler keeps track of every variable that exists in the program being processed. When a variable is not being used or is not available for processing (in visual programming, it would be considered as disabled) to make a variable (temporarily) unusable, you can nullify its value. To render a variable unavailable during the evolution of a program, apply the logical not operator which is Not. Its formula is: Not Value
There are two main ways you can use the logical Not operator. As we will learn when studying conditional statements, the most classic way of using the logical Not operator is to check the state of a variable. To nullify a variable, you can write Not to its left. When used like that, you can display its value. You can even assign it to another variable. Here is an example: Private Sub Command1_Click() Dim value1 As Integer Dim value2 As Boolean value1 = 250 value2 = Not value1 Text1.Text = value2End Sub |
|
When a variable holds a value, it is "alive". To make it not available, you can "not" it. When a variable has been "notted", its logical value has changed. Therefore, you can inverse the logical value of a variable by "notting" or not "notting" it. This is done by typing Not to its left. |
|
Inequality <> |
|
|
|
Visual Basic provides an operator used to compare two values for inequality. Its formula is: Value1 <> Value2
<> is a binary operator (like all logical operators except the logical Not, which is a unary operator) that is used to compare two values. The values can come from two variables as in Variable1 <> Variable2. Upon comparing the values, if both variables hold different values, the comparison produces a true or positive value. Otherwise, the comparison renders false or a null value. |
|
|
|
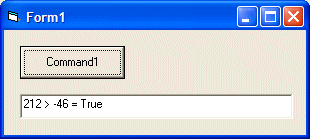
Here is an example: |
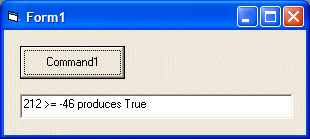
Private Sub Command1_Click() Dim value1 As Integer Dim value2 As Integer Dim value3 As Boolean value1 = 212value2 = -46 value3 = (value1 <> value2) Text1.Text = value1 & " <> " & value2 & " = " & value3End Sub |
|
|

|
The inequality is obviously the opposite of the equality. |
|
Less Than < |
|
|
|
To find out whether one value is lower than another, use the < operator. Its formula is: Value1 < Value2 The value held by Value1 is compared to that of Value2. As
it would be done with other operations, the comparison can be made between
two variables, as in Variable1 < Variable2. If the value held by Variable1
is lower than that of Variable2, the comparison produces a true or positive
result. |
|
|
|
Here is an example: |
Private Sub Command1_Click() Dim value1 As Integer Dim value2 As Integer Dim value3 As Boolean value1 = 212 value2 = -46value3 = (value1 < value2) Text1.Text = value1 & " < " & value2 & " = " & value3End Sub |
|
|

|
Less Than Or Equal <= |
|
|
|
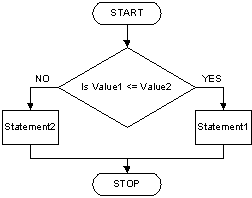
The previous two operations can be combined to compare two values. This allows you to know if two values are the same or if the first is less than the second. The operator used is <= and its formula is: Value1 <= Value2 The <= operation performs a comparison as any of the last two. If both Value1 and Value2 hold the same value, the result is true or not null. If the left operand, in this case Value1, holds a value lower than the second operand, in this case Value2, the result is still true. |
|
|
|
Here is an example: |
Private Sub Command1_Click() Dim value1 As Integer Dim value2 As Integer Dim value3 As Boolean value1 = 212 value2 = -46value3 = (value1 <= value2) Text1.Text = value1 & " <= " & value2 & " = " & value3End Sub |
|
|

|
Greater Than > |
|
|
|
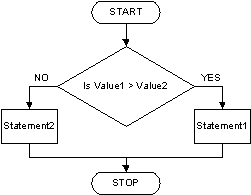
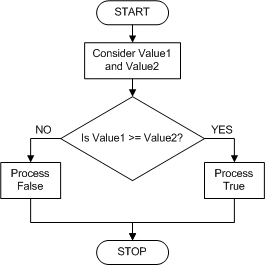
When two values of the same type are distinct, one of them is usually higher than the other. Visual Basic provides a logical operator that allows you to find out if one of two values is greater than the other. The operator used for this operation uses the > symbol. Its formula is: Value1 > Value2 Both operands, in this case Value1 and Value2, can be variables or the left operand can be a variable while the right operand is a constant. If the value on the left of the > operator is greater than the value on the right side or a constant, the comparison produces a true or positive value. Otherwise, the comparison renders false or null. This can be illustrated as follows:
Here is an example: |
Private Sub Command1_Click() Dim value1 As Integer Dim value2 As Integer Dim value3 As Boolean value1 = 212 value2 = -46value3 = (value1 > value2) Text1.Text = value1 & " > " & value2 & " = " & value3End Sub |
|
|
|
Greater Than or Equal >= |
|
|
|
The greater than or the equality operators can be combined to produce an operator as follows: >=. This is the "greater than or equal to" operator. Its formula is: Value1 >= Value2 A comparison is performed on both operands: Value1 and Value2. If the value of Value1 and that of Value2 are the same, the comparison produces a true or positive value. If the value of the left operand is greater than that of the right operand, the comparison produces true or positive also. If the value of the left operand is strictly less than the value of the right operand, the comparison produces a false or null result. This can be illustrated as follows:
Here is an example:
|
|
||||||||||||||||||||||||||||||||||
|
Conditional Statements |
|
|||||||||||||||||||||||||||||||||
|
|
||||||||||||||||||||||||||||||||||
|
|
|
|
|
|
|
|
The If...Then...Else Statement |
|
|
|
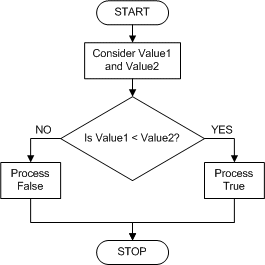
The If...Then statement offers only one alternative: to act if the condition is true. Whenever you would like to apply an alternate expression in case the condition is false, you can use the If...Then...Else statement. The formula of this statement is: If ConditionToCheck Then Statement1 ElseStatement2 End If
When this section of code is executed, if the ConditionToCheck is true, then the first statement, Statement1, is executed. If the ConditionToCheck is false, the second statement, in this case Statement2, is executed. |
|
|
|
|
|
|
The If...Then...ElseIf Statement |
|
|
|
The If...Then...ElseIf statement acts like the If...Then...Else expression, except that it offers as many choices as necessary. The formula is: If Condition1 Then Statement1 ElseIf Condition2 Then Statement2 ElseIf Conditionk Then Statementk End If
The program will first examine Condition1. If Condition1 is true, the program will execute Statment1 and stop examining conditions. If Condition1 is false, the program will examine Condition2 and act accordingly. Whenever a condition is false, the program will continue examining the conditions until it finds one. Once a true condition has been found and its statement executed, the program will terminate the conditional examination at End If. There is still a possibility that none of the stated conditions is true. In this case, you should provide a "catch all" condition. This is done with a last Else section. The Else section must be the last in the list of conditions and would act if none of the primary conditions is true. The formula to use would be: If Condition1 Then Statement1 ElseIf Condition2 Then Statement2 ElseIf Conditionk Then Statementk Else CatchAllStatementEnd If
|
|
|
|
|
|
|
The Select Case Statement |
|
|
|
If you have a large number of conditions to examine, the If...Then...Else will go through each one of them. Visual Basic offers the alternative of jumping to the statement that applies to the state of the condition. The formula of the Select Case is: Select Case Expression Case Expression1 Statement1 Case Expression2 Statement2 Case Expressionk Statementk End Select The Expression will examined and evaluated once. Then it will compare the result of this examination with the Expression of each case. Once it finds one that matches, it would execute the corresponding Statement. If you anticipate that there could be no match between the Expression and one of the Expressions, you can use a Case Else statement at the end of the list. The statement would then look like this: Select Case Expression Case Expression1 Statement1 Case Expression2 Statement2 Case Expressionk Statementk Case Else Statementk End Select |
|
|
|
|
|
|
Loops Repeaters |
|
|
|
Introduction |
|
|
|
A loop is an expression used to repeat an action. Visual Basic presents many variations of the loops and they combine the Do and the Loop keywords. |
|
The Do...While Loop |
|
|
|
The formula of the Do... While loop is: Do While Condition Statement(s) Loop This expression examines the Condition. If the condition is true, then it executes the Statement or statements. After executing the statement(s), it goes back to examine the Condition. AS LONG AS the Condition is true, the Statement will be executed and the Condition will be tested again. If the Condition is false or once the condition becomes false, the statement will not be executed and the the program will move on. As you may guess already, the Condition must provide a way for it to be true and to be false. |
|
The Do...Loop...While Statement |
|
|
|
Since the Do...While statement tests the Condition first before executing the Statement, sometimes you will want the program to execute the Statement first, then go back and test the Condition. Visual Basic offers a reverse to the formula, which is: Do Statement(s) Loop While Condition In this case, the Statement or Statements will be executed first. Then the Condition will be tested. If the Condition is true, the program will execute the Statement again. The program will continue this examination-execution as long as the Condition is true. The big difference here is that even if the Condition is false, the program will have executed the Condition at least once. |
|
The Do...Until...Loop Statement |
|
|
|
An alternative to the Do...While loop is the Do...Until loop. Its formula is: Do Until Condition This loop will first examine the Condition, instead of examining whether the Condition is true, it will test whether the Condition is false. |
|
The Do...Loop...Until Statement |
|
|
|
An alternative to the Do...Until...loop consists of executing the the Statement first. The formula is: Do Statement(s) Loop Until Condition This express executes the Statement first. After executing the Statement, it would examine the Condition. If the Condition is False, then it would go back and execute the Statement again and re-check the Condition. Once the Condition becomes true, it would stop and move on; but as long as the Condition is False, the Statement would be executed. |
|
Loop Counters |
|
|
|
Introduction |
|
|
|
The looping statements we reviewed above are used when you don't know or can't anticipate the number of times a condition needs to be checked in order to execute a statement. If you know with certainty how many times you want to execute a statement, you can use another form of loops that use the For...Next expression. |
|
The For...To...Next Loop |
|
|
|
One of the loop counters you can use is For...To...Next. Its formula is: For Counter = Start To End Statement(s) Next Used for counting, the expression begins counting at the Start point. Then it examines whether the current value (after starting to count) is greater than End. If that's the case, it then executes the Statement(s). Next, it increments the value of Counter by 1 and examines the condition again. This process goes on until the value of Counter becomes equal to the End value. Once this condition is reache, the looping stops. |
|
Stepping the Counting Loop |
|
|
|
The formula above will increment the counting by 1 at the end of each statement. If you want to control how the incrementing processes, you can set your own, using the Step option. Here is the formula: For Counter = Start To End Step Increment Statement(s) Next Counter You can set the incrementing value to your choice. If the value of Increment is positive, the Counter will be added its value. This means that you can give it a negative value, in which case the Counter will be subtracted the set value. |
|
For Each Item In the Loop |
|
|
|
Since the For...Next loop is used to execute a group of statements based on the current result of the loop counting from Start to End, an alternative is to state various steps in the loop and execute a group of statements for each one of the elements in the group. This is mostly used when dealing with a collection of items. The formula is: For Each Element In Group Statement(s) Next Element The loop will execute the Statement(s) for each Element in the Group. |
|
Logical Operators |
|
|
|
Introduction |
|
|
|
A logical operation is one that is performed on one or two expressions to check the truthfulness or falsity. Logical operators are performed only on conditional statements. |
|
Logical Conjunction: AND |
|
|
|
A logical conjunction is an operation used to check two conditions for absolute truthfulness. This operation uses the AND keyword. The formula to use the AND operator is Condition1 AND Condition2 The left condition, Condition1, is first checked. If it is False, the whole expression is rendered False and the checking process stopped. If the left condition is True, then the right condition, Condition2, is checked. If the right condition is False, the whole expression is False, even if the first is True. In the same way, if both conditions are false, the whole expression is False. Only if both conditions are True is the whole condition true. This can be resumed as follows: |
|
|
Logical Disjunction: OR |
|
|
|
A logical disjunction is performed on two conditions for a single truthfulness. This operation uses the OR keyword on the following formula: Condition1 OR Condition2 The left condition, Condition1, is first checked. If Condition1 is True, then the whole expression is true, regardless of the outcome of the second. If Condition1 is False, then Condition2 is checked. If Condition2 is True, the whole expression is True even if Condition1 is False. In the same way, if both conditions are True, the whole expression is True. The whole expression is false only if both Condition1 and Condition2 are False. This can be resumed as follows: |
|
|
Details on Conditional Statements |
|
|
|
Mixed And Nested Conditional Statements |
|
|
|
Sometimes you will find out that one conditional statement does not satisfy the criteria you are trying to apply to your program; you might have to have many conditions. Programming allows you to use as many conditions as necessary and to create some conditions inside of others. Mixing conditions is the ability to use different conditional statements in your program. Nesting is the ability to put some conditions inside of others. These two techniques make your programs more efficient. |
|
Built-in Logical Constants: NULL |
|
|
|
A variable is said to be null when its value is invalid or doesn't bear any significant or recognizable value. |
|
Built-in Logical Constants: TRUE and FALSE |
|
|
|
An expression is said to be false if the result of its comparison is 0. Otherwise, the expression is said to bear a true result. |
|
Modules, Functions and Procedures |
|
|
|
|
|
|
|
|
|
|
|
|
Procedures |
|
|
|
A procedure is an assignment you ask the compiler to take care of inside of your program. The assignment is performed behind the scenes. The program developer writes the function and the user would only see the result. In reality, there are two types of procedures you will use in your programs: those that have already been created thus made available to you, and those you will create yourself. In Visual Basic, like most other languages, there are two categories of procedures: functions and sub routines (many other languages like Pascal make this distinction; some other languages like C++, C#, etc use only the name function to identify both categories). |
|
Sub Routines |
|
|
|
Introduction |
|
|
|
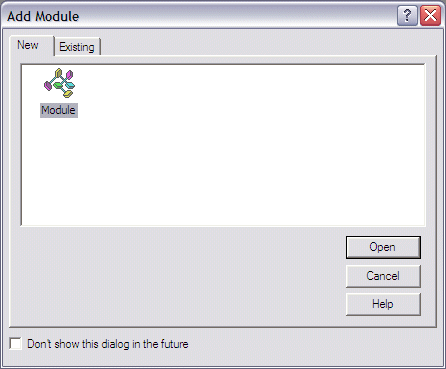
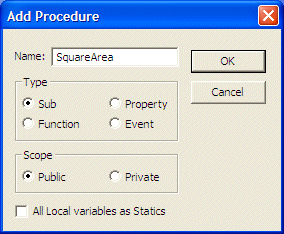
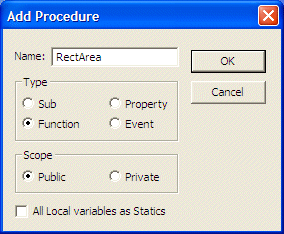
As mentioned already, there are differences between a function and a sub routine. A sub routine is an assignment that is carried but doesn't give back a result. To create a sub routine, start by typing the Sub keyword followed by a name because, like everything else, a procedure must have a name. The name of a procedure is always followed by parentheses. At the end of the sub routine, you must type End Sub. Therefore, the syntax of a sub routine is: Sub ProcedureName() End Sub You can also initiate a sub routine by asking Visual Basic to generate one for you. To do that, on the main menu, you can click Tools -> Add Procedure... In the Add Procedure dialog box, specify a name for the procedure. Make sure the Sub radio button is selected and click OK. The name of a procedure should follow the same rules we learned to name the variables, omitting the prefix:
The section between the Sub and the End Sub lines is referred to as the body of the procedure. The body of the procedure is used to define what and how the assignment should be carried. For example, if you need to use a variable, you can declare it and specify what kind of variable you need. There is no restriction on the type of variables that can be declared in a procedure. Here is an example in which a string variable is declared in the body of a sub routine:
In the same way, you can declare as many variables as you need inside of a procedure. The actions you perform inside of a procedure depend on what you are trying to accomplish. For example, a procedure can simply be used to create a string. The above procedure can be changed as follows:
|
|
|
|
|
|
|
Calling a Sub Routine |
|
|
|
Once you have sub routine, whether you created it or it shipped with Visual Basic, you can use it. Using a procedure is also referred to as calling it. Before calling a procedure, you should first locate the section of code in which you want to use it. For example, you may want to use it inside of a control's event. To call a simple sub routine, simply type its name in the section where you want to use. For example, you can call the assignment in the Load event of a form as follows: Private Sub Form_Load() AssignmentEnd Sub |
|
|
|
|
|
|
Functions |
|
|
|
Introduction |
|
|
|
Like a sub routine, a function is used to perform an assignment. The main difference between a sub routine and a function is that, after carrying its assignment, a function gives back a result. We also say that a function "returns a value". To distinguish both, there is a different syntax you use for a function. |
|
Practical Learning: Introducing Modules |
|
|
|
|
Function Creation |
|
|
|
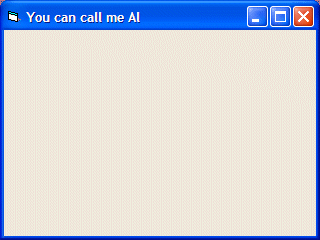
To create a function, you use the Function keyword followed by a name and parentheses. Unlike a sub routine, because a function returns a value, you should/must specify the type of value the function will produce. To give this information, on the right side of the closing parentheses, type the As keyword, followed by a data type. To indicates where a function stops, type End Function. Based on this, the minimum syntax used to create a function is: Function FunctionName() As DataType End Function The name of a function follows the same rules and suggestions we reviewed for sub routines. The DataType factor indicates the type of value that the function will return. If the function will produce a word or a group of words, you can create it as String. If the function will check something and determine whether it produce a true or a false value, you can create it as Boolean. The other data types are also valid in the contexts we reviewed them. As mentioned already, the section between the Function and the End Function lines is the body of the function. It is used to describe what the function does. As done on a sub routine, one of the actions you can perform in a function is to declare a (local) variable and use it as you see fit. Here is an example: Function CallMe() As String Dim Salute As String Salute = "You can call me Al"End Function After performing an assignment in a function, to indicate the value it returns, somewhere after the assignment and before the End Function line, type the name of the function, followed by the = sign, followed by the value the function returns. Here is an example in which a function returns a name: Function CallMe() As String CallMe = "You can call me Al"End Function You can also use some local variables in the function to perform an assignment and then assign their result to the name of the function. Here is an example: Function CallMe() As String Dim Salute As String Salute = "You can call me Al" CallMe = SaluteEnd Function |
|
|
|
|
|
|
Calling a Function |
|
|
|
As done for the sub routines, in order to use a function in your program, must call it. Like a sub routine, to call a function, you can simply type its name in the desired section of the program. Here is an example: Private Sub Form_Load() CallMeEnd Sub Since the primary purpose of a function is to return a value, to better take advantage of such a value, you can assign the name of a function to a property or a variable in the section where you are calling the function. In the following example, the return value of the CallMe function is assigned to the Caption property of the form from its own Load event: Private Sub Form_Load() Caption = CallMeEnd Sub |
|
|
|
|
|
|
Arguments and Parameters |
|
|
|
Introduction |
|
|
|
So far, to use a value in a procedure, we had to declare it. In some cases, a procedure may need an external value in order to carry its assignment. A value that is supplied to a procedure is called an argument. When creating a procedure that will use an external value, declare the argument that represents that value between the parentheses of the procedure. For a sub routine, the syntax you use would be: Sub ProcedureName(Argument) End Sub If you are creating a function, the syntax would be: Function ProcedureName(Argument) Function Sub The argument must be declared as a normal variable, omitting only the Dim keyword. Here is an example that creates a function that takes a string as argument: Function CalculatePayroll(strName As String) As Double Function Sub A certain procedure can take more than one argument. In this case, in the parentheses of the procedure, separate the arguments with a comma. Here is an example of a sub routine that takes two arguments: Sub EvaluateInvoice(strEmplName As String, dblHourlySalary As Currency) End Sub In the body of a procedure that takes one or more arguments, use the argument(s) as you see fit as if they were locally declared variables. For example, you can involve them with values inside of the procedure. You can also exclusively use the values of the arguments to perform the assignment.
|
|
|
|
|
|
|
Passing Arguments (By Value) |
|
|
|
To call a procedure that takes an argument, type its name and a space, followed by value for each argument. The value provided for an argument is also called a parameter. If there is more than one argument, separate them with a comma. Here is an example: Private Sub txtResult_GotFocus() Dim dblHours As Double Dim dblSalary As Double dblHours = txtHours dblSalary = txtSalary CalcAndShowSalary dblHours, dblSalaryEnd Sub Sub CalcAndShowSalary(Hours As Double, Salary As Double) Dim dblResult As Double dblResult = Hours * Salary txtResult = dblResultEnd Sub Alternatively, you can use the Call keyword to call a sub routine. In this case, when calling a procedure using Call, you must include the argument(s) between the parentheses. using Call, the above GotFocus event could call the CalcAndShowSalary as follows: Private Sub txtResult_GotFocus() Dim dblHours As Double Dim dblSalary As Double dblHours = txtHours dblSalary = txtSalary Call CalcAndShowSalary(dblHours, dblSalary)End Sub If you use the above technique to call a procedure that takes more than one argument, you must provide the values of the arguments in the exact order they are listed inside of the parentheses of the function. Fortunately, you don't have to. If you know the name of the arguments, you can type them in any order and provide a value for each. To do that, on the right side of each argument, type the := operator followed by the desired value for the argument. Here is an example: Function DisplayName(FirstName As String, LastName As String) As String Dim FullName As String FullName = FirstName & " " & LastName DisplayName = FullNameEnd Function Private Sub Form_Load() Caption = DisplayName(LastName:="Nguyen", FirstName:="Hermine")End Sub
|
|
|
|
|
|
|
Passing Arguments By Reference |
|
|
|
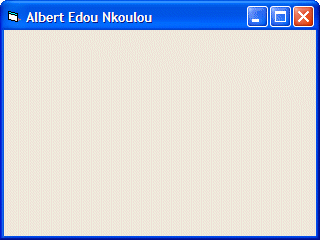
When calling a procedure that took an argument, we were supplying a value for that argument. When this is done, the procedure that is called makes a copy of the value of the argument and make that copy available to calling procedure. That way, the argument itself is not accessed. This is referred to as passing an argument by value. This can be reinforced by typing the ByVal keyword on the left side of the argument. Here is an example: Sub GetFullName(ByVal FullName As String) FullName = "Nguyen, Hermine"End Sub If you create a procedure that takes an argument by value and you have used the ByVal keyword on the argument, when calling the procedure, you don't need to use the ByVal keyword; just the name of the argument is enough, as done in the examples on arguments so far. Here is an example: Private Sub Form_Load() Dim FName As String FName = "Albert Edou Nkoulou" GetFullName FName Caption = FNameEnd Sub This would produce:
An alternative to this technique is to pass the address of the argument to the called procedure. When this is done, the called procedure doesn't receive a simple copy of the value of the argument: the argument is accessed at its root. That is, at its memory address. With this technique, any action carried on the argument will be kept. That is, if the value of the argument is modified, the argument would now have the new value, dismissing or losing the original value it had. This technique is referred to as passing an argument by reference. To pass an argument by reference, on its left, type the ByRef keyword. This is done only when creating the function. When the called procedure finishes with the argument, the argument would keep whatever modification was made on its value. Now consider the following: Private Sub Form_Load() Dim FName As String FName = "Albert Edou Nkoulou" GetFullName FName Caption = FNameEnd Sub Sub GetFullName(ByRef FullName As String) FullName = "Nguyen, Hermine"End Sub This would produce:
Using this technique, you can pass as many arguments by reference as many arguments by value as you want. As you may already, this technique is also used to make a sub routine return a value, which a regular sub routine cannot do. Furthermore, passing arguments by reference allows a procedure to return as many values as possible while a regular function can return only one value. |
|
|
|
|
|
|
Built-In Functions |
|
|
|
|
|
|
||||||||||||||||||||||||||||||||||||||||||||
|
1.
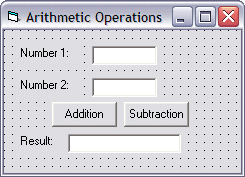
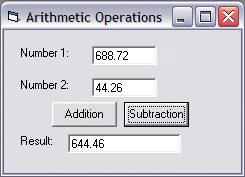
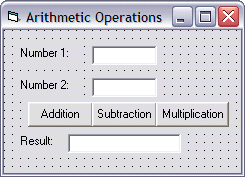
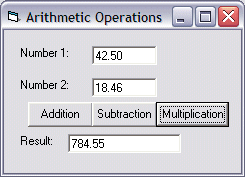
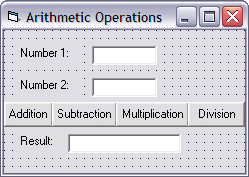
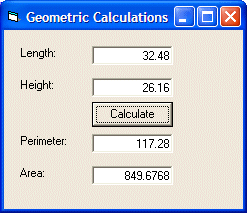
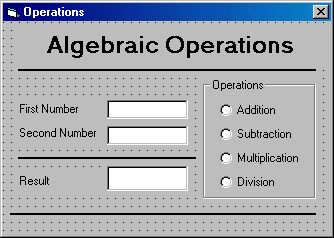
Start a new project and create a form as follows: 2.
Here are the names of the controls (the three left labels and
the horizontal lines are provided "as is"):
3.
On the Project window, click the View Code button 4.
On the Object combo box, select optAddition. 5.
Since its default event is Click, implement it as follows: 6. Private Sub optAddition_Click()7. Dim dblNumber1 As Double 8. Dim dblNumber2 As Double 9. Dim dblResult As Double 10. 11. dblNumber1 = CDbl(txtNumber1.Text) 12. dblNumber2 = CDbl(txtNumber2.Text) 13. dblResult = dblNumber1 + dblNumber2 14. 15. txtResult.Text = dblResultEnd Sub 16.
Implement the Click event of the other option buttons the
(exact) same way, only changing the sign in the dblResult line. Here is the
code: 17.Private Sub optDivision_Click() 18. Dim dblNumber1 As Double 19. Dim dblNumber2 As Double 20. Dim dblResult As Double 21. 22. dblNumber1 = CDbl(txtNumber1.Text) 23. dblNumber2 = CDbl(txtNumber2.Text) 24. dblResult = dblNumber1 / dblNumber2 25. 26. txtResult.Text = dblResult27.End Sub 28. 29.Private Sub optMultiplication_Click() 30. Dim dblNumber1 As Double 31. Dim dblNumber2 As Double 32. Dim dblResult As Double 33. 34. dblNumber1 = CDbl(txtNumber1.Text) 35. dblNumber2 = CDbl(txtNumber2.Text) 36. dblResult = dblNumber1 * dblNumber2 37. 38. txtResult.Text = dblResult39.End Sub 40. 41.Private Sub optSubtraction_Click() 42. Dim dblNumber1 As Double 43. Dim dblNumber2 As Double 44. Dim dblResult As Double 45. 46. dblNumber1 = CDbl(txtNumber1.Text) 47. dblNumber2 = CDbl(txtNumber2.Text) 48. dblResult = dblNumber1 - dblNumber2 49. 50. txtResult.Text = dblResultEnd Sub 51.
To test the form, press F5. 52.
Please, make sure you type a number, and a number other than 0,
in the Second Number text box, especially before clicking the Division option
button. This is because we didn't write a conditional statement that would
check the content of those text boxes, and we know that it is
"nasty" to divide a number by 0. Conditional statements will be
studied later: one lesson at a time |
|
String-Based Functions |
|
|
|
Introduction |
|
|
|
A string-based function is one that deals with functions; either it manipulates them or returns them. Microsoft Visual Basic allows you to be specific about the return value you are expecting. Some of the functions you will be using can be configured to return exactly a string. Such functions use the $ suffix that states it clearly. |
|
Message Boxes |
|
|
|
A message box is a special form used to display a piece of information to the user. As opposed to a regular form, the user cannot type anything on the box. There are usually two kinds of dialog boxes you will create: one that simply displays information and one that expects the user to make a decision. To create a message box, you can use the MsgBox function. There are two techniques to use it. To display a simple message with just an OK button, use the MsgBox method whose syntax is MsgBox Message The parameter, Message, is the string to present to the user. As a normal, it should be passed in double-quotes. Here is an example: Private Sub Form_Load() MsgBox "Welcome to the wonderful world of Microsoft Visual Basic"End Sub When the above version of the the MsgBox function is used, a rectangular form (we will learn later on that this type of form is called a dialog box) is presented to the user, display a string message and an OK button:
Another version of the MsgBox function allows you to present a message that asks a question to the user, expecting a decision. This version displays a more informative prompt with more than one button. The user makes a decision by clicking one of the presented buttons. After the user has clicked a button, you can then retrieve the result and use it as you see fit. The syntax of this version is: MsgBox Message, [Buttons], [Title], [HelpFile], [Context] The Message argument is the string that the user will see displaying on the message box. As a string, you can display it in double quotes. You can also create it from other pieces of strings. The Message argument can be made of up to 1024 characters. To display the Message on multiple lines, you can use either the constant vbCrLf or the combination Chr(10) & Chr(13) between any two strings. Besides the Message parameter, this version allows you to display more than one button. If you don't need to, you don't have to specify the buttons. If you don't, the message box would appear with only an OK button. Otherwise, you can specify what buttons to display. This is done using the Buttons argument. There are different kinds of buttons available and Visual Basic recognizes them by a numeric value assigned to each. The buttons are
Here is an example of a message box that display a Yes and a No buttons: Private Sub Form_Load() MsgBox "Are you ready to rumbleeeeeeeeeee", vbYesNoEnd Sub This would produce:
When a message box displays more than one button, one of the buttons usually has a thick button. That button is also called the default button. If the user presses Enter upon reading the message, the compiler would behave as if the default button was clicked. There are some buttons that are set automatically as default when you create the message box. If you don't like the set button to be the default, you can specify which one you prefer as default. To do that combine a second value with one of the above values for the buttons. You can set the default argument using the following table
To combine one of these values with one of the buttons, use the OR operator between them. Here is an example: Private Sub Form_Load() MsgBox "Are you ready to rumbleeeeeeeeeee", vbYesNo Or vbDefaultButton2End Sub This would produce:
These additional buttons can be used to further control what the user can do:
Besides the message and the button(s), you can also display a friendly icon on the message box. To do that, combine the button value with one of the following:
Here is an example: Private Sub Form_Load() MsgBox "Are you ready to rumbleeeeeeeeeee", vbYesNo Or vbQuestion End Sub This would produce:
As you can see on the message boxes we have used so far, by
default, a message box displays the name of the application it belongs to in
its title bar. If you want, you can display your own title. This is done
using the Title argument which is also called the caption of the
message box. It is a string whose word or words you can enclose between
parentheses or that you can get from a created string. Private Sub Form_Load() MsgBox("Are you ready to rumbleeeeeeeeeee", vbYesNo Or vbQuestion)End Sub When treated as a function, MsgBox returns a value. This value corresponds to the button the user clicks on the message box. Depending on the buttons the message box is displaying, after the user has clicked, the MsgBox function can return one of the following values:
|

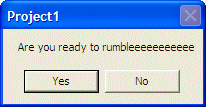
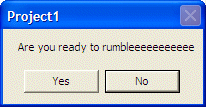
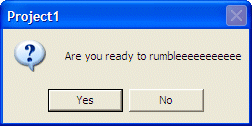
|
|
|
|
6. Private Sub cmdExit_Click()7. Unload Me 8. End End Sub
11.Private Sub cmdMessage1_Click() 12. MsgBox "As simple as it can get" End Sub
22.Private Sub cmdMessage2_Click() 23. MsgBox "Before formatting a floppy disk, " & _ 24. "make sure you know its content", , _ 25. "Disk Formatting Instructions"End Sub
31.Private Sub cmdMessage3_Click() 32. MsgBox "This will be your only warning", _ 33. vbOKOnly + vbExclamation, _ 34. "Attention! Attention!! Attention!!!"End Sub
39.Private Sub cmdMessage4_Click() 40. MsgBox "You are about to embark on a long journey." & _ 41. vbCrLf & "If your courage is still fresh, " _ 42. & "please let us know!", _ 43. vbOKCancel + vbQuestion, _ 44. "Accept or Cancel the Mission"End Sub
48.Private Sub cmdMessage5_Click() 49. MsgBox "This message usually appears when trying " & _ 50. "to format a floppy disk while the floppy drive " _ 51. & "is empty. " & Chr(13) & Chr(10) _ 52. & "When or if this happens, make sure you have a " _ 53. & " floppy disk in the floppy drive.", _ 54. vbAbortRetryIgnore + vbCritical, _ 55. "Floppy Disk Formatting"End Sub
59.Private Sub cmdMessage6_Click() 60. Dim intResponse As Integer 61. 62. intReponse = MsgBox("Your printing configuration " _ 63. & "is not fully set." & vbCrLf _ 64. & "If you are ready to print, click" & vbCrLf & _ 65. "(1) Yes: To print the document" & vbCrLf & _ 66. "(2) No: To configure printing" & vbCrLf & _ 67. "(3) Cancel: To dismiss printing", _ 68. vbYesNoCancel + vbInformation, _ 69. "Critical Information")End Sub
73.Private Sub cmdMessage7_Click() 74. Dim intAnswer As Integer 75. 76. intAnswer = MsgBox("Do you want to continue this " _ 77. & "operation?", _ 78. vbYesNoCancel + vbQuestion + vbDefaultButton2, _ 79. "National Inquiry")End Sub
83.Private Sub cmdMessage8_Click() 84. Dim strEmplName As String 85. Dim intInquiry As Integer 86. 87. strEmplName = txtEmployeeName.Text 88. intInquiry = MsgBox("Hi, " & strEmplName & Chr(13) & _ 89. "I think we met already." & vbCrLf & _ 90. "I don't know when. I don't know where." & vbCrLf & _ 91. "I don't know why. But I bet we met somewhere.", _ 92. vbYesNo + vbInformation, _ 93. "Meeting Acquaintances")End Sub
|
|
The Input Box |
|
|
|
Like a message box, an input box is a (relatively) small form (in reality, it is a dialog box) that displays a message to the user. Unlike a message box, an input box presents a small text box that expects the user to enter a value. After using it, the user can either send the form with the new value or dismiss it without any change. To create an input box, you can use the InputBox function procedure prompts the user to enter some information in a message box, and the function will return the content of that box. |
|
The Character To ASCII Conversion |
|
|
|
The Chr function is used to associate an entered character with its ASCII character equivalent. It could be used to convert a number to a character. It could also be used to break a line in a long expression. The syntax of the Chr function is: Chr(Number) A combination of Chr(13) and Chr(10) would break a line in an expression. |
|
Case Conversion |
|
|
|
If you are presented with a string or an expression whose cases must be the same, you can convert all of its characters in either uppercase or lowercase. To convert a character, a string or an expression to uppercase, you can call the UCase or the UCase$ function. These functions take one argument as the string or expression to be considered. The syntaxes are: Function UCase(Letter As Char) As Char Function UCase(Expression As String) As String The first version receives one character as argument. If the character is already in uppercase, it would be return the same. If the character is not a readable character, no conversion would happen and the function would return it. If the character is in lowercase, it would be converted to uppercase and the function would then return the uppercase equivalent. The second version considers the argument supplied as a string. Any letter that is in lowercase in the string would be converted to uppercase. Any letter that is in uppercase would be preserved and would not be changed. Any non-alphabetic character in the string would be kept "as is". |
|
Logical Functions |
|
|
|
Is it Empty? |
|
|
|
A logical function is one that checks whether an expression is true or false and then return a Boolean value. The IsEmpty function check whether a field is empty. Its syntax is: IsEmpty(Expression) In this case, the Expression argument will be checked. If it is empty, the IsEmpty function returns True. If the expression or field is not empty, that is, if it contains something, the function returns False. |
|
Is it Null? |
|
|
|
Another problem you may encounter when involving an operation or the contents of a control is whether it has never contained a value. This operation is sometimes confused with that of checking whether a field is empty. Here is the difference (it is important to understand this because it is used in many other environments):
To check whether an expression or the value of a control is null, you can call the IsNull() function. Its syntax is: IsNull(Expression) Also used on fields, the IsNull() function checks the state of a field (remember, this functions does not check whether a field is empty or not; it checks if the field has ever contained a value). If the field it null, this function returns True. If the field is not null, this function returns False. |
|
Date and Time Functions |
|
|
|
Current Data and Time |
|
|
|
Microsoft Visual Basic provides various functions to perform date and time related operations. These functions allow you to add dates or times, find the difference between dates or times, or add constant values to dates or times. The current date is represented by a function called Date. The Date() function is used to get the system date of the computer. You can use it to display today's date, provided your computer has the correct date. The current time of the computer is represented by a function called Time. The Time() function is used to get the system time of the computer. The Date() and Time() functions can be combined and are represented by a function called Now. |
|
|
|
|
|
1.
On the main menu of Microsoft Visual Basic, click View ->
Immediate Window. 2.
In the Immediate window, type ?Date and press Enter 3.
Notice that the system date is displayed. 4.
Still in the Immediate window, type ?Time and press Enter 5.
Again, in the Immediate window, type ?Now and press Enter
|
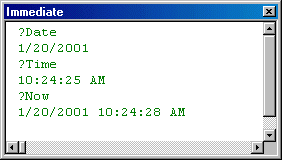
|
Day - Month - Year |
|
|
|
The Day function is used to get the numeric value that represents a day in the month. It ranges from 1 to 31 included. The formula of the Day function is Day(DateValue) The Month function displays the numeric month of a date. It ranges from 1 to 12 included. The formula of the Month function is Month(DateValue) The Year function returns the numerical year of a date. The formula is the Year function is Year(DateValue) |
|
|
|
|
|
|
|
|
Adding a Date |
|
|
|
|
|
The DateAdd function is used to add a date value to another date. It can be used to add a number of days, weeks, months, or years to another date. The formula for the DateAdd function is DateAdd(Interval, Number, date) Required, the Interval argument specifies the kind of value you want as a result. This argument will be enclosed between double quotes and can have one of the following values:
Required also, the Number argument specifies the number of units you want to add. If you set it as positive, its value will be added. On the other hand, if you want to subtract, make it negative. The number represents the units of the Interval argument you want to add. The date argument is the date to which you want to add the number. |
|
Subtracting a Date |
|
|
|
The DateDiff function is used to find the difference between two date or time values. It allows you to find the number of seconds, minutes, hours, days, weeks, months, or years from two valid date or time values. The DateDiff function takes 5 arguments, 3 are required and 2 are optional. The formula of the function is DateDiff(Interval, Date1, Date2, Option1, Option2) Required, the Interval argument specifies what kind of value you want as a result. This argument will be enclosed between double quotes and can have one of the following values:
Required also, the Date1 and Date2 argument specify the date or time values that will be used when performing the operation. By default, the days of a week are counted starting on Sunday. If you want to start counting those days on another day, supply the Option1 argument using one of the following values: vbSunday, vbMonday, vbTuesday, vbWednesday, vbThursday, vbFriday, vbSaturday. There are other variances to that argument. If your calculation involves weeks or finding the number of weeks, by default, the weeks are counted starting January 1st. If you want to count your weeks starting at a different date, use the Option2 argument to specify where the program should start. |
|
|
|
|
|
|
Parent Controls |
|
|
|
|
|
|
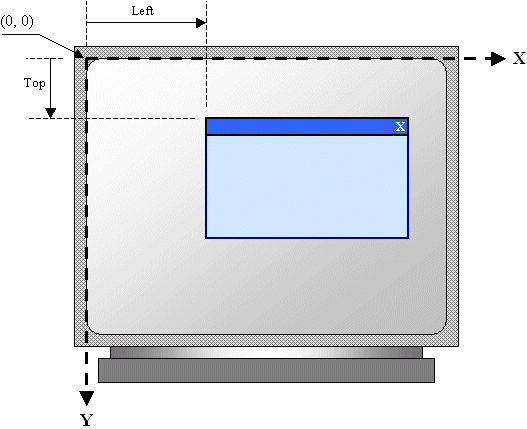
|
The above illustration shows a form positioned on a monitor. The desktop acts as the parent window of the form. In the same way, if you place a control on a container, the control is located with regards to its parent, not based on the screen. As seen previously, in such a case, the origin of the coordinate system is located on the top-left corner of the parent window. The distance from the left border of the parent window to the left border of the control is the control’s Left property. The distance from the top border of the parent window to the top border of the control is the control’s Top property. Here is an example in which a control as a child is positioned inside of another control that acts as its parent:
|
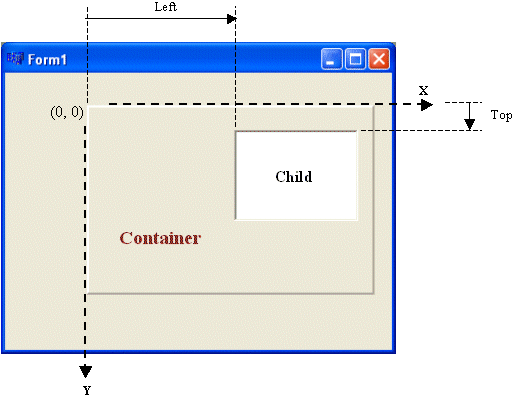
|
The Client Area |
|
|
|
An object positioned on a parent can be seen only if its dimensions are confined to the body of the parent. To manage the display of visible windows, each parent provides a section called the client area. For the desktop screen, the client area is the whole screen. For a form, the client area is the body of the form without the title bar. Most other containers provide their whole body as the client area:
The desktop window provides a rectangular area that it can use to display the computer’s applications. This area is also used to host other objects. Although an object’s borders can span beyond the borders of the desktop, only the area of an object covered by the desktop can be seen. Here is an example of a window whose right side cannot be seen:
The client area is a rectangle primarily used for its location and dimensions. To get the values of the shape that compose the client area, you have various options and considerations. For example, to get the area that represents the desktop, which would let you know how much real estate is available for your application, you can call the Screen.Width and/or Screen.Height variables. It is important to know where the origin of a control is located. During control design, we saw that, when a container is selected and you double-click a visual control on the Toolbox, the new control would be added to the container. On the other hand, if you have a container that is positioned on the form but the container, or any specific container, is not selected, if you double-click a control on the Toolbox, the control would be added to the form even though the new control may be positioned on a container. In this case, the form would become the parent of the new control. Therefore, in order to do anything related to the location and/or dimensions of a control, you must know the coordinate of the origin used as the basis for its location and dimensions. Because only a parent can host some controls, it holds an origin and makes it available to its children. |
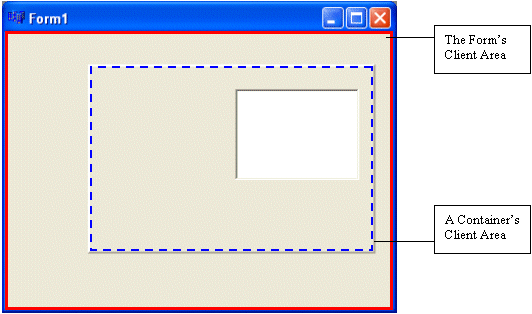

|
Forms |
|
|
|
Introduction |
|
|
|
A form is a rectangular object that can be used as a program of its own, it is also usually used as part of a bigger application. The form is a window control that mostly serves as a place holder for other controls. There are two main ways you create a form: as its own program or as part of an application. Whenever you launch Microsoft Visual Basic, the opening dialog offers to create a form. To add a form into an existing program, on the main menu, you can click Project -> Add Form. When creating a form, you can control its properties at design time using the Properties window. Many of these properties can be set at run time with code. A form can control its own properties when an event related to a form is fired. A form's properties can also be set or changed using other controls on the form itself or controls from another form or from the computer (for example, you can control a property based on the system time of the computer). |
|
|
|
|
|
|
Forms Characteristics: The System Icon |
|
|
|
As the main or primary object of an application, a form is equipped with a title bar. This can be used to minimize, maximize, restore, move, or close a form. The most left section of a form's title bar displays a small picture called an icon. A Visual Basic form displays a default icon. If you want to use a different icon, you must have one in file. You can either use one of the icons that ship with Microsoft Visual Studio or design your own. To display a different icon on the title bar of a form, first select the form. Then, in the Properties window, click the ellipsis button of the Icon property. This would open the Load Icon dialog box to let you locate and select an icon. After selecting an icon, you can click Open. |
|
Forms Characteristics: The Caption |
|
|
|
On the right side of a form's system icon, the title bar displays what is referred to as the name of the window: this is the caption. After adding a form to a project, it displays a default caption that mimics its name. For example, the first form is called Form1 and its caption is Form1. Most of the time, it will be necessary to change the caption so it displays a friendlier name. To change the caption of a form, after selecting it in the design, in the Properties window, click Caption and either change the text or edit the existing one. |
|
Forms Characteristics: The System Buttons |
|
|
|
On the right side of its title bar, a form displays three system buttons. The presence of this group of buttons is controlled by the ControlBox Boolean property whose default value is True. Therefore, if you don't want any these buttons at all, you can set the ControlBox property to False. If you keep or set it to True, you can then configure different combinations that control the presence or availability of these buttons. When the ControlBox property is set to True, you can control the system buttons using the MinButton and the MaxButton properties. |
|
The Startup Position of a Form |
|
|
|
When you create an application that has a form, the form is positioned in a design window that hosts it. When the application is executed and the form comes up, you should be able to predict where it would be positioned on the screen, since its position on the design window has nothing to do with its actual position at run time. There are various ways you can specify the default position of a form when its application launches. To manually and visually specify where a form would be positioned when it comes up, while it is selected in design, in the lower right section of the screen, click and drag the same rectangle in the Form Layout window:
This technique allows you to position the form with a good approximation. Alternatively, after selecting the form in design, in the Properties window, change the value of the StartUpPosition property. The options are:
As another solution, you can double-click the form to access its Load event, then assign a value to the Left and the Top properties of the form. This is the least precise and the most complicated of all three solutions because you should know the system of measures you are using. |
|
|
|
|
20.Private Sub Form_Load() 21. Me.Height = 4500 22. Me.Width = 6465 23. Me.Caption = "Form Interaction"End Sub
31.Private Sub Form_DblClick() 32. Me.Caption = "You double-clicked Me!" End Sub
42.Private Sub Form_DblClick() 43. Me.Caption = "You double-clicked Me!" 44. frmEmployees.ShowEnd Sub
|
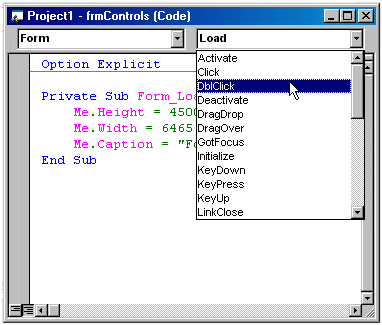
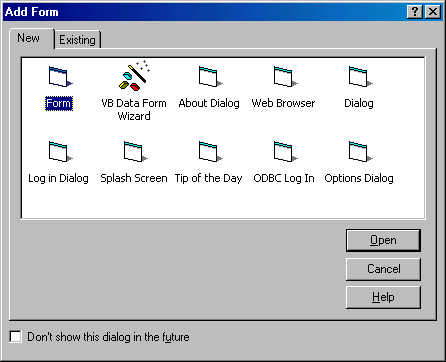
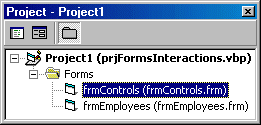
|
|
|
Frames |
|
|
|
A frame is used as a place holder for other controls; therefore, it is called a container. You can insert any kind of control in a frame, including labels, text box, command buttons, and even other controls. The controls inside of a frame are treated as a group; as we will see, some of their settings can be changed together at once. |
|
Practical Learning: Creating A Frame |
|
|
|
10.To close the running form, click its close button ![]() .
.
|
Primary Controls |
|
|
|
|
|
|
|
|
|
Text Boxes |
|
|
|
A text box is used to receive information from the user by her typing it into this box. A text box can also be used to simply display information to the user. Although a text box is a good control by itself, it usually
doesn't mean much to the user if she doesn't know what the box is used for.
Therefore, you should always create a text box in conjunction with a label.
The label is used to identify what the text is used for. You should position
the label on the left or on top of the text box. The rules of using the computer
suggest that a text box be identified by the caption of its label. For
example, if a label displays First Name:, the text box on its right would be
called The First Name Text Box. If a labels displays How Old Are You?, its
corresponding text box would be called The How Old Are You Text Box. But
remember, programmatically, the text box and its label are completely
independent. |
|
Practical Learning: Adding A Text Box |
|
|
|
|
|
|
Introduction To Expressions |
|
|
|
The contents of controls are worth nothing unless you put them to good use. This is done through expressions. An expression is a combination of values and signs that allow you to get a new value to display in a control. This is handy because some values will simply not be available when the user is using your program. For example, to get a sum of two numbers that the user is supposed to enter in a form, when creating such a form, you cannot know what the user would enter in two boxes, but you can write an expression that would use whatever the user enters, to get a new value. The values involved in an expression could be external to the program, such as algebraic numbers; they could also come from the program itself, such as BillingRate or DateHired; and they could be a combination of algebraic numbers and controls content on the your program. An operation, an expression, are the result of a function is usually meant to be displayed in a new and appropriate control. |
|
|
|
Option Buttons |
|
|
|
Sometimes referred to as radio buttons, option buttons allow the user to select one item in a group. We have already seen that controls are placed on a form before being used in an application. The controls on a form are considered in a group. A frame allows you to create a group in a group. This is particular useful when you want to use option buttons in your program. You should create a group of these buttons so that the user can select one. |
|
Practical Learning: Creating Option Buttons |
|
|
|
|
|
|
Check Boxes |
|
|
|
Check Boxes allow to user to make selections by click these boxes. The user knows that a choice is made when a check mark appears inside of the corresponding square. Programmatically, a check box specifies a value as being true or false. Although they are usually treated as a group, the user can select more than one check box or as many as are available. As you will see in your programming experience, the functionality of check boxes can be very easy or very complex, depending on the result you are trying to achieve. |
|
Practical Learning: Creating Check Boxes |
|
|
|
|
|
|
List-Based Controls |
|
|
|
|
|
|
ADO Fundamentals |
|
|
|
|
Although treated as one entity, Microsoft ActiveX Data Object is really many libraries grouped under one name. For the rest of our lessons, ADO will be used to refer to all the technologies we need to create and administer our databases. We will point the differences only when needed. ADO is only a library, that is, a series of files that provide "drivers" and documentation to perform a task. In order to use ADO, you need a programming or development environment in which you can write code. The environment you use should/must also be able to "understand" your code, analyze it and produce a result. This is not an anomaly of ADO. All libraries work like that. There are many environments you can use with ADO. Some of them are Microsoft Internet Explorer (using scripting languages such as VBScript or JavaScript), Borland Delphi, Microsoft Visual C++, Visual InterDev, Borland C++ Builder, Microsoft Visual Studio. NET, just to name a few.
In order to follow the lessons on this site, you are supposed to have some knowledge of Microsoft Visual Basic as it is the main language of ADO. The topics you are:
It would be a big waste of time to try to teach both MSVB (which is a language or a programming environment) and ADO (which is a library). |
||||||||||||
|
Object-Oriented ADO |
|
||||||||||
|
|
|
||||||||||
|
|
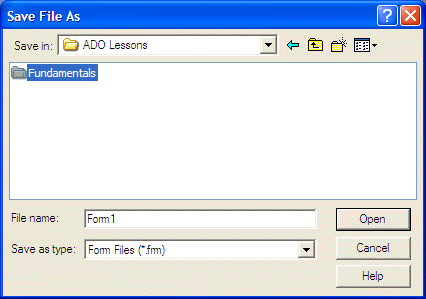
|
ADOX Fundamentals |
|
|
|
The most fundamental object used in ADO databases is ADOX. To use this object, you must create a reference to it. To do this, first declare a variable of type ADOX. The ADOX object is equipped with the Catalog property. This property defines most of the objects you will need to use in your databases, the objects we will start introducing in the next lesson. To use the Catalog property, specify it when declaring the ADOX variable. Here is an example: Private Sub cmdAction_Click() Dim objCatalog As ADOX.Catalog End Sub Before using the Catalog property of the ADOX object, you must specify that you need a reference to it, this can be done by initializing your variable with ADOX.Catalog using the New operator. Here is an example: Private Sub cmdAction_Click() Dim objCatalog As ADOX.Catalog Set objCatalog = New ADOX.Catalog End Sub You can also refer to this property when declaring the variable. Here is an example: Private Sub cmdAction_Click() Dim objCatalog As New ADOX.Catalog End Sub Whenever you create an ADO object and while it is being used, it consumes resources. Therefore, after using the object, you should/must remove it from memory (if you don't, you may start seeing abnormal behavior on your computer after a while, as resources become scarce for other objects or applications are trying to use the same resources). To remove a resource from memory, after using it, assign it the Nothing constant. |
|
|
|
|
|
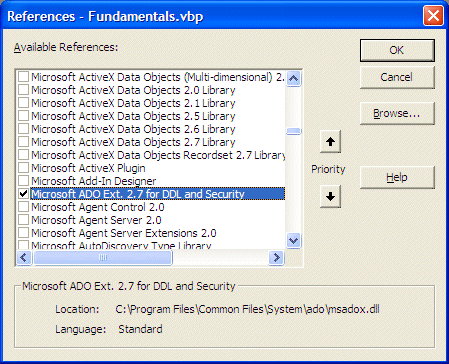
|
Database Creation |
|
|
|
Introduction |
|
|
|
Once you have gotten a reference to the object you want to use, you can perform a related operation. The primary operation you can perform consists of creating a database. This is done using the Catalog property of the ADOX object. To create a database, you can call the Create() method of the Catalog. This would be started as follows: Private Sub cmdAction_Click() Dim objCatalog As ADOX.Catalog Set objCatalog = New ADOX.Catalog objCatalog.Create End Sub This method takes as argument a string, also called a connection string, that defines the assignment to perform. The string itself is internally made of different sections separated by a semi-colon. The first part of the connection string is called the provider. It specifies the platform used to handle the database. To specify this factor, assign the desired name to the provider word. This would be done as: Private Sub cmdAction_Click() Dim objCatalog As ADOX.Catalog Set objCatalog = New ADOX.Catalog objCatalog.Create "provider=" End Sub Although there are various providers in the industry, there are two primary providers used in ADO. One of them is Microsoft SQL Server and it is represented by SQLOLEDB. Therefore, if your database will reside on a SQL Server, you can specify the provider as follows: Private Sub cmdAction_Click() Dim objCatalog As ADOX.Catalog Set objCatalog = New ADOX.Catalog objCatalog.Create "provider=SQLOEDB" End Sub Probably the most used provider in Visual Basic 6 databases is the Microsoft JET database engine. It is represented as Microsoft.JET.OLEDB.4.0. You can use it to specify the provider as follows: Private Sub cmdAction_Click() Dim objCatalog As ADOX.Catalog Set objCatalog = New ADOX.Catalog objCatalog.Create "provide=Microsoft.Jet.OLEDB.4.0" End Sub You can also include the name of the provider as its own string. To do that, you can include it in single-quotes: Private Sub cmdAction_Click() Dim objCatalog As ADOX.Catalog Set objCatalog = New ADOX.Catalog objCatalog.Create "provider='Microsoft.Jet.OLEDB.4.0'" End Sub If you are creating a SQL Server type of database, there are various other details you must provide to the connection string. For the rest of our lessons, we will use Microsoft JET. When using Microsoft JET, the second part of the connection is referred to as the data source. If you are creating a database, you can specify the path and the name of the database to the Data Source factor. The path must consist of the drive and the folder(s). After the last folder, the name of the database must have the .mdb extension. For example, to create a database called Exercise that would reside in a folder called Exercises in the C: drive, you can specify the connection string as follows: Private Sub cmdAction_Click() Dim objCatalog As ADOX.Catalog Set objCatalog = New ADOX.Catalog objCatalog.Create "provider=Microsoft.Jet.OLEDB.4.0;Data Source=C:\Exercises\Exercise.mdb" End Sub To be safer, you can also include the value of the data source in single-quotes: Private Sub cmdAction_Click() Dim objCatalog As ADOX.Catalog Set objCatalog = New ADOX.Catalog objCatalog.Create "provide=Microsoft.Jet.OLEDB.4.0;'Data Source=C:\Exercises\Exercises.mdb'" End Sub |
|
|
|
|
|
|
|||
|
Tables Fundamentals |
|
||
|
|
|||
|
|
|
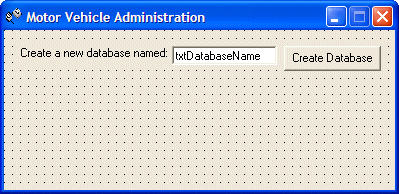
|
Table Creation |
|
|
|
To create a table, you start a statement with the CREATE TABLE expression followed by the desired name of the table as follows: CREATE TABLE TableName When creating a table, you must provide a name for it. The name of a table can be made of digits, letters, underscores, or a combination of those. In our lessons, we will use the following rules:
Every table must have at least one column. The list of columns of a table starts with an opening parenthesis “(“ and ends with a closing parenthesis “)”. If the table will be made of more than one column, you can separate them with a comma. The syntax used would be: CREATE TABLE TableName(Column1, Column2, Column_n); To create a column, you specify its name, followed by its data type, and some possible options. Therefore, the syntax of creating a column is: ColumnName DataType Options Notice that there is only space that separates the sections of the syntax. For this reason, the name of a column should be in one word because, if you put space after the first word, the SQL engine would treat the next word as a data type. For example, the following statement would produce an error: CREATE TABLE Test(Marital Status) If you want to use space in a column name, include it between an opening square bracket “[“ and a closing square bracket “]”. The above statement would be changed to: CREATE TABLE Test([Marital Status]) After (or on the right side of) the column name, you must specify the type of information, also called the data type) that will be stored in the cells under that column. Here are the data types you can use:
CREATE TABLE Persons ( FirstName VARCHAR, [Last Name] varchar, Gender int, [Date Of Birth] DateTime, MaritalStatus Integer, IsMarried Bit, PersonalIncome Money, HouseholdIncome Currency ); A field size can be used to specify the size of value used on a field. Based on this, when creating a column whose data type is char, text or varchar, you can optionally specify the desired number of characters that the field should allow. To specify the maximum number of characters of a text-based field, include it in parentheses just to the left of the data type. In ADO, to create a table, you include its whole statement between double-quotes, as a string. To actually perform the assignment, you can call the Execute() method of the ADO reference you are using, passing your string as argument. |
|
|
|
|
|
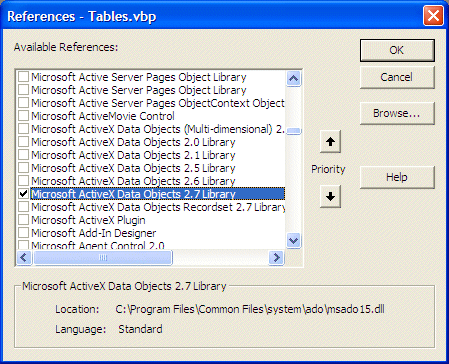
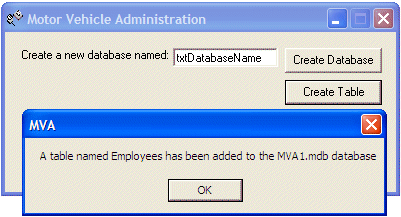
|
Table Deletion |
|
|
|
If you have a table in a database but don't need that table anymore, you can get rid of it. To delete a table, write the DROP TABLE expression followed by the name of the table. |
|
|
|
|
|
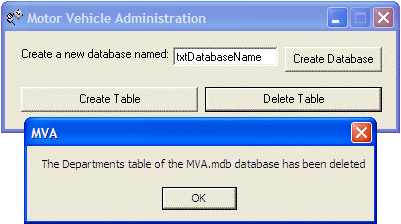
|
Columns Management |
|
|
|
|
|
|
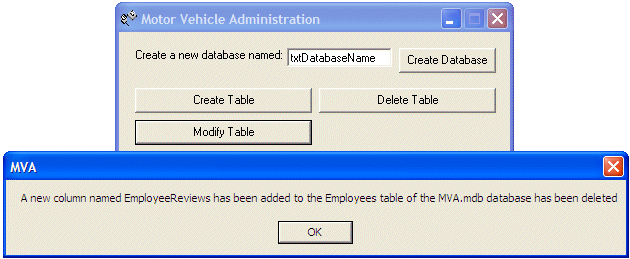
|
Column Deletion |
|
|
|
As opposed to creating a new column, if you have a column that has become useless on a table, you can get rid of it. To delete a column, use the DROP COLUMN expression followed by the name of the column. Before deleting a column, make sure it exists on the table. Here is an example: Private Sub cmdAlterTable_Click() Dim conEmployees As ADODB.Connection Dim strSQL As String Set conEmployees = New ADODB.ConnectionconEmployees.Open "Provider=Microsoft.Jet.OLEDB.4.0;" & _ "Data Source='C:\Programs\MSVB\ADO2\MVA1.mdb'" strSQL = "ALTER TABLE Employees DROP COLUMN Notes;" conEmployees.Execute strSQL MsgBox "The Notes column of the Employees table has been removed" Set conEmployees = NothingEnd Sub |
|
|
|
|
|
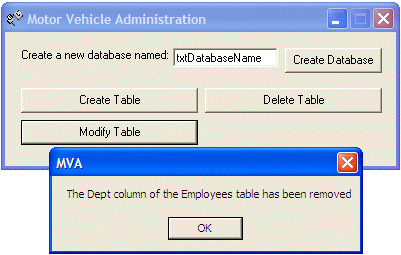

|
Column Modification |
|
|
|
If a certain aspect of a column is wrong while its name fine, you can modify the column without deleting and recreating it. To modify an aspect of the column, use the ALTER COLUMN, followed by the name of the column, and the modification to perform. For example, to change the data type and optionally the length of data, on the right side of the column name, enter the data type and the option. |
|
|
|
|
|

|
The ADO Set of Records |
|
|
|
|
Creating a table provides you with a structure in which you can create a list of values. When a table has been created, it is initially empty but an empty placeholder is automatically created for each column:
Therefore, after creating a table, you can populate it. Since an empty placeholder is created under each column, you can start by adding one value for each category. When a value has been created for each column, even if you skip some columns, you are said to have created a record. Here is an example:
In the same way, you can keep adding records as you see fit. Every time you have created a record, a placeholder for a new record is automatically made available so you don't have to wonder when a record would go. This also implies that each new record you create is appended, that is, it is added to the end, of the table. Here is an example of a table with records:
|
|
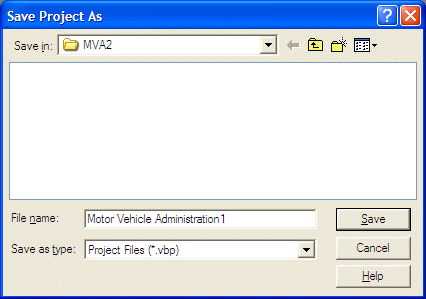


|
The Recordset Object |
|
|
|
The group of records that belong to a table is called a set of records. In ADO, whenever you need to deal with the set of records of a table, you should first declare a variable that would hold the records. To do this, you must obtain an appropriate reference to ADODB. A set of records of a table in ADO is managed by an object called Recordset. After obtaining a reference to a Recordset object, in order to use it, you must open it. This is done using its Open() method whose syntax is: recordset.Open Source, ActiveConnection, CursorType, LockType, Options
The first argument to this method can be a different thing depending on the circumstance. For example, if you are trying to deal with the records of a table, this argument can be the name of that table. The second argument specifies how the connection will be carried. It can be the name of a Connection reference you previously established. The rest of the arguments are optional. In other words, if you don't specify their values, they would use a default. The third argument specifies the type of cursor that would be used. The available options are stored in an enumerator called CursorTypeEnum and they are: |
|
Constant |
Value |
Description |
|
adOpenUnspecified |
-1 |
Does not specify the type of cursor |
|
adOpenForwardOnly |
0 |
Uses a forward-only cursor |
|
adOpenKeyset |
1 |
Uses a keyset cursor |
|
adOpenDynamic |
2 |
Uses a dynamic cursor |
|
adOpenStatic |
3 |
Uses a static cursor, which is a static copy of a set of records
that you can use to find data or generate reports. Additions, changes, or
deletions by other users are not visible |
|
The default value of this argument is adOpenForwardOnly. The fourth argument specifies the type of locking system that would be used on the set of records. The available options are stored in an enumerator called LockTypeEnum and they are: |
|
Constant |
Value |
Description |
|
adLockUnspecified |
-1 |
Does not specify a type of lock.
For clones, the clone is created with the same lock type as the original |
|
adLockReadOnly |
1 |
Indicates read-only records. You cannot alter the data |
|
adLockPessimistic |
2 |
Indicates pessimistic locking, record by record. The provider
does what is necessary to ensure successful editing of the records, usually
by locking records at the data source immediately after editing |
|
adLockOptimistic |
3 |
Indicates optimistic locking, record by record. The provider
uses optimistic locking, locking records only when you call the Update method |
|
adLockBatchOptimistic |
4 |
Indicates optimistic batch updates. Required for batch update
mode |
|
The last argument is an option you specify about the first argument. |
|
Record Creation |
|
|
|
One of the actions you can perform using a Recordset object is to perform data entry, that is, to create new records. To support data entry, the Recordset object is equipped with the AddNew() method. Its syntax is: recordset.AddNew FieldList, Values
The first argument is a name of a column and must be identified as belonging to an array called Fields. After specifying the name of the column in the parentheses of the Fields array, you can assign it the desired value. You can do this for each column or for selected columns of the table. After creating a record, you should remember to save it. This is done by calling the Update() method of the Recordset object. |
|
|
|
|
|
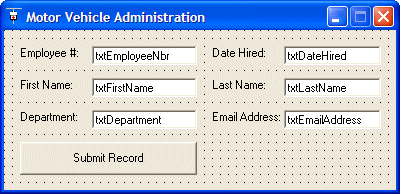
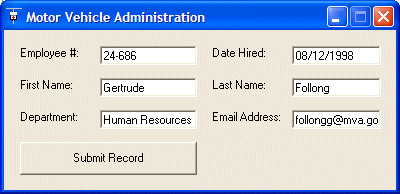
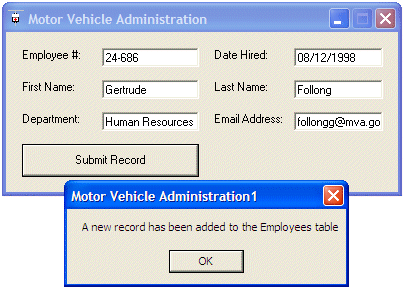
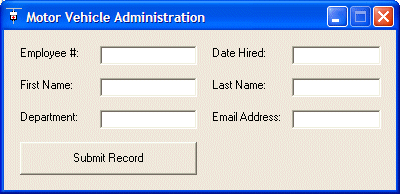
|
|
|
Record Insertion |
|
|
|
Besides, or as opposed to, adding a new record, if you don't want to formally use the Recordset class to create a record, you can use the Execute() method of the Connection object. To create a new record using the Connection object, you can call the Execute() method and pass it a string that contains the following formula: INSERT TableName VALUES(Name1, Name2, Name_n) or INSERT INTO TableName VALUES(Name1, Name2, Name_n)
|
|
|
|
|
|
||||
|
Data Navigation |
|
||
|
|
|
||
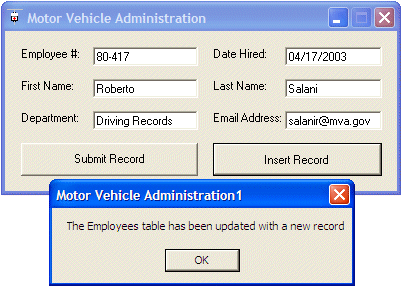
|
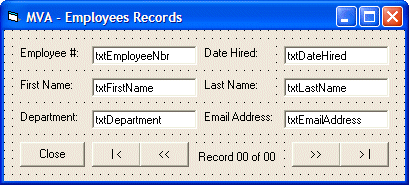
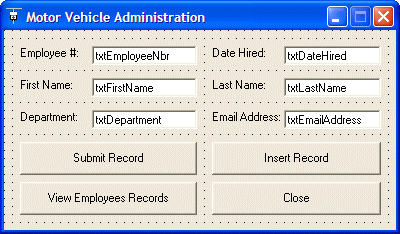
U can Download From http://rapidshare.com/files/61338737/VisualBasic6.doc