|
Introduction to Microsoft Access |
|
|
|
|
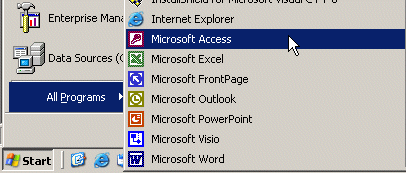
Microsoft Access is a computer application used to create and manage computer-based databases on desktop computers and/or on connected computers (a network). Microsoft Access can be used for personal information management (PIM), in a small business to organize and manage all data, or in an enterprise to communicate with servers. Like any other computer application, in order to use Microsoft Access, you must first open it. There are various ways this can be done. Microsoft Access is a classic computer application and it gets launched like the usual products you have probably been using. As such, to start this program, you could click Start -> (All) Programs -> Microsoft Access:
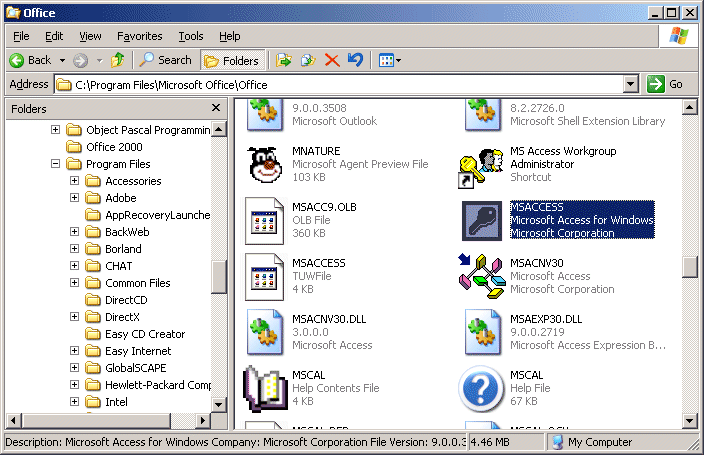
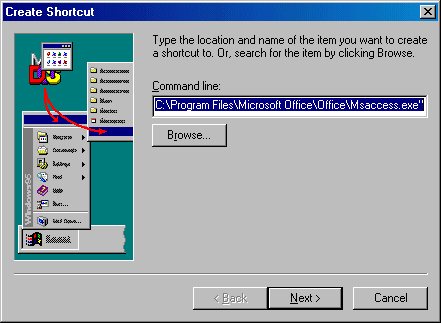
As a regular member of the Microsoft Office suite of applications, if your installation created a sub-menu on the Start menu, you could click Start -> New Office Application and proceed from the New dialog box. Although Microsoft Office 97 and Microsoft Office 2000 get installed in the C:\Program Files\Microsoft Office folder, they treat the shortcuts that launch them differently. The applications that are part of Microsoft Office 97 designate their shortcuts with full names and these are installed in the Microsoft Office folder. Microsoft Office 2000 (Premium) uses shortcut names to designate its shortcuts and they are installed in the Microsoft Office\Office folder. This means that you could launch an application from Windows Explorer or My Computer. Therefore, in order to launch Microsoft Access, locate its shortcut in Windows Explorer or My Computer and double-click it: |
|
|
If you have a Microsoft Access database such as an E-Mail
attachment, a file on a floppy disk, on the network, or in any other means,
once you see its icon, you can double-click it. Not only will this action
launch Microsoft Access, but also it will open the file. |
|

|
Microsoft Access Shortcuts |
|
|
|
|
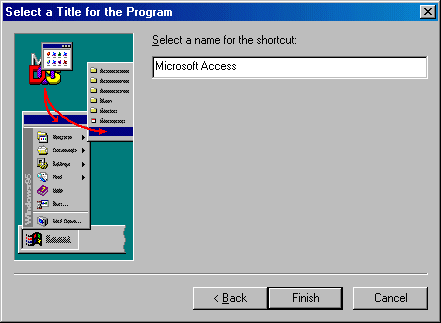
Whenever you find out that you are using a particular program or file most regularly, you should have an icon on the desktop that can lead you to it quickly. This icon is called a shortcut. There are various techniques used to create a shortcut. Probably the first thing you should find out is where your application is located. You can find out by doing a search on the computer. Except on Microsoft Windows 95, you can create a shortcut from the Programs menu. |

|
By default, the shortcuts on the Microsoft Office 97
applications are located in the C:\Program Files\Microsoft Office folder. And
these shortcuts hold the same names as their respective programs; those will
be Microsoft Word, Microsoft Excel, Microsoft PowerPoint, etc. The shortcuts
of the Microsoft Office 2000 applications are located in the C:\Program
Files\Microsoft Office\Office folder. These shortcuts use another naming
convention. They are Msaccess, Winword, Excel, or Frontpg, just to name a
few. |
|
|
|
|
|

|
Microsoft Access Interface |
|
|
|
|
To get better acquainted with the user interface of Microsoft Access, we will use this section as a Practical Learning exercise.
|
|

|
|
|
|||||||||||||||
|
The Main Menu |
|
|
|
|
|
From now on, in this book, |
|
|
Press |
Means |
|
|
T |
Press the T key |
|
|
Alt, G |
Press and release Alt. Then press G |
|
|
Ctrl + H |
Press and hold Ctrl. While you are still holding Ctrl, press H
once. Then release Ctrl |
|
|
Ctrl + Shift + E |
Press and hold Ctrl. Then press and hold Shift. Then press E
once. Release Ctrl and Shift |
|
|
The Toolbars |
|
|
|
Under the menu bar, there is another bar made of various buttons. This is called a toolbar. The toolbars change a lot in Microsoft Access. As you spend more time with this application you will learn how to recognize these toolbars. Each toolbar has a proper name and we will learn how to recognize them. At times, there will be many toolbars that come and go while you are using Microsoft Access. For this reason, we will refer to each toolbar by its name. To know the name of a toolbar, you can right-click any word on the menu bar or any button on the toolbar. If you have only one toolbar on your screen, its name will have a check box. The other name(s) on the context menu is (are) the one (those) you can add to the screen if you wish:
You could also create your own toolbar. |

|
The Status Bar |
|
|
|
The status bar is a long horizontal bar that spans the whole button section of Microsoft Access. It will be used to provide some assistance or information about an item that is displaying or being accessed in Microsoft Access. At this time, it may be displaying Ready (and it means it) |
|
Microsoft Access Database File |
|
|
|
|
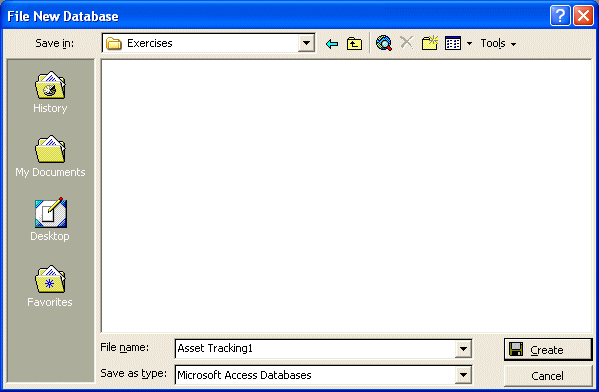
A Microsoft Access database is primarily a Windows file like any other. It must have a location, also called a path, which indicates how the file can be retrieved and made available. Although you can create a database on the root directory such as the C: drive, it is usually a good idea to create your files, including your databases, in an easily recognizable folder. Starting with Microsoft Windows 95 but except Windows NT 4.0, the operating system creates a folder called My Documents that provides a convenient place for a user to create files. With Windows 2000, XP, and 2003, there is also a My Documents folder but because various people may use the same computer, there is a different My Documents folder for each user. When a user logs in, the operating system locates his or her corresponding My Documents folder and makes it available. Throughout this site, we will use a folder called Exercises and located in a parent folder called Microsoft Access Desktop Databases.
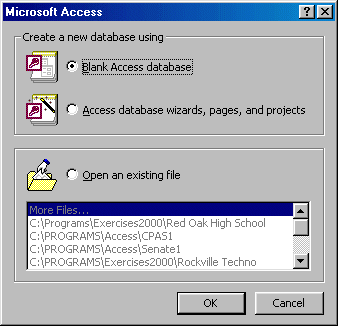
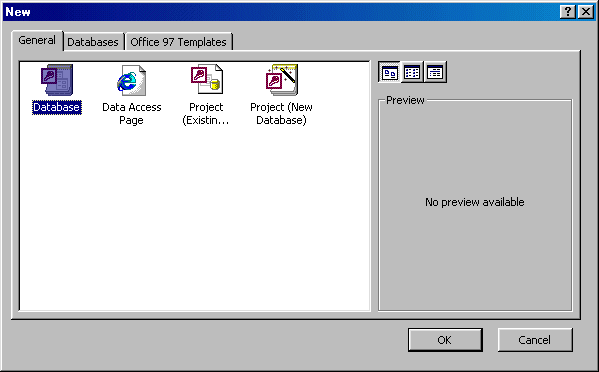
Throughout this site, we will learn different techniques of creating a database. For now, a database is first of all a Windows file. It is mainly created from Microsoft Access. If you are just starting Microsoft Access, you can use one of the two top radio buttons. If Microsoft Access is already opened, to create a database, you can display the New dialog box and select an option from the icons on the property pages. Like every file in the computer, a database must have a name that identifies it. This name must be specified when creating the database.
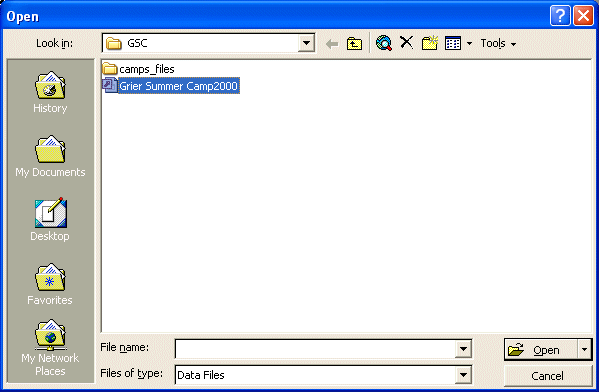
Unlike some other programming environments, Microsoft Access considers a database as a single Windows file with a name. We will eventually learn that this file can contain various objects that actually make up a database. Therefore, a Microsoft Access database is opened as a normal file. To open a database, if you are just starting Microsoft Access, from the Microsoft Access dialog box, you can click the bottom radio button, Open An Existing File, locate the folder that contains the database, select the database file and click Open. If you locate a database in Windows Explorer, My Computer, My Documents, or any other window that displays the Microsoft Access file icon, you can just double-click the icon and open the database. If you received a database as an email attachment, you can also open the attachment and consequently open the database file. |
|
|
|
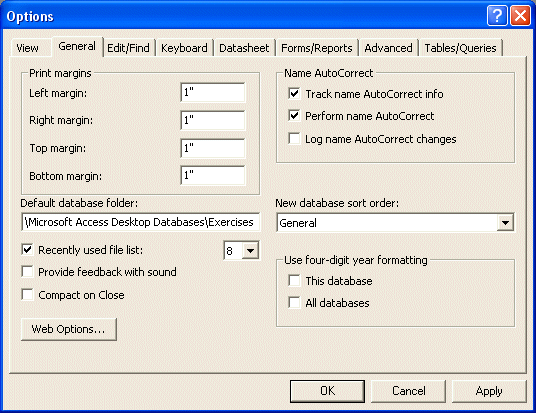
Microsoft Access keeps a list of most recently used databases under the File menu. In Microsoft Access 97, the list is limited to 4. In versions of Microsoft Access after 97, you can increase the list of MRU (most recently used) files in the General tab of the Options dialog box. To open a file that was previously used, you can click File from the main menu and click the database file from the list. |

|
|
|
|
|
|
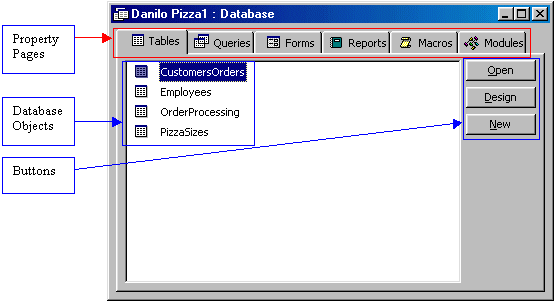
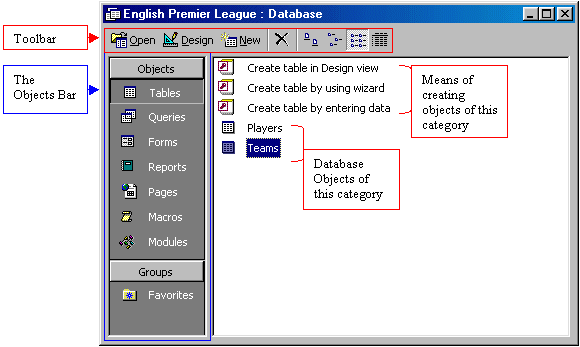
Overview of Database Objects |
|
|
|
|
After creating or opening a database, unless the product is
setup otherwise, the first object that appears is a rectangular box named the
Database window. It is different on Microsoft Access 97 and Microsoft Access
2000 (and later versions).
Once in the property page of a category, to open an object:
One of the biggest changes that Microsoft Access 2000
brought was on the Database window. It got completely redesigned and highly
improved. Like all classic windows, it is equipped with a title bar similar
to the Database window of the 97 version as we described above. Under the
title bar, the Database window is equipped with a contextual toolbar. This
means that the toolbar responds according to the object that is selected in
the Database window. |
|
|
|
|
To open an object:
Besides providing the ability to create a new object or open an existing one, you can also delete an object using the Database window’s toolbar. To do this, you can click the object to select it. Then, on this toolbar, click the Delete button. The Database window’s toolbar also provides four view buttons that allow you to change the way the list displays in the right side of the view. If you have used Windows Explorer, My Computer, or My Documents, you are probably familiar with these buttons. For example, here is the Database window that displays its list in Large Icons: |
|
|
|
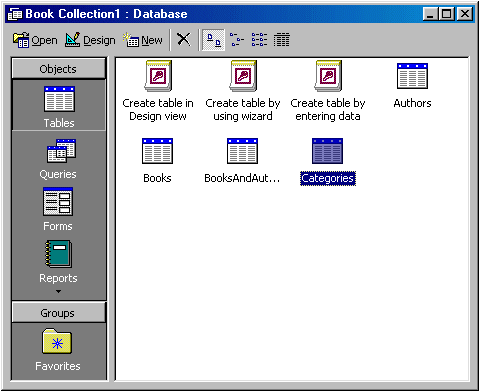
Database Objects: Tables |
|
|
|
A Microsoft Access database is a file made of various internal objects: tables, queries, forms, reports, etc. All these are managed from an object called the Database Window. The objects are kept in categories. To access an object, you click the button that corresponds to its category. A table is the central point of a database, because all data is stored in tables. For better organization, you will have various tables in your database, each for a different purpose. Each table is recognized by its name. To open a particular table, you can double-click it. You can also right-click a table's name and click Open. If the desired table is already selected on the Database Window, you can click the Open button to open it. |
|

|
|
|
|
|
|
Database Objects: Queries |
|
|
|
A table can be large depending on the information it holds. To further organize your data, you should be able to retrieve necessary information for a specific purpose. The solution is to create a query (or queries) in order to limit part of the data in a table for a specific goal, for better managing or searching. That's the role of a query. Just like tables, queries are managed from the Database Window in their own category. You can open a query the same way you open a table. |
|
|
|
|
|
|
|
Database Objects: Forms |
|
|
|
Tables are used to create the data in your database, but they are usually not friendly looking, as far as the users are concerned. Forms are windows objects used to view and/or enter data in your database. A form can combine data that is part of one or more tables or queries. Forms are the window interfaces that you usually will ask your users to access when performing data entry in your database. |
|
|
|
|
|
|
Database Objects: Reports |
|
|
|
A report is the organized document that allows a user to print information from a database. A report can include different parts or details about your database. It could include data from a table or a query, it could also get its data from various tables, queries, forms, or data that is calculated from other data coming from different tables or forms. You could also create a completely independent report whose content is not related to any data on an object. |
|
|
|
|
|
|
Database Objects: Pages |
|
|
|
Starting with Microsoft Access 2000, Data Access Pages allow you to publish your forms as web pages on the Internet or on an Intranet. Their use is not as common as the other database objects but they provide thoughtful functionality. |
|
|
|
|
|
|
|
Macros |
|
|
|
When creating Microsoft Access databases, you can customize certain behaviors of your products. Some of these behaviors can be automated through a combination of buttons. For example, you may want to open one document (form) from another. You can use macros to do that. In such case, you would not have to write code. Since macros are becoming less and less popular (for good reasons), we will not spend much time learning them. |
|
Modules |
|
|
|
Modules are pieces of code used to impose particular behaviors to your application to make it better. They are written in Microsoft Visual Basic. Modules are more flexible and extensive than macros, although they are usually written for various and particular circumstances. One example is to print a receipt after a customer has bought paint in a store. Macros and Visual Basic code can be used on the same application. Sometimes you will prefer one to the other, and sometimes you will keep using VBA (Visual Basic for Applications). Whenever possible, you should use VBA instead of macros. Although modules are represented on the Database Window like the database objects we have seen so far, to view, read, or access a module, you need to get to Microsoft Visual Basic. There are various ways you could do that. A module could be an independent piece of code that is not related to another object, in this case its name would appear in the Database Window; all you have to do is double-click it and that would launch Microsoft Visual Basic. If you select a form or report from the Database Window, you will see the Code button on the Database toolbar. If you click that button, it would launch Microsoft Visual Basic. If the form or report has some code associated (or bound) to it or to some of its controls, the code would display; otherwise the programming window look empty (it should have at least one line displaying Option Compare Database. |
|
|
|
|
|
|
Microsoft Access Help |
|
|
|
|
Context-sensitive help refers to help provided on a specific item on the screen. Such help is provided for objects that are part of Microsoft Access interface. It includes objects like buttons on toolbars, an object opened such as a table, a query, a form, or a report, etc. Context-sensitive help is also referred to as “What’s This?”. To get context-sensitive help, press Shift + F1. In addition to the traditional arrow, the mouse cursor would be accompanied by a question mark. To get help on an object, you can just click it. Another type of context sensitive help is provided in various dialog boxes. They display a button with a question mark on the left of the system Close button. To use this type of help, click the question mark button and click the item on which you need help.
|
|

|
|
|
The Office Assistant |
|
|
|
The Office Assistant is a “character” or a “virtual person” whose main job is to provide instant help when using a Microsoft Office product. The Office Assistant is usually on top of Microsoft Access while you are working. If you do not like the way it looks, you can click it and click Options. This would present you with the Office Assistant property sheet in which the Gallery property page allows you to select a different Office Assistant. The Options property page allows you to configure the behavior and responsiveness of the Office Assistant. To use its service, just click it, then type a word, a sentence, or a question. After pressing Enter, a primary list of possible matches would be displayed. If you do not find what is close to your request, you can use the available options or change your request. If you do not want the Office Assistant on the screen while you are working, you can hide it. To do this, in Microsoft Access 97, you can click its Close button. In Microsoft Access 2000, on the main menu, you can click Help -> Hide Office Assistant. To display it when it is not available, on the main menu, you can click Help -> Show the Office Assistant. |
|
|
|
|
|
|
Online Help |
|
|
|
Online help is a separate program that provides help on Microsoft Access. There are two main types of online help:
|

|
|
It is
important to note that help in Microsoft Access 2000 and above is different
than help in Microsoft Access 97. In the 97 version, help was provided
through a system called WinHelp. After that, Microsoft decided to start using
HTML Help. Like everything in computer applications, each of these help
systems has its advantages and disadvantages. Over all, the process of
getting help remains the same but it is displayed differently. |
|
Internet Help |
|
|
|
Although help on the Internet tends to be disparate, it is still the widest form of help available. This is provided in web sites, web pages, newsgroups, support groups, etc. As the publisher of the database environment, it is only natural to refer to the Microsoft corporate web site first for help. The Microsoft web site is divided in categories. A web site is dedicated to Microsoft Access at http://www.microsoft.com/access. You can get help at http://support.microsoft.com. Probably the most visited site of Microsoft for developers of all Microsoft products is http://msdn.microsoft.com. This last site provides a tree-based list that presents items in categories. |
|
Microsoft Access Exit |
|
|
|
Since Microsoft Access shares the same functionality you are probably familiar with from using other applications, you can close it easily.
|
|
|
|
|
|
|
MOUS Topics |
|
|
|
S4 |
Use the Microsoft Office Assistant |
|
S5 |
Select an object using the Objects Bar |
|
Exercises |
|
|
|
Bethesda Car Rental |
|
|
|
|
US Senate |
|
|
|
2.
|
Introduction to Data Sheets |
|
|
|
|
|
Creating a Database |
|
|
|
The Database Wizard |
|
|
|
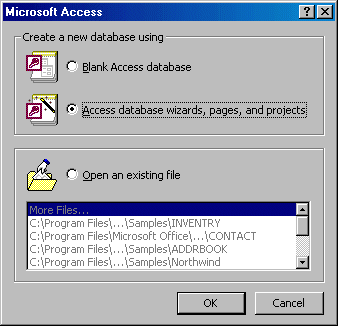
Many techniques allow you to create a database, the fastest of which consists of using one of the provided examples. Microsoft Access 97 shipped with 22 sample databases while Microsoft Access 2000 ships with 10. Furthermore, the 97 version allowed to provide sample data into the database. This is not available with the 2000 release. The databases that ship with Microsoft Access can help you in two main ways: they provide a fast means of creating a database and you can learn from their structure. |
|

|
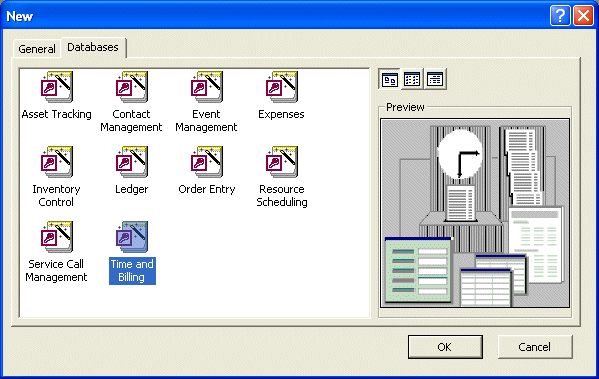
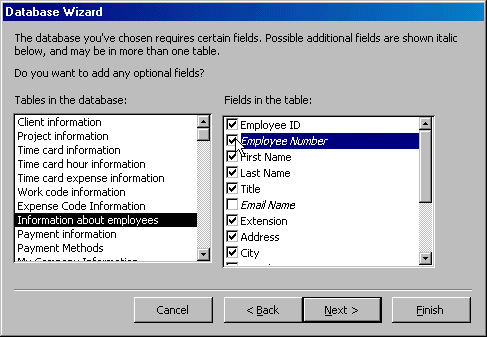
To create a database using one of the samples, there is a little detail to follow depending on whether you had launched the program already or not. If Microsoft Access is not running, you can start it. When the first dialog box comes up, you can click the second radio button: Access Database Wizard, Pages, And Projects and click OK. If the program is already on your screen, on the menu bar, click File -> New Database… The New dialog box displays two property pages labeled General and Databases. If you want to create a database based on one of the samples, you can click the Databases property page. A list of the sample databases appears. You can then choose one and click OK. When creating a database using one of the samples, depending on the sample you selected, the Database Wizard will display a few objects and suggest some fields for your database. Some fields are already associated with the objects and some other fields can be added. You can examine them, then add some fields you think are important for your database. You will also have the option of selecting a design layout. Some of the sample databases have been configured to require information about the company you are creating the database for.. |
|
|
|
|
|
|
|
|
Database Properties |
|
|
|
|
Your screen may be made of a large box at this time: this is the Switchboard, and it is a form. A special window you will be using most regularly is called the Database Window. Whenever it is minimized or hidden, you can display it by pressing F11 (unless it has been configured to (almost) never display). Whether you work alone or in a group, communication and documentation are important. Your database project has its own properties that you can |

|
use to find out some details about your file, to enter some notes about the project, or to give directives to other people who have access to the database. |
|
|
|
|
|

|
Tables Fundamentals |
|
|
|
|
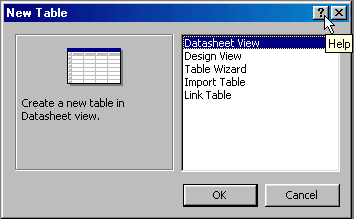
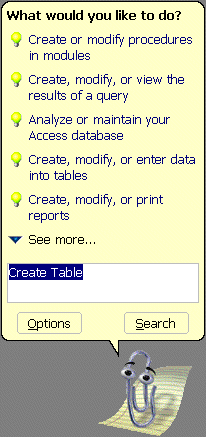
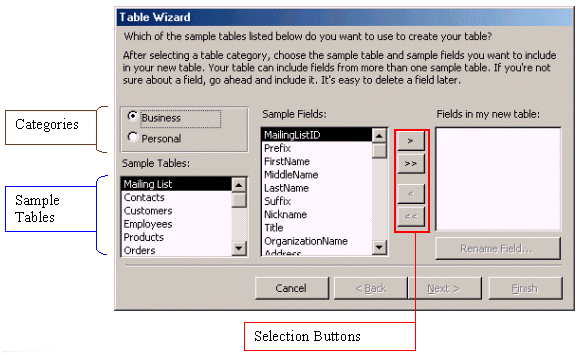
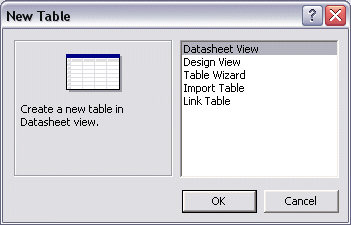
the wizard. To use the Table Wizard, on the main menu, you
can click Insert -> Table. Alternatively, on the Database Window, when in
the Tables section, you can click the New button. These two actions would
display the New Table dialog box from where you would select Table Wizard. If
you are using Microsoft Access 2000 and later, from the Tables section of the
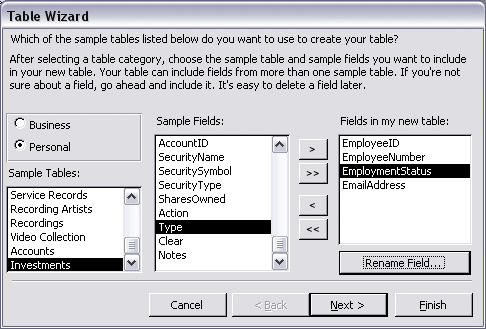
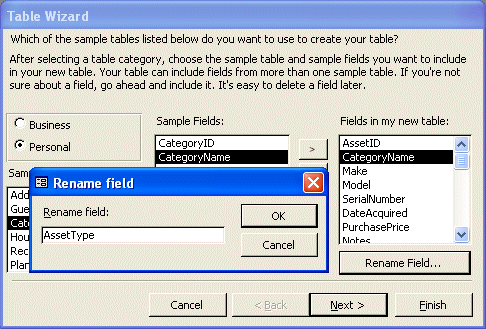
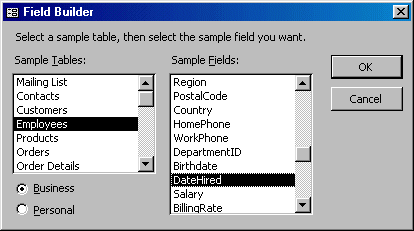
Database Window, you can double-click Create Table By Using Wizard In the Table Wizard, the tables are organized in two primary categories: Business and Personal. To select one of those categories, you can click its radio button. Each main category is made of various sample tables. To select a sample table, you can click its name in the Sample Tables list. In the middle, the Sample Fields list, the fields associated with the selected sample table are displaying. From that list, you can select the desired field(s). Once a field has been selected, it displays in the Fields In My New Table list. You can then select a different table to mix fields from as many tables as desired. The 4 buttons between the Sample Fields list and the Fields In My New Table list allow you to add or subtract fields. To help with selection and de-selection, the wizard provides four buttons:
During field selection, if you select a field, its corresponding name appears in the right list. If you select a field of the same name more than once, for example, if you select Address twice, the 2nd Address would be called Address1. Sometimes that will be what you want, and sometimes it will be by mistake. If then you make a mistake when selecting fields, you can double-click the unwanted field in the Fields In My New Table list and that field will be removed. After making your choices, you can keep the names provided by Microsoft Access into your table, or you can rename any field to suit your needs. To rename a field, first select it in the Fields In My New Table list. Then, click the Rename Field button. In the Rename Field dialog box, type the desired name and click OK:
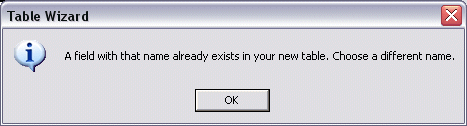
If you try providing a name for a field that already exists, you would receive an error:
|
|

|
|
|
|
|
|
Data Entry on Tables |
|
|
|
Data is entered in a table by typing it into cells. Some
fields can be configured to accept some types of data and reject others. Some
other fields would allow anything. This depends on how the database fields
were setup. |
|

|
After typing data into a cell, you can press Enter or Tab
to move the cursor to the next cell. In many circumstances you will also be
able to move to the next cell by pressing the right arrow key. Sometimes you
can move to the next record even if the current record is not completed. In
this case, you could press the down arrow key. |
|
|
|
|
|
|
Table Printing |
|
|
|
The primary function of the table is to provide a means of storing and arranging information of a database. Nevertheless, you can print data of a table, especially if either you do not have appropriate reports available or you are in a hurry. You can print data on a table whether the table is opened or not. To print a closed table, locate it in the Database Window. Then right-click the desired table and click Print. |
|

|
Once a table is opened in Datasheet View, on the Table
Datasheet toolbar, you can click the Print button. This will send all the
records of the table to the printer for printing. |
|
|
|
|
|
|
||
|
Queries Fundamentals |
|
|
|
|
||
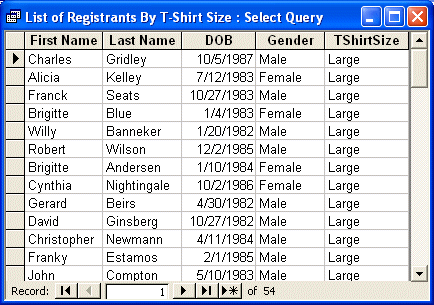
A query is a request you present to the database, and the database displays its response to you. The whole purpose of creating a query lies on how you formulate that request. There are three main ways you create a query in Microsoft Access:
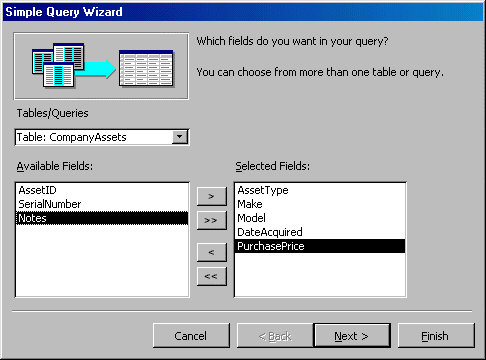
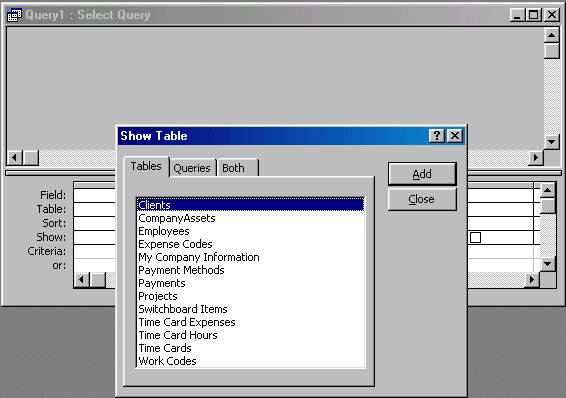
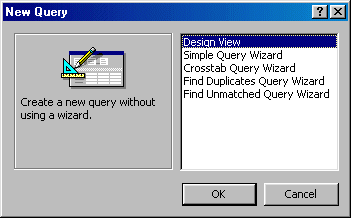
The simplest way to create a query is by using the Query Wizard. The wizard presents the tables that are part of the database and you select which fields you need. Such a query is called a Select Query. Data used on a query can originate from a table, another query, or a combination of tables and/or queries. The first page of the Simple Query Wizard expects you to choose the origin of the query, starting with the table or the query name. For example, you can use a table of employees, then, you choose the necessary data that you want to filter for your query. You can use this query to retrieve the employees' data by their employee number, their last name, the date they were hired, their salary, their marital status, their E-Mail address, or the city or state they live in. To use the Query Wizard, on the Database Window, you can click the Queries button and then double-click Create Query By Using Wizard. Alternatively, you can first display the New Query dialog from where you would choose Simple Query Wizard. To display the New Query dialog box:
When building a query in the first page of the Simple Query Wizard , you must first specify the object (a table or another query) that will provide data. Then select items using the same types of buttons we reviewed for the Table Wizard.
|
|
|
Data Entry on a Query |
|
|
|
|
A query uses the same approach to present its data, like a table: it is made of columns and rows whose intersections are cells. Although the main purpose of a query is to prepare data either for analysis or isolate some fields to make them available to other database objects, as done on a table, data can be entered in a query. |

|
Data entry on a query is the same as done on a table: data is entered into cells. The Enter, Tab and arrow keys are used with the same functionality. Like the table, the query provides navigation buttons on its lower section, allowing you to move to the first, the previous, the next, the last or any record in the range of those available. |
|
|
|
|
|

|
Query Printing |
|
|
|
Like tables, queries provide you with a fast means of printing data. Once again, this should be done when you need a printed but not a professional-oriented product. Data printing on a query is done with the exact same approaches and techniques as for a table. |
|
|
|
|
|
|
|
MOUS Topics |
|
|
|
S6 |
Print database objects (tables and queries) |
|
S7 |
Navigate through records in a table, query, ... |
|
S8 |
Create a database (by using a wizard ...) |
|
S9 |
Create tables by using the Table Wizard |
|
S23 |
Enter records using a datasheet |
|
Exercises |
|
|
|
Tenley Associates |
|
|
|
3.
|
Introduction to Forms and Reports |
|
|
|
|
|
|
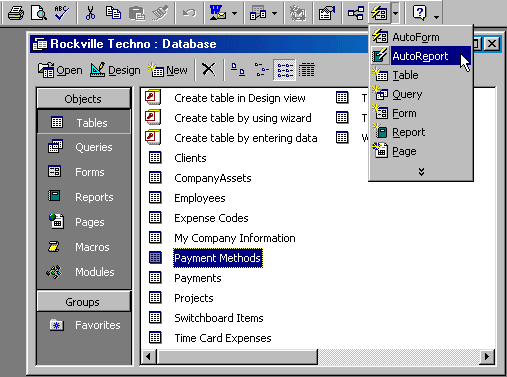
 ,
then click it. If it displays something else, click the arrow of the
New Object button and click AutoForm
,
then click it. If it displays something else, click the arrow of the
New Object button and click AutoForm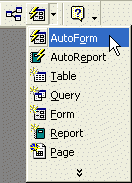
|
The Form Wizard |
|
|
|
As far as users are concerned, the form is the central point of a database. It is used to view, enter, manipulate, and search data. Because users spend a great deal of their time looking at forms, you should create and make them as attractive and friendly as possible. Form design can take a long time in database development but Microsoft Access provides quick means to get around. |
|

|
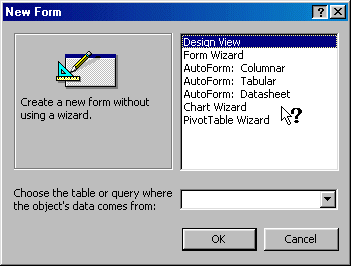
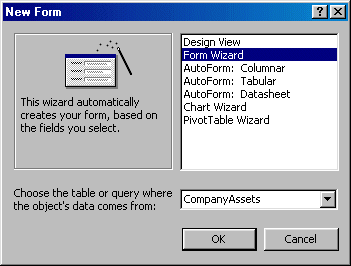
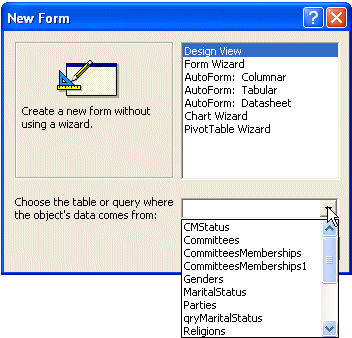
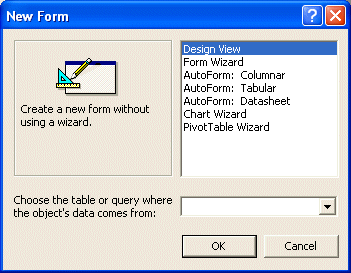
The Form Wizard provides an easy and fast means of creating a form. Like the other wizards we have used so far, this one also takes you step by step through creating the object. There are two main ways you can launch the Form Wizard: from the Database Window or from the New Form dialog box. On the Database Window, you can click the Forms button. Then double-click Create Form By Using Wizard. On the New Form dialog box, you can click Form Wizard and click OK. The first page of the Form Wizard allows you to choose the originating table or query that will supply the necessary fields in the form. Once you have selected the object, its corresponding fields display in the Available Fields list box. You can then select all fields or decide which ones you want to include in the form. The 2nd page of the wizard allows you to select the desired layout of the form. Forms can be designed in various flavors: Columnar, Datasheet, Tabular, Justified:
|
|
|
|
|
|
|
Data Entry on a Form |
|
|
|
|
Data entry of a database is mainly performed on forms as they provide the friendliest display of information. Data entry on a form is performed using text boxes, combo boxes, and other controls. On text boxes, the user enters data by typing it. On a combo box, depending on how the object was configured by the database developer, the user may have to only select an item from the list. In some other cases, the user may be allowed to enter new data. |

|
After entering or changing data on a control, to move from one field to the next, the surest way is to press Tab. On most occasions, the user can also press Enter. The Enter key may not move the cursor from a text box that allows multiple lines of text (such as a field created as Memo). If the user is simply reviewing data without performing data entry, the keyboard’s arrow keys can also be used to move among fields. |
|
|
|
|
|

|
Form Printing |
|
|
|
Although not part of their primary role, forms provide a quick means of printing data, especially in the absence of desired reports. There are various issues related to printing forms, including printing all records or just some of them. |
|

|
You can print a form without opening it. Once you know the form you would like to print, locate its name in the Database Window, right-click it and click Print... All records on the form would be printed. When a form is opened, you have the option of printing all of its records or the selected one. Once in Form View, you can click the Print button on the toolbar. To print just one record, navigate to the record you would like to print, click the Form Selection bar to select the record. On the Form View toolbar, click the Print button. |
|
|
|
|
|
|
Reports Fundamentals |
|
|
|
|
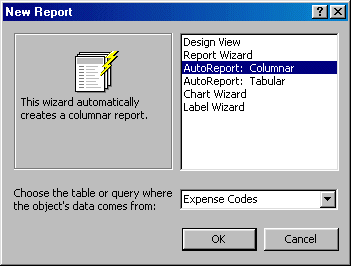
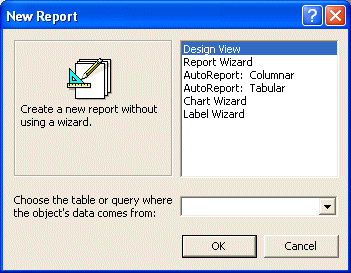
A report provides an object used to print a database records. Although you can print tables, queries, or forms, reports are customized to be printer friendly. They can perform and display calculations. Once again, Microsoft Access provides wizards to quickly create reports. The simplest way to create a report is by using the AutoReport feature available either from the New Object button on the Database toolbar or the New Report dialog box.
|
|
|
The Report Wizard |
|
|
|
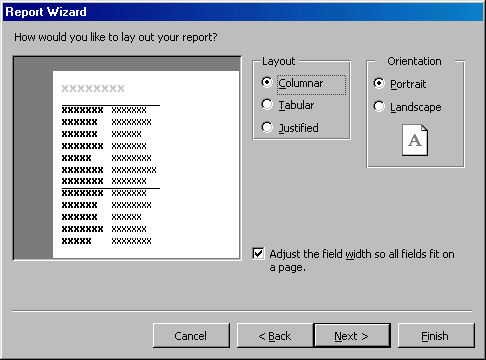
Microsoft Access can help you create a more elaborate report where you would use one of the pre-designed layouts. This is done using the Report Wizard. The Report Wizard is available from the New Report dialog box that you can access either from the menu bar or from the New button on the Database Window when in the Reports section. If you are using Microsoft Access 2000 or 2002, you can also double-click Create Report By Using Wizard. |
|
|
|
|
|
|
|
Report Printing |
|
|
|
As stated already, the report is the favorite object used to print data. As done with the other objects, you can print a report whether it is opened or not. Before printing a report, you must first select or open it. If you want to print a report without opening it, in the Database window, make sure the Reports section is selected. Then, you can locate and right-click the desired report. If you follow this approach, the report would be sent directly to the printer. If you want to control or customize the printing of a report, first select it in the Reports section of the Database window or open it. Then, on the main menu, you can click File -> Print… This would display the Print dialog box, allowing you to select a printer if you have more than one. You can also specify such aspects as the color, the number of copies or the range of records to be printed. |
|

|
|
|
|
|

|
MOUS Topics |
|
|
|
S6 |
Print database objects (..., forms, reports, ...) |
|
S7 |
Navigate through records in a form |
|
S16 |
Create a form with the Form Wizard |
|
S23 |
Enter records using a form |
|
S35 |
Create a report with the Report Wizard |
|
S26 |
Preview and print a report |
|
Exercises |
|
|
|
Tenley Associates Company Expenses |
|
|
|
4.
|
Database Fields on Sheet |
|
|
|
|
|
|

|
Database Object and Fields |
|
|
|
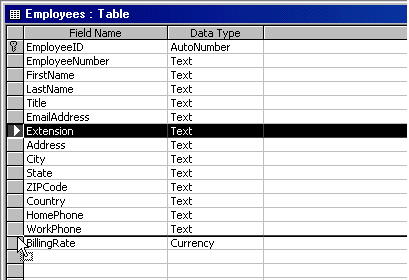
A field is an object used to host, hold, or store a piece of information of a database. Before such an object can perform its function, it must first be created. In the strict sense, the most important or the most regularly used fields of a database are created on a table; but as we have mentioned in previous sections, tables may not be the friendliest windows to present to a user for data entry. For this reason, fields can and should also be created on other windows. The process of making a field available depends on the type of object it will reside on and probably how the field will be used. This leads to two categories of fields: those that can receive or store information and those that can only present or display it. All fields of a table, especially in Microsoft Access, are created to store data. On the other hand, fields on almost all of the other objects (queries, forms, reports) can be made of combinations of already existing fields of a table, or they can be created independently of any existing or non-existing data. |
|
The Table Data Sheet and its Fields |
|
|
|
Table Layout |
|
|
|
|
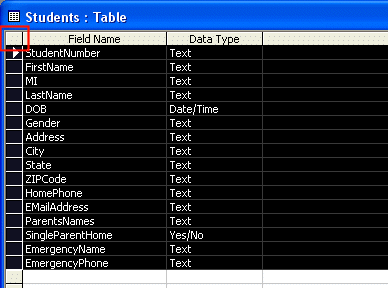
To make fields available on a table, you must create each one of them. Before adding the fields, you must first create the table. There are various techniques available. We have already seen how to use the Table Wizard to create a table. Another technique consists of displaying the table as if you were doing data entering. In this Datasheet View, you can create, add, or insert a field. You can also add fields to a table that was created using the Table Wizard. The last technique you can use consists of designing the table. |

|
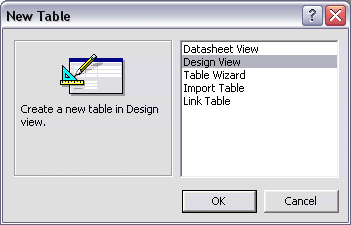
To create a table in Datasheet View, on the Database window, you can click the Tables button and double-click the Create Table By Entering Data. Alternatively, on the toolbar of the Database window, you can click the New button. You can also click Insert -> Table from the main menu. One of these techniques would display the New Table dialog box from which you can click Datasheet View and click OK.. |
|

|
|
|
|
|
|
The Title Bar |
|
|
|
A table is a rectangular window. On top, it presents a
title bar. The title bar is made of a table's icon |
|
Columns and Rows |
|
|
|
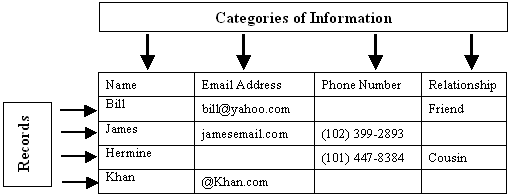
Imagine you create a list of people with whom you have some type of relationship. The list can be started with names as follows: Bill, James, Hermine, and Khan. This type of list is considered one-dimensional because all of its items fit in one category. In order to create a more significant list, you may want to include these people’s email addresses and probably other related information. If you include these additional pieces of information in the same category, the list may become confusing. To arrange the list, you would create categories. Here is an example: |
|

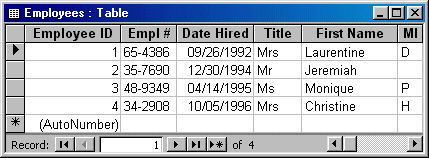
This type of display allows you to refer to a piece of information by its category. This is the basis of a table. A table is a two-dimensional list of items so that the items are arranged by categories. A complete or incomplete series of items that represent each category is called a record. Therefore, a table can be represented as follows:
In the world of database development, a category is
represented as a column. Sometimes it is also called a field. A record is
represented as a row. To better organize its information, each column of a
table must have a (unique) name. By default, Microsoft Access creates a table
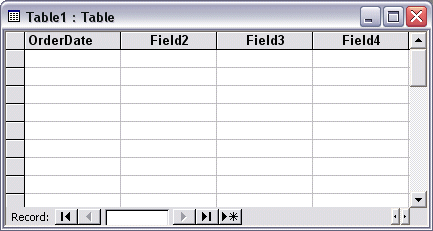
with columns named Field1, Field2, Field3, etc. By default, a table starts
with 10 columns. You can add more or delete unneeded ones. |
|
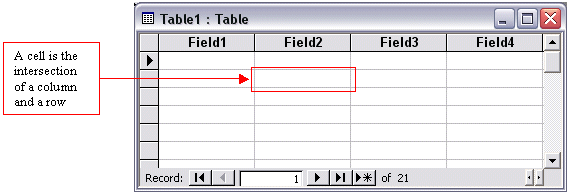
Table Cells |
|
|
|
Although a table is primarily recognized as an arranged list of columns and rows, these are hardly important to the user. Each column and each row intersect to create a rectangular box called a cell. The cell is actually the object that holds data of a table. A cell holds only one piece of information. The database developer decides what type of information would go into a cell: |
|
|
|
The Scroll Bars |
|
|
|
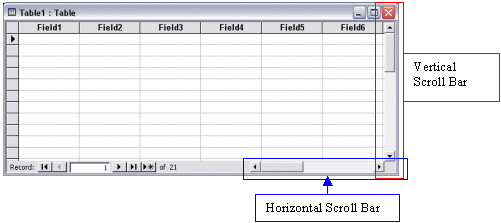
If you start entering data into a table and there are more records than the height of the table can display, the table would be equipped with a vertical scroll bar. The vertical scroll bar would allow you to move up and down on the datasheet. This is useful if/when a table has more records than can be displayed all at once, and this will happen (almost) all the time. In the same way, if a table contains one or more records than the width of the table can display, the table would be equipped with a horizontal scroll bar:
The presence or absence of one or both scroll bars is automatically managed by the operating system. Since you will usually not give your users access to tables, you should not be concerned with the management of scroll bars. If your users need to use a table, they know how to use a scroll bar. |
|
Table Navigation Buttons |
|
|
|
The lower left side of the table is made of five buttons used to navigate the table or create records, and a text box. Each button plays a specific picture:
|
|
Table Creation in Datasheet View |
|
|
|
Fields Names |
|
|
|
Once a table displays in Datasheet View, you can simply
start entering data into its cells but because the columns would have
insignificant names, you should make sure they display names that can
identify their type of information. |
|
|
To name a field, first figure out what the data in the category will be made of. If you are planning to enter employees' salaries in a field, you can just call the field Salary. If you want to specify employees’ names by first name, middle name, and last name, you can use such field names and make them distinct. In this case, you could name the first field as firstname (in one word), the last name would be called lastname. Although this good technique allows you to use one word name, some people including yourself might be confused. The suggestion is to distinguish wherever a new English |

|
(or the language you are using to design your database) name starts in the field name, by using a starting uppercase. Instead of firstname, you can use FirstName. Instead of fullname, you can use FullName. Instead of firstdayofmonth, you can use FirstDayOfMonth. To change the name of a field, you can click its column header, such as Field1. You can also right-click a column and click Rename Column. Alternatively, when any cell under a column has focus, on the main menu, you can click Format -> Rename Column and type the new desired name. |
|
|
|
|
|

|
The Name of a Table |
|
|
|
Like everything that is part of a database, a table must
have a name that can be used to refer to the object throughout the database
in other files that can be linked to the table. Fortunately, when you perform
data entry, information you type into a table is saved immediately, as soon
as you move to another cell. There are two main ways you can specify the name
of a table, either when you save it for the first time or if you decide to
rename it. |
|
|
Unlike the previous version of this site, we will not use the
convention of prefixing the name of a database object with a three letters.
For example, the names of tables will not start with tbl. We came to this
decision because most other database environments, including Microsoft SQL
Server, do not suggest this rule. Although the lack of this rule may create
some confusion, because you will end up having a table and a form with the
same name, we will strive to explicitly state what object type we are
referring to. For example, we will avoid writing, “Open Employees” or “Open
the Employees object”. Instead, we will usually state, “Open the Employees
table”. This should clearly indicate that you must first click the Tables
button in the Database Window because the tables are only in the Tables
section, and then open the indicated table. In the same way, if we write,
“Open the Employees form”, you must first click the Forms button in Database
Window, then open the indicated form. |
|
|
|
|
|
4b.
|
Table Creation in Datasheet View |
|
|
|
|
Once a table displays in Datasheet View, you can simply start entering data into its cells but because the columns would have insignificant names, you should make sure they display names that can identify their type of information. A field can have almost any name: "Book Title", "This Is The Book Title", "My Book Titles", etc. Some of your fields will have only tinny data, like a person's age, the number of books in an office, a person’s middle initial, etc, it might not be a good idea to give them a name that would take too much space. In the future, when you start programming, it would be easier to handle field names that are composed of only one word, without an empty space.
(or the language you are using to design your database) name starts in the field name, by using a starting uppercase. Instead of firstname, you can use FirstName. Instead of fullname, you can use FullName. Instead of firstdayofmonth, you can use FirstDayOfMonth. To change the name of a field, you can click its column header, such as Field1. You can also right-click a column and click Rename Column. Alternatively, when any cell under a column has focus, on the main menu, you can click Format -> Rename Column and type the new desired name.
|
|
|
The Name of a Table |
|
|
|
Like everything that is part of a database, a table must
have a name that can be used to refer to the object throughout the database
in other files that can be linked to the table. Fortunately, when you perform
data entry, information you type into a table is saved immediately, as soon
as you move to another cell. There are two main ways you can specify the name
of a table, either when you save it for the first time or if you decide to
rename it. |
|
|
Unlike the previous version of this site, we will not use the
convention of prefixing the name of a database object with a three letters.
For example, the names of tables will not start with tbl. We came to this
decision because most other database environments, including Microsoft SQL
Server, do not suggest this rule. Although the lack of this rule may create
some confusion, because you will end up having a table and a form with the
same name, we will strive to explicitly state what object type we are
referring to. For example, we will avoid writing, “Open Employees” or “Open
the Employees object”. Instead, we will usually state, “Open the Employees
table”. This should clearly indicate that you must first click the Tables
button in the Database Window because the tables are only in the Tables
section, and then open the indicated table. In the same way, if we write,
“Open the Employees form”, you must first click the Forms button in Database
Window, then open the indicated form. |
|
|
|
|
|
4c.
|
Column and Row Maintenance in Datasheet View |
|
|
|
|
|
|

|
Column Selection |
|
|
|
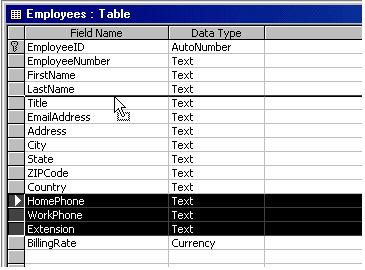
Many times during design or once users have started using your database, you will find that a sequence of fields is not appropriate. In order to move fields, you should know how to select them:
|
|
|
|
|
|
|
Column Deletion |
|
|
|
After creating a column, if you find out that you do not need it anymore, you can delete it. |
|
|
If you had created a relationship that the column is involved
in, you cannot delete it until you “break” or delete the relationship first. |
|
To get rid of a column you do not need anymore, you can right-click it and click Delete Column. |
|
|
|
|
|
|
Column Moving |
|
|
|
If you find out during design, data entry, or database maintenance that a particular field is misplaced, you will likely want to move it for better navigation or to ease data entry. To move a column or group of columns in Datasheet View, first select that column or those columns. Click and hold your mouse on it (or one of them). Then, start dragging left or right in the desired direction. While your mouse is moving, a thick vertical line will guide you. Once the vertical line is positioned to the desired location, release the mouse. |
|
|
|
|
|
|
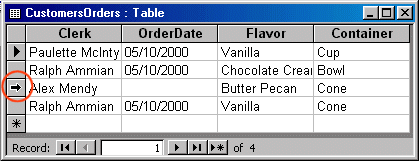
Record Selection |
|
|
|
To select a row or record in Datasheet View, click the desired row header and release your mouse. To select more than one record, click and hold your mouse on one of them, then drag to cover the other desired row or rows. When all desired rows are highlighted, release the mouse. Another technique used to select more than one row consists of clicking one row that will be at one end, press and hold Shift, and then click the row that will be at the other end. |
|
|
|
|
|
|
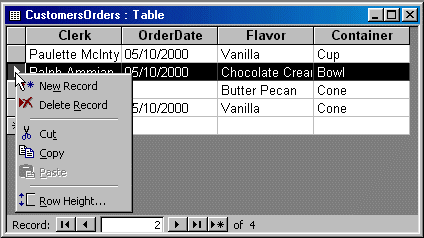
Record Deletion |
|
|
|
If a record is not needed anymore or has become irrelevant in a database, you can delete it. To do this, right-click the record selector button, which is the gray box, on the left side of the most left field of the record, and click Delete Record from the context menu. |
|
|
|
|
|
|
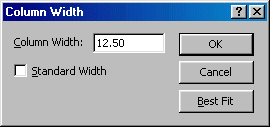
Columns Width and Rows Height |
|
|
|
The columns and rows of a table use some default values to display their records and fields. When data exceeds the regular width of a column, part of the information would be hidden. If a particular column contains data that you want to display at all times, you can enlarge the column. On the other hand, if a column displays short pieces of information, such as one character for middle initial or two characters (US states or Canadian provinces), you can narrow the column to let it just fit the data as desired. In the same way, you can heighten or shrink rows of a table as you see fit. |
|

|
There are various techniques you can follow to widen or narrow a column. You can position the mouse on the right border of the column header. The mouse pointer would change into a horizontal double arrow crossed by a vertical beam. If you double-click, the column would be sized to the widest value of the column, provided the widest value is wider than the column header. If the widest value is narrower than the column header, the column width would be wide enough to display the caption of the column. On the other hand, you can change a column's width by clicking on the column's right border and dragging in the desired direction. To set or change the rows height, you can position the mouse on one of the rows lower border, then click and drag in the opposite direction. |
|
|
|
|
|


|
MOUS Topics |
|
|
|
S8 |
Create a database (... in-design view) |
|
S11 |
Modify field properties |
|
S25 |
Delete records from a table |
|
Exercises |
|
|
|
Yugo National Bank |
|
|
|
|
Watts A loan |
|
|
|
5.
|
Managing Data Fields |
|
|
|
|
|
|

|
The Table in Design view |
|
|
|
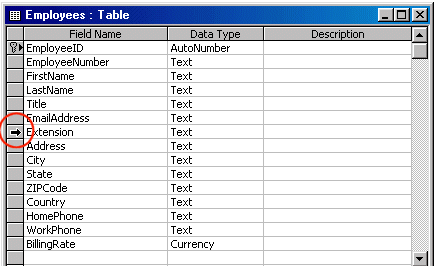
The title bar of a table in Design View presents the table’s icon on the left section. Like most other windows, the table's icon holds the table's system menu. This system icon can also be double-clicked to close the table. The long empty section of the title bar is different from a classic window. Instead of being used to maximize, minimize, move, or close the table, it provides features adapted for the database object it is. For example, at a minimum, it can be used to switch views. To use its function, you can right-click it. This would present a menu you can select from:
The right section of the title bar presents the system buttons of a regular window. They can be used to minimize, maximize, restore, or close the table. On the left side of the view, the row headers allow you to select a row completely. The most left gray button allows you to select everything on the table while in Design View:
The File Name column is used to type a name for each field. The rules we used when in Datasheet View apply here. A field can have any name but keep a name with one word and no space. |

|
|
|
|
|

|
Field Renaming |
|
|
|
One of the jobs involved with database design and maintenance is to review fields and make sure they are explicit enough for the user. There are three issues related to a field's name. Some fields, as you will find out, are involved in relationships, and you will have to be careful when deciding to change their name. The other issues are related to a field's actual name and its caption. |
|

|
A field's name is mainly made of two parts from the developer's standpoint: the actual name and the caption. A field's name is stored as part of the table and is involved with any business dealing the table has to cope with. The caption simply guides the user in identifying the use of a particular field. These two items are not strictly related. For example, you could have a field whose name is SocSecNbr while its caption displays Nat Number From Gvt and this will not affect the functionality of the table. Overall, as a developer, you should pay attention to your fields names because these are the names you will refer to when performing calculations and other programming issues. To rename a field in Datasheet View, use any of the techniques we learned to change a field's name. After you have typed the name, the new name will replace the old one. To rename a field in Design View, click it and type the new name. |
|
|
|
|
|
|
Field Selection in Table Design View |
|
|
|
In the Design View of a table, there are various types of operations you can perform for database maintenance. Operations include naming or renaming fields, moving or deleting fields, and changing various other properties. In order to perform some of the operations on a field or a group of fields, you must first select one.
|
|
Column Moving in Table Design View |
|
|
|
The columns of a table are displayed in the sequence in which they were created. We learned earlier how to change this sequence in Datasheet View. You can also change the sequence of fields in the Design View of a table.
|
|
|
|
|
|
|
Field Insertion |
|
|
|
When it comes to tables, the best place to add new fields is in Design View because this view provides more flexibility. In Design View, you can insert a new field at any position. You can also add a new field to the end of the table, a feature that is not available in Datasheet View. You can also use one of the same fields as we saw when using the Table Wizard:
|
|

|
|
|
|
|
|
Field Deletion |
|
|
|
When in Design View, you can delete a field you don't need anymore or if it was added by mistake. To delete a column, you can right-click anywhere on its line (on the Field Name, the Data Type, or the Description columns) and click Delete Rows. When a column has focus, you can also click the Delete Rows button on the Table Design toolbar to delete it. |
|
|
|
|
|
5b.
|
Queries and Fields |
|
|
|
|
|
|

|
Query Design |
|
|
|
The Select Query window presents another classic window. Its title bar displays its system button on the left section. This can be used to minimize, maximize, restore, move, resize, or close the window. Like all Microsoft Access window objects, the title bar displays a special menu when right-clicked:
The right section of the title bar displays the classic
system buttons of a regular window. |
|
|
|
Column Insertion |
|
|
|
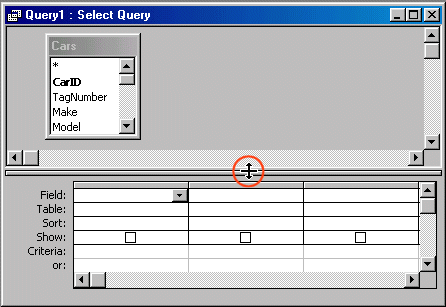
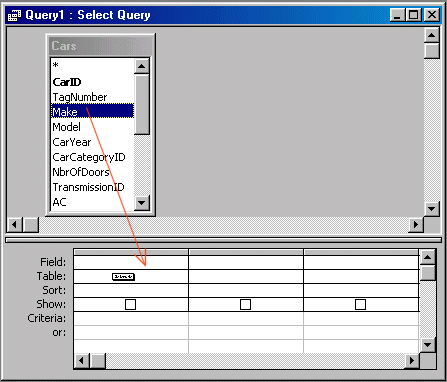
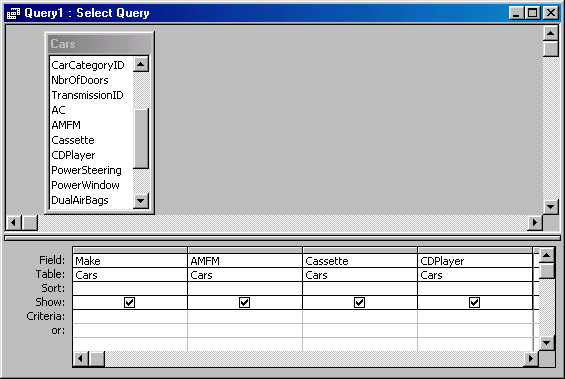
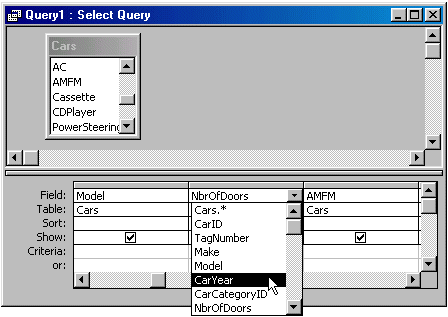
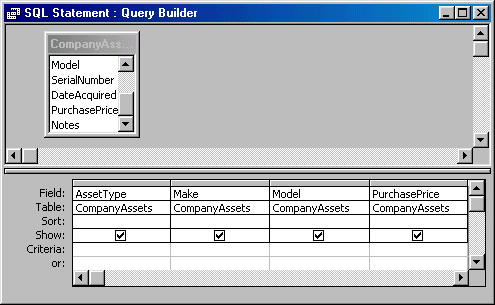
To create the fields for a query, you use the table, query, tables, or queries displayed in the upper section of the window. Once you have decided on the originating object or objects, you can select which fields are relevant for your query:
Once you have made your selection on the list, you can drag it and drop it on the query. Instead of dragging a field or all fields, you can either double-click a field to add it to the query, or double-click the * line to add all fields to the query. |
|
|
|
|
|

|
Column Selection |
|
|
|
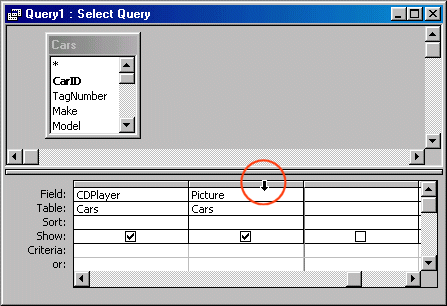
Sometimes, the idea of using a query is to test data or verify a condition. Therefore, a query, as compared to a table, could provide just a temporary means of studying information on your database. When performing such assignments or when testing values before isolating an appropriate list, you can add, insert, delete, replace or move fields at will. We have already covered different techniques of adding or inserting fields:
|
|
|
Column Replacement and Deletion on a Query |
|
|
|
As seen above, a query is built by selecting columns from the originating list and adding them. If you do not need a column anymore on a query, which happens regularly during data analysis, you can either delete it or replace it with another column:
|
|
Column Moving |
|
|
|
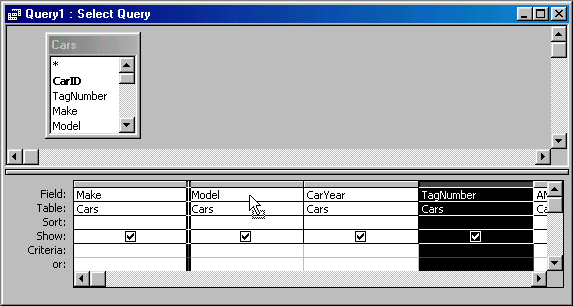
Columns on a query are positioned incrementally as they are added to its list. If you don't like the arrangement, you can move them and apply any sequence of your choice. Before moving a column or a group of columns, you must first select it, then:
|
|
|
|
|
|
|
MOUS Topics |
|
|
|
S2 |
Create Table Structure |
|
S11 |
Modify field properties |
|
S13 |
Modify tables using Design View |
|
Exercises |
|
|
|
Yugo National Bank |
|
|
3.
Close the table |
|
Watts A Loan |
|
|
5.
Save and close the table |
6.
|
Database Fields on Forms and Reports |
|
|
|
|
|
|
|
Navigation Buttons |
|
|
|
Forms and reports are equipped with the same navigation buttons used on tables (and queries). This time, they are used to navigate left and right to the previous or the next records instead of up and down. Object Role |
|
|
|
|
|
|
|
|

|
Forms Fields |
|
|
|
Introduction |
|
|
|
Microsoft Access is an MDI application. This means that it allows you to open many objects, such as different forms and/or reports at the same time. This lets you switch from one window to another to perform data entry on related objects. A form, by design, provides a friendlier interface and should make its navigation easy for the user. To provide this functionality, a form can be equipped with various types of Windows controls. Some of the objects are used only to display information to the user. Some others allow the user to change data. |

|
Subform |
|
|
|
A subform is a form that is “glued” or embedded in another form. It is used to display related data that would otherwise be accessible from another form. |
|
Record Selector |
|
|
|
A form is equipped with a special area that allows selecting the currently displaying record. The Record Selector is on the left side immediate to the left border of the form. The Record Selector is not available on all forms. The database developer decides on its availability or not. |
|
|
|
|
|
|
Reports and Controls |
|
|
|
Introduction |
|
|
|
Like a form, a report uses the same label, text box, combo box, and list box controls. As mentioned already, the appearance of the controls may not be printed as we will see when studying properties of controls, the background and borders of controls can be changed for aesthetic reasons. Such background and borders would be printed. |
|
Subreport |
|
|
|
A subreport is a report added to a parent report in a master-detail layout. It allows the user to view data from different tables but that is related to create a more realistic report. Although playing the same roles, subforms and subreports are not created the exact same way. |
|
|
|
|
|
6b.
|
Database Fields on Forms and Reports |
|
|
|
|
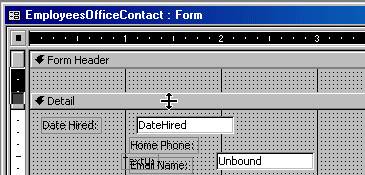
Forms provide a friendlier look for data entry to the main user of the database. As such, you will spend a great deal of time designing their look, tuning their functionality, and checking their efficiency. Even when creating a product from the Database Wizard, you will usually realize that various objects are lacking critical fields for the role of the object, or the database itself, as software, needs a few more objects. As we have learned already, the quickest way to create forms and reports is by using the Database Wizard. Even if you create your database from scratch, you still can use the AutoForm or AutoReport to get very easily rendered and readily available objects. As it happens, the Database Wizard was configured to create only a limited number of objects. If you need additional objects, you can create your own. If you want to control everything or almost everything on the forms and reports, you will have to get into design. To add fields to a form or a report, you must display the object in Design View. This gives you access to the Controls toolbox, which hosts some of the Windows controls used on forms and reports.
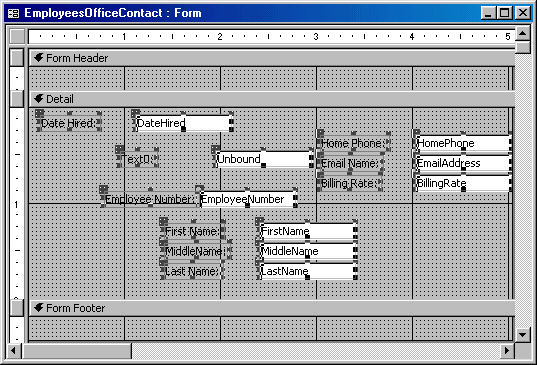
Data on fields of forms and reports fall in three main categories: fields that directly originate from a table or a query, fields created as a combination of existing fields, and fields independent of any other fields. The techniques used to create these fields are different but a field created using one technique can be changed into another category as necessary. If you want to use a field that is already part of a table or a query, before, or when, creating the form or report, you must specify the list that holds the fields. There are three main ways you can do this:
To add a field to a form or a report, you can either click a control from the Toolbox and click the form or report, or drag a field from the Field List to the form or report. |
|
|
Introduction to Form Design |
|
|
|
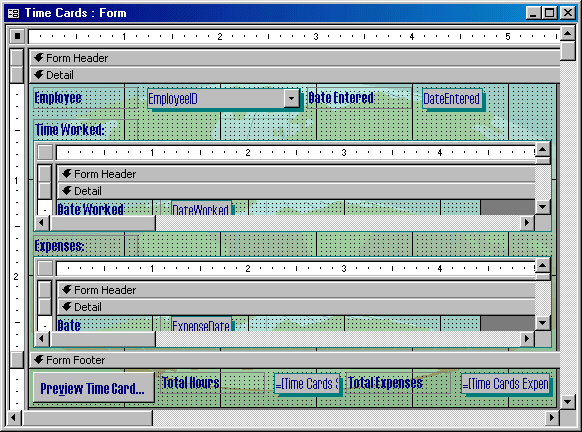
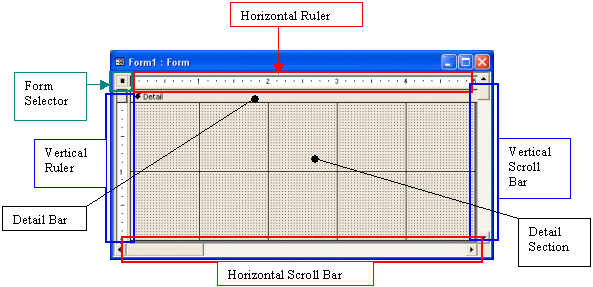
When it comes up, a form is presented as a rectangular box made of a form selection button, two rulers, two scroll bars, a horizontal bar labeled Detail, and a gray area: |
|
|
|
By default, a form presents a section referred to as the
Detail section. This section starts from the Detail bar to the lower end of
the section.
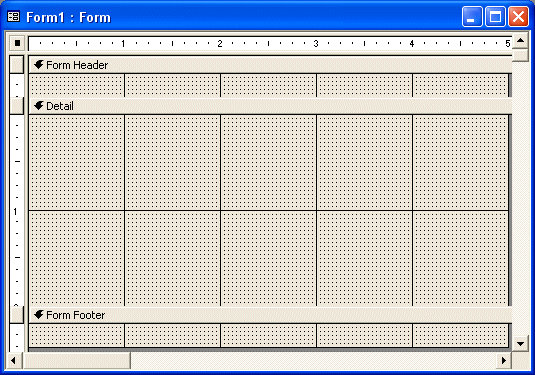
If you click Form Header/Footer after right-clicking the form, two new sections will be added to the form: the Form Header section on top and the Form Footer section at the bottom:
Although two sections are added, you can reduce one
completely so it would not appear to the user. Therefore, you can keep one
section and hide the other. If you create a form using the Form Wizard, both
the header and the footer sections are added but they are completely reduced
so they would not appear to the user. If you want to display them to the
user, you must expand them.
|
|
|
|
|
|
|
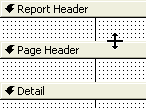
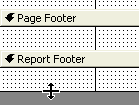
Introduction to Report Design |
|
|
|
By its structure, a report resembles a piece of paper that you can use to prepare printable information to the user. Like a form, a report is made of a Selector button, two rulers, two scroll bars, and a Detail section. Unlike a form, by default, a report presents a Page Header and a Page Footer sections: |
|
|

|
As you can see, a report appears with three default sections. Like a form, you can add another section on top and another at the bottom of the report. To do this, you can right-click the body of the report and click Report Header/Footer. You can also click View -> Report Header/Footer on the main menu. Additionally, unlike a form, you can create as many sections on a report as you see fit. This is referred to as grouping fields. As mentioned for the form, you can add any control in any section of the report but, unlike a form, it is very important how you use the sections of a report as they have greater influence on the printed product. For this reason, each section can be configured for a specific task. If you are creating a regular report that displays one record per page, you may not need a Report Header and a Report Footer sections. If you are creating a brochure or a document that appears as a catalogue or a book, you may need a Report Header and a Report Footer sections. The sections would appear as follows:
|
|
|
|
|
|
|
MOUS Topics |
|
|
|
S22 |
Switch between object views |
|
S17 |
Use the Control Toolbox to add controls |
|
Exercises |
|
|
|
Yugo National Bank |
|
|
|
|
|
|
|
7.
|
Data Field Design |
|
|
|
|
|
|

|
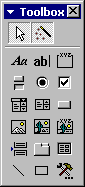
The Toolbox |
The Toolbox presents a list of some of the most common window
controls, Some of these controls can be associated with fields of your Field
List; some others can be configured to relate to another existing control on
the form. Yet, another control can behave independently of anything else that
is on the form. To display
the Toolbox, on the Form Design toolbar, click the Toolbox button |
|
|
|
The Properties
Window |
|
|
|
Made of five property pages, this Properties window displays the characteristics associated with the object or the control that is selected on the form. To get the Properties window of the properties associated with a control, right-click that control and click Properties. To display the Properties window for the form, double-click
the button that is at the intersection of both rulers |
|
Forms, Reports, and Data Existing Fields |
|
|
|
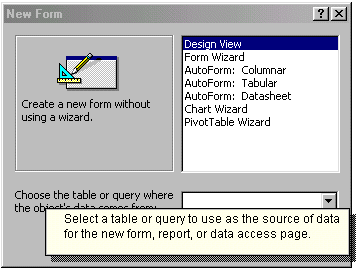
As mentioned already, on forms and reports, you can create fields that do not exist on tables or queries, as we have done so far in this lesson. Alternatively, when in the New Form or the New Report dialog box, you can select the object that holds the list of fields in the combo box.
If you had started the design of a form or report already, you can display its Properties window and select an object in the Record Source combo box |
|
|
|
|
|
|
|
|
Data Field Design |
|
|
|
|
If you want to use just a few fields from a table or an existing query, you can set it as the source of a form or report. Otherwise, you can create a new list of fields that are retrieved from a table or an existing query. To do this, you must build a query. To build a new query that would serve as the source of a
form or report, when in Design View, display the Properties window for the
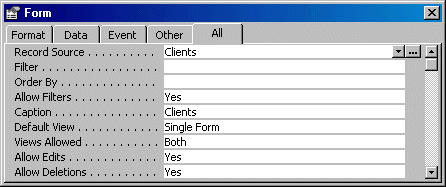
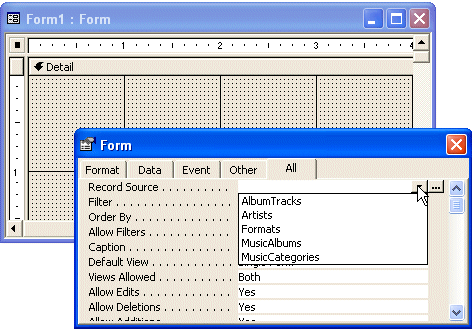
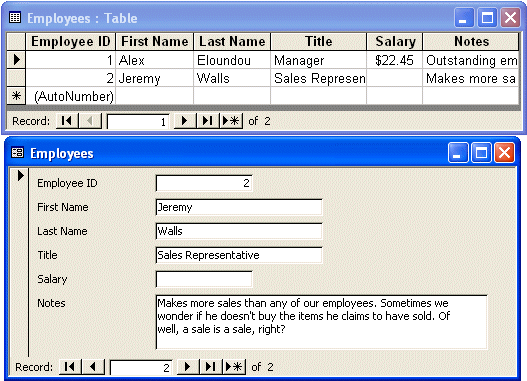
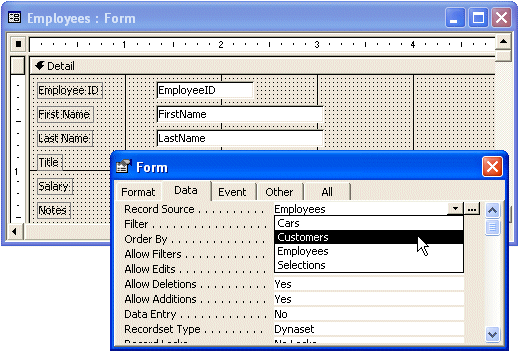
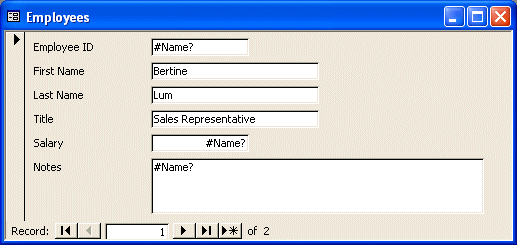
form or report and click the ellipsis button If the form or report had already been created with fields that do not exist on the list, these fields on the form or report would become “orphans”. For example, suppose you create a form or report based on a Record Source such as Employees:
Because you can, suppose you don't want to start the design of a new form but instead decide to change the Record Source of the form to something else like Customers:
Consequently, the fields that were created from the Employees set of records but that don't exist on Customers would have lost their "ties". When such a form or report displays, the "orphaned" controls would display #Name? error:
For such controls, you can then either delete them or change their own data source. |
|
|
|
|
|
|
|
Form and Report Design: Controls Insertion |
|
|
|
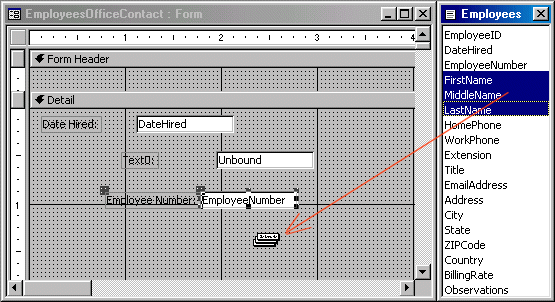
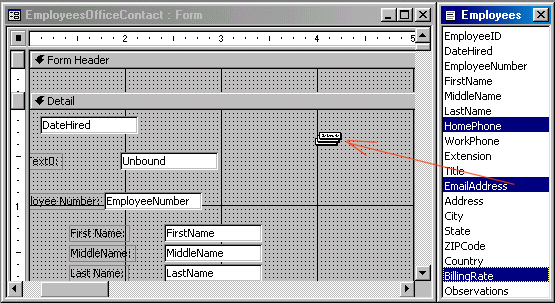
When designing a form or a report, one of the most usual actions you will perform consists of inserting items from the Field List to the form or the report. To add a field, you can drag it from the list to the desired section on the form or report. To drag many fields at the same time, first select them. To select all items at the same time on the Field List, you can:
To select fields at random, press and hold Ctrl, then click
each one of the desired fields. If you had selected an item but want to
remove it from the selection. While still holding Ctrl, you can click the
undesired item. |
|

|
|
|
|
|
|
|
|
In the following exercises, there is a 100% guaranty that the
fields on our form do not display as those on your form. Therefore, the
screenshots are provided only as a guide: they are not showing how your form
should or must appear. When we would like you to have the same type of design,
we will let you know and we will show you. Based on this, follow only the
instructions and don't make any other attempt to change the way your form
appears. Don't make it look like ours We have a pretty good idea of what your
form looks like. And, if it helps, at least for this exercise: Trust Us. |
|

|
Rulers and Dimensions |
|
|
|
Since the rulers are dimensionally configured, there are divisions inside of the rulers to help you be more precise. Between two numbered dimensions, there are 7 marks that create 8 divisions. The mark in the middle, a little taller than the others, represents the middle of two dimensions. In this site, the middle division will be referred to as ½. The first division on the right side of a number represents 1/8 of a dimension, the 2nd represents 2/8 = ¼ of a dimension, the 3rd represents 3/8, and that is why the 4th represents 4/8 = ½. This is how we will refer to these dimensions. |
|

7c.
|
Data Field Design |
|
|
|
|
To manipulate controls on the form, you will regularly need
to select them. When one control is selected, you can change only its
characteristics. When many controls are selected, you can make a change that
would impact all of them.
To select more than one control, at random, click one, then
press and hold Shift. While holding Shift, click each of the desired
controls. After selecting the controls, release Shift.
|
|

|
Controls Moving |
|
|
|
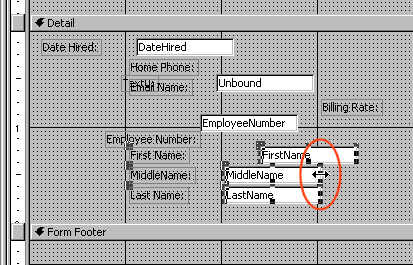
Once a control is selected, as your mouse moves over a selected control, its pointer displays a different cursor. Two of these cursors can be used to move a control:
|
|
|
|
|
|
|
Controls and Sections Sizing |
|
|
|
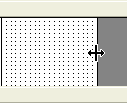
Resizing an object allows you to change its height or its width. This can be applied to forms, reports, their sections, or the controls they are hosting. To physically change the width of a form or a report, position the mouse on its right border until the cursor turns into a vertical beam with a double-horizontal arrow:
Then click and drag left or right until you are satisfied.
To change the width of the form or report and the height of the lowest section at the same time, you can position the mouse on the lower-right corner. The cursor would change into a small square with 4 arrows:
You can then click and drag left, right, up, down, or
diagonally.
Although these pointers can be used to resize one control, they can also be applied to a group of controls. |

|
|
|
|
|
|
Controls Deletion |
|
|
|
If you have added a control or it was created by the Form
Wizard or the Report Wizard, you can delete it. You can also delete a group
of controls in one step. |
|
|
|
|
|
|||||
|
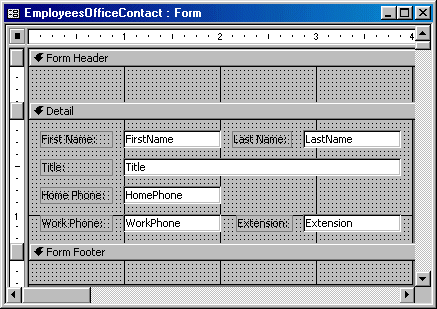
Tab Ordering |
|
|
|
The controls on a form are aligned in the order you desire for their sequence. Unfortunately, when you add a control on the form that already has other controls, regardless of the section or area you place the new control, it is sequentially positioned at the end of the existing controls. If you don't fix it, the data entry personnel could have a hard time figuring out how the sequence should be followed. When writing Visual Basic code, you will also find out that the sequence of navigation of controls on a form is very important. The sequence of controls navigation is set using the Tab Order dialog box. The Tab Order dialog box is available when the form is opened in Design View. Once in Design View, either (1) on the menu bar, click View -> Tab Order; or (2) right-click on the form and click Tab Order. The simplest and quickest way to rearrange the order of items is to click the Auto Order button. Sometimes, you will not like the arrangement made by the Tab Order dialog box. To rearrange items manually, move a row or a group of rows using the same technique we used to move field names on a table's Design View. |
|
|
|
|
|
|
Opening an "Un-Openable" Form |
|
|
|
Some of the forms created by the Database Wizard were
programmed not to be opened from the Database Window, for good reasons. To
explain why, here is an example. |
|
|
|
|
|
|
MOUS Topics |
|
|
|
S22 |
Switch between object views |
|
Exercises |
|
|
|
Yugo National Bank |
|
|
2.
Save and close the form
4.
|
8.
|
Properties of Database Fields |
|
|
|
|
|
|
|
|
|
|
|
8b.
|
Properties of Database Fields |
|
|
|
|
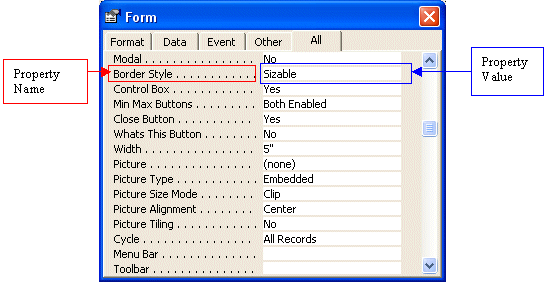
Properties are set by changing their values and there are various types of properties. A property is made of two parts: its name and its value:
The name of a property displays on the left gray section.
Although you can click it to select it, you cannot change it. The property
name can be made of one word such as Width. It can also be made of a
combination of words, such as Border Style. On this site, a property
will be called by what displays on that left gray section. This means that,
if a property displays "Height", we will call it "The Height
Property". If it displays "Whats This Button", we will call it
"The Whats This Button Property".
already display a value while some others are empty. To set
or change such a string, if it is already displaying something, it depends on
whether you want to replace the property value or edit it.
of Yes/No, True/False, or On/Off. To change the value of the field, you can first click the property name to reveal its combo box. Then click the arrow of the combo box and select the other value. You can also double-click the property name or its value. This would toggle with the opposite value. With experience, you can also type the first letter of the value, such as y or n and Microsoft Access would complete with the corresponding value.
|
|
|
|
|
|
|
|
Enumerated Properties |
|
|
|
|
A set is a list of words that composes the possible values of a
property. The list, which is static, which means it cannot be
changed, comes as a combo box |
|
where the user (in this case the user is the database developer) can select one item from. To access the value of such a property, you can click the property name to reveal its combo box. To change the property value, click the arrow of the combo box and select the desired value from the list. You can also double-click either the property name or the property value. This would display the next value in the list. You can keep double-clicking until the desired value comes up. If you know the values in the list (from experience), you can type the first letter of the desired value and Microsoft Access would complete it with the corresponding value. If you try typing a value that is not in the list, you would receive an error. |
|
|
|
|
|
|
Numeric Properties |
|
|
|
|
Some properties, like the string fields, expect you to provide a
value. In this case the value must be numeric. There are two types of numbers
you will be asked to provide, depending on the property. |
|
An integer is a natural number that does not take a decimal
portion. Such a number can be made of digits only. For such a field, make
sure you provide an integer of appropriate range, as you will possibly be
directed to do. The other type of number will be decimal. |
|
|
|
|
|
|
Expressions Properties |
|
|
|
|
Some properties display a value that is a more elaborate string.
If you know what value the property should display, namely an
expression, |
|
you can just type it. Otherwise, Microsoft Access provides intermediary steps that you can follow to create or build the value. We will see examples of those when we study expressions and queries. |
|
|
|
|
|
8c.
|
Properties of Database Fields |
|
|
|
|
We have seen so far that, in order to use anything in your
database, you must first create it, but the process of creating something
depends on its type. For example, tables are created in Datasheet View or
designed in Design View. Queries are created by adding fields from existing
tables or other queries. Forms and reports are created by adding existing
fields or adding independent fields to them. Fields are created and added to
these objects. When you start a brand new table in Datasheet View, Microsoft Access assigns various names to its fields (or columns). These are Field1, Field2, etc. We saw how to change these fields. If you start a brand new table in Design View, you must specify a Field Name for each column that will be used. When you create a simple query, as you select fields from a
table or query and add them to the new query, they keep their names and, in
this case, the names are held in the originating object (the original table
or query). You can still create new fields by combining existing fields from
the original table or query. When you create such a new field, you must give
it a name. To create a new field in a query, you can select an empty column
and, in the field box, assign an expression to it. After doing this, the
query would provide a suggested name like Expr1. You can then change the name
to something else than Expr1.
|
|
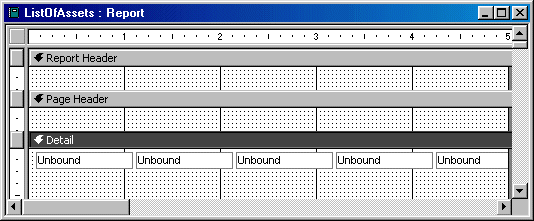
|
Record and Control Source |
|
|
|
We had previously mentioned that there are fields created
from tables and used on the objects, and that these objects also use fields
that either existed already or fields that are independent of any other. When
adding or creating a field on a form or report, if data for that field
originates from a previously created column on a table, the field is said to
be “bound” because its data is bound to an existing field. If a field is
either created as an expression that combines other fields or if the field
doesn't depend on any existing field, the field is said to be unbound. |
|
|
|
|
|
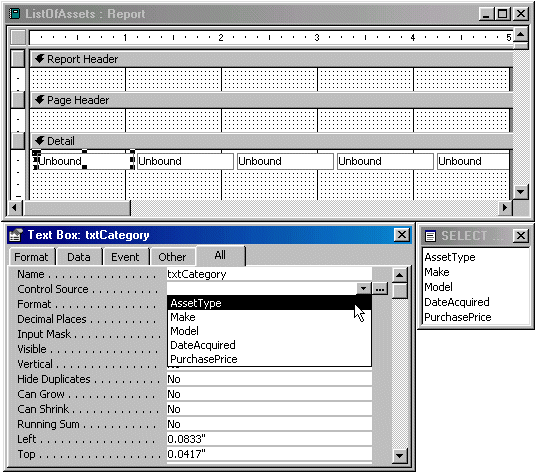
|
Visibility |
|
|
|
After adding a field to a form or report, it becomes visible and can be used. An object is referred to as visible if it can visually be located on the screen. A user can use an object only if he can see it. Most of the time, you will not be concerned with this aspect. On the other hand, there are situations that will lead you to create a control but hide it from the user. For example, since you cannot declare a (VBA) variable in Microsoft Access, you can instead create a control such as a text box, make it hold a value that you can use in an expression but hide it from the user who would never need to use such an object. |
|
Availability |
|
|
|
In order to use a control on a form or a report, the object
that is hosting the control must allow it. For example, the user cannot type
text or change the value of a combo box if this action was not made possible.
This aspect is controlled in two different ways. |
|
|
|
|
|
|
Field Locking |
|
|
|
During data entry, a user usually clicks a field to give it
focus and starts typing. As we will learn, some fields get an automatic
number set and controlled by Microsoft Access. Some other fields use data
created from an expression. These types of fields do not support data entry
and their content cannot be changed directly by the user. In some other
circumstances, you will create fields but would not like the user to be able
to change their value. For this reason, you can lock such a field. |
|
|
|
|
|
|
Tool tip |
|
|
|
A tool tip is a small yellow border-less box that appears
when the mouse is positioned on top of a control for a few seconds. It is a
fast means of providing help to the user. Because only the form displays
controls in a manner suitable for them, a field can display a tool tip only
on a form. |
|
|
|
|
|

|
Status Bar Text |
|
|
|
When a field receives focus, you can display a sentence on
the status bar to provide some guidance or suggestion to the user. The text
that displays on the status bar should be explicit enough but not too long.
When creating it, make sure it can fit in the left section of the status bar,
which should be long enough to explain anything. |
|
|
|
|
|

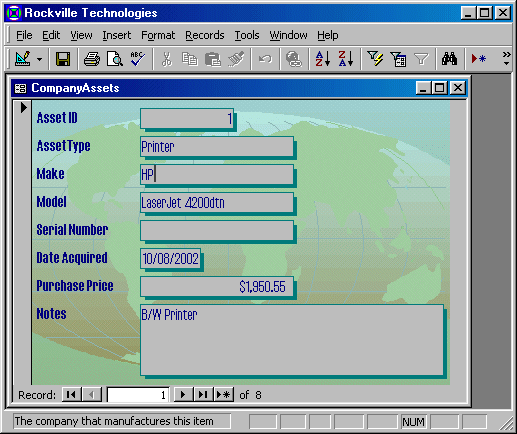
|
Database Objects Captions |
|
|
|
A caption is text that guides the user to identify a window
or another object. As it is the most important property of a label, it may
appear as a significant guide to the user. For a table, a query, a form, or a
report, the caption is text that displays on the title bar. For a label, the
caption is text the user can read on the control. After creating an object
such as a table, a query, a form, or a report, Microsoft Access uses its name
as its caption.
The caption of a query depends on the type of query. If you create the types of queries we have used so far, which consisted of selecting fields, these are called Select Queries. The title bar of such a query would use the same technique as the table but the category of object would be Select Query:
If you create a form using the Form Wizard or if you create a report using the Report Wizard, Microsoft Access would use the name you provided as its caption. If you design a brand new form or report by adding fields to it, it would have a caption as Form1 or Report1 followed by the object category as the Form or the Report. To display its caption, Microsoft Access would use the same convention as seen above:
If you create a report or a form using a wizard, after you have saved the object, its name would be used as its caption:
|
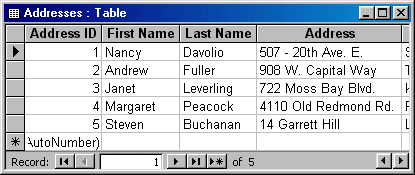
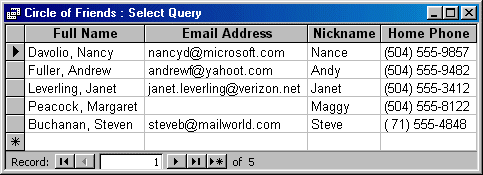
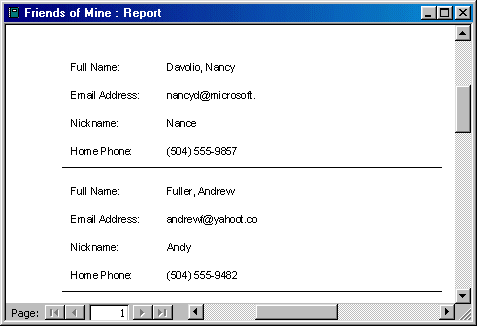
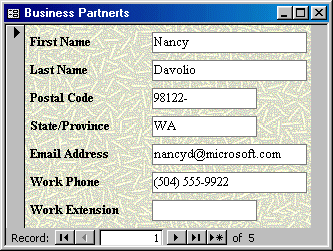
|
Controls Captions |
|
|
|
So far, we have used two techniques to create fields on a
table: using the Datasheet View or using the Design View. In Datasheet View,
the name you give to a column also becomes its caption. This is one of the
limitations of the Datasheet View. Most programming or development
environments, including Microsoft Access, separate the name of a field from
its caption. The name is used by you and the operating system to identify an
object. The caption is most used to guide the user. To help with this, the
Design View of a table allows you to make a distinction on these two aspects
of a field.
The caption would display as follows:
Although this works, you should set a (short) caption that
indicates what the field is used for. For this example, an appropriate
caption could be Empl # or Employee # or Empl. Nbr.
When you run the query, it would display the caption you had set:
To set or change the caption of a form, a report, or a
label, access its Properties window. Then, click the Caption field and edit
or replace it as necessary. If you delete the Caption of a form or a report,
Microsoft Access would use the ObjectName: Category formula to
create its caption. |
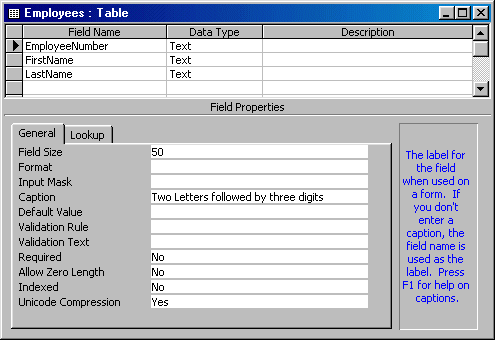
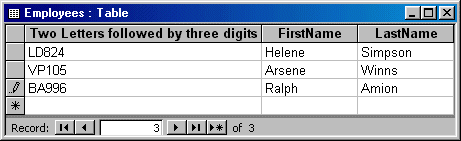
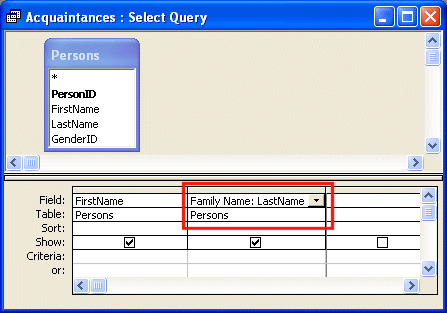

|
|
|
|
|
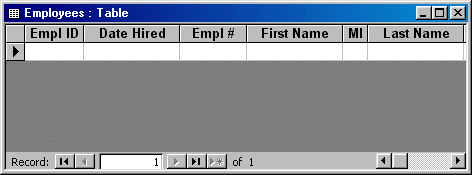
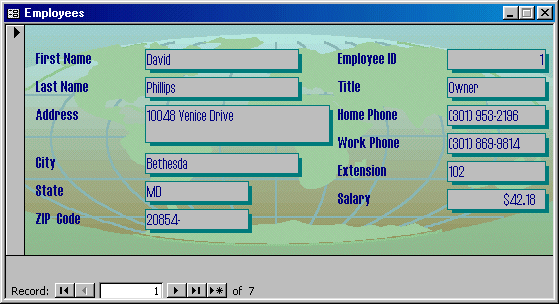
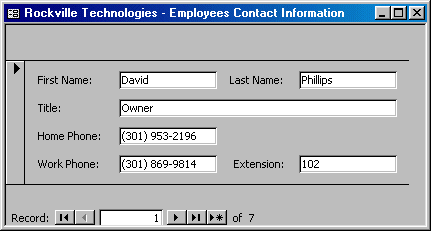
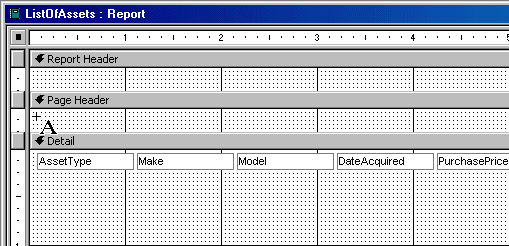
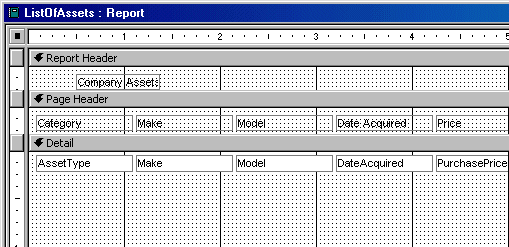
|
Text Alignment |
|
|
|
Most fields or controls of a database display text. This includes labels, text boxes, and combo boxes, etc. To enhance the appearance of the fields or controls, you can specify the alignment of text of a control. This property has three values: left, center, or right. By default, the alignment of text-based fields, including any caption on a label, is set to the left (following US English). The alignment of fields that display numbers or dates is set to the right. If you don't like these suggestions or for any other reason, you can change the text alignment of a field or control. There are various ways you can change text alignment. After
selecting it and while in Design View, the Formatting toolbar provides the Align
Left |
|
|
|
|
|
|
Font |
|
|
|
A font is an art effect made of designed symbols used to
represent letters and other characters on a field, a control or a label. A
font is designed by an artist but usually follows a specific pattern. For
example a font designed to produce symbols readable in the US English
language must be designed by a set of predetermined and agreed upon symbols.
These symbols are grouped in an entity called the English alphabet. When
designing such a font, the symbols created must conform to that language.
Because a font is primarily an art, one font can be significantly different
from another and a font is not necessarily a series of readable symbols. The names of fonts installed on your computer can be seen in the Fonts window accessible from Control Panel. Here is an example (from a Windows 98 installation): |
|
|
|
By default, Microsoft Access uses a font called Arial to display columns and fields on tables, queries, and reports. The default font used on forms is called Tahoma. If you want to use a different font to display text on labels and fields of your database, you can changes these defaults. To set or apply a font on a label or a field, after selecting it in Design View, you can use the Formatting toolbar which is equipped with the Font combo box. You can click its arrow and select a font from the list. Alternatively, to change a font, access the Font Name property of a label or a field in the Properties window, click the arrow of the property’s combo box and select from the list. When changing the default font, in other words, if you decide to change the default font, you should use only the most popular fonts that are more likely to be found on your user’s computers. To set or apply a font on a group of labels and/or fields, select the group and either use the Formatting toolbar or, from the Properties window, click the Font Name combo box and select from the list. Besides its name, a font is also known for its size. The size defines how much height and proportional width would be used to represent the characters of the selected font. To change or set the size of the font used to display the characters of a label or a field, after clicking it or selecting the group of controls, on the Formatting toolbar, you can click the arrow of the Font Size combo box and select a size from the list. You can also click the label or field, access its Properties window and select a size from the Font Size combo box. In both cases, if you want a size that is not in the list of the Font Size combo box, you can simply type the desired natural number and press Enter or Tab. As done for the font names, you can also select a group of labels and/or fields and apply the same size to them. A font is also characterized by its style. The style controls how the font displays, in normal, bold, italicized, underlined, some of these characteristics or all of them. Here are examples of these characteristics:
To change or set the font style of a label or a field,
after selecting it and while in Design View, on the Formatting toolbar, click
the Bold |
|
|
|
|
|
|
Fore Color |
|
|
|
The color is a non-spatial characteristic applied on a
Windows control or a field to define its visual density of darkness or
clarity. This density itself is a numeric value created by combining three
numbers that each ranges from 0 to 255 included. The first number is also
referred to as red. The second is referred to as green. The third is referred
to as blue. A combination of red, green, and blue creates a color. Since each
number has 256 values, if you multiply them as 256 * 256 * 256, you get
16777216. This means that various combinations of red, green, and blue
produce more than 16 million possible colors.
After clicking a color, it becomes selected on top of the button. The next time, if you need the same color, you can just click the Font/Fore Color button and the already selected color would be applied. If, during design, you will keep changing colors, you can permanently display the Font/Fore Color as a window on your screen. To do this, click the arrow of the Font/Fore Color button and drag its short title bar:
This would create a window based on it. |
|
Black |
Brown |
Olive Green |
Dark Green |
Dark Teal |
Dark Blue |
Indigo |
Gray- 80% |
|
Dark Red |
Orange |
Dark Yellow |
Green |
Teal |
Blue |
Blue-Gray |
Gray-50% |
|
Red |
Light Orange |
Lime |
Sea Green |
Aqua |
Light Blue |
Violet |
Gray-40% |
|
Pink |
Gold |
Yellow |
Bright Green |
Turquoise |
Sky Blue |
Plum |
Gray-25% |
|
Rose |
Tan |
Light Yellow |
Light Green |
Light Turquoise |
Pale Blue |
Lavender |
White |
|
Names of Preset
Colors |
|
Besides the Font/Fore Color button on the Formatting
toolbar, to set the font color of a field or label, while in Design View, you
can right-click it, position the mouse on Font/Fore Color and click
one of the preset colors. Once again, you can use only one of the existing
colors.
This displays a constant list of colors. If none of the available colors is appropriate for the task at hand, you can click the Define Custom Colors >> button to expand the dialog box:
The expanded Color dialog box allows you to either select one of the preset colors or to custom create a color by specifying its red, green, and blue values. You can change the color in four different areas:
After selecting or specifying a color, you can click OK or press Enter. |
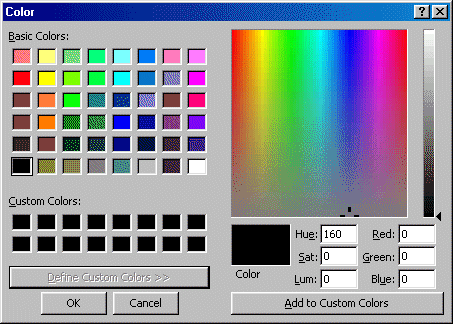
|
|
|
|
|
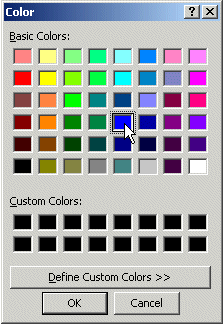
|
Background Color |
|
|
|
You can enhance the appearance of an object by change its
background color. This aspect can be applied only to the object that is
selected. Based on this, you can paint the background of one section of a
form or a report without changing the other sections. In the same way, you
can paint the bounding rectangle of a field or a label independent of the
other fields or labels. If you do not want a label or field to be painted with a particular color, you can make it transparent by setting its Fill/Back Color property to Transparent. Using the Properties window, you can also make a control such as a text box transparent by using the Back Style property. Its default value is Normal. To be able to see through the control, you can set this property to Transparent. |
|
|
|
|
|
|
Special Effects |
|
|
|
Microsoft Access provides some special visual effects used to raise or sink, etc a section of a form or report, a label or a field. These effects can be controlled by using the Special Effect button on the Formatting toolbar, by right-clicking a label, a field or a group of labels and/or fields, positioning the mouse on Special Effect, and clicking from the list. You can also access the effects from the Special Effect property of the Properties window. The special effects appear as follows: |
|
|
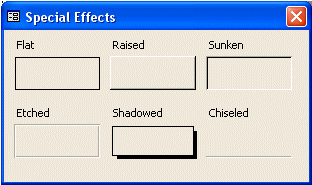
|
|
|
|
|
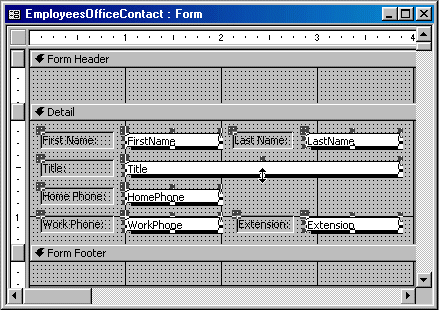
|
Borders |
|
|
|
A border is a line that defines the limit of an object. You
can control how the border of a label or a field is drawn. The borders of a
label or field can be drawn with a variant width of a line.
The Border Style characteristic can be used in
combination with the Special Effect property. Some of these effects
depend on the Special Effect value and may not appear as expected. |
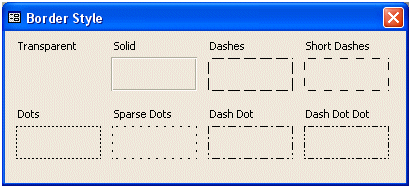
|
Location |
|
|
|
When you add or drag a control to a section of a form or report, it assumes a distance from the left border of the section and from the lower border of the bar of that section. These two dimensions are referred to as its location. The location of an object is determined by its Top and its Left properties:
The location of an object can be set by dragging its
top-left handle |

|
|
|
|
|
|
Dimensions |
|
|
|
The width of an object is the distance from its left border
to its right border. The height of an object is the distance from its top
border to its bottom border. The width and the height of an object are
referred to as its dimensions. The width of a form or report is the common
width of each one of its sections. All sections use the same width. The
height of a form or report is the total height of all of its sections. For
this reason, the form and the report do not have a height because they let
each section control this characteristic.
The dimensions of an object can be set by dragging one of
its middle handles |
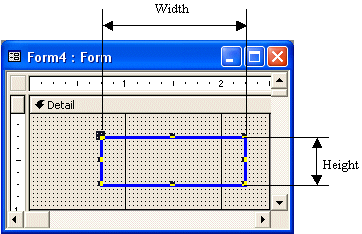
|
|
|
|
|

|
Tab Ordering |
|
|
|
When performing data entry, we saw that the user can press
Enter or Tab to navigate from one field to another. Because a label cannot
receive focus, it is not affected by this navigation. The controls that
participate in this navigation are part of a group. Participation to this
group is controlled by the Tab Stop Boolean property. In order for a
control to receive focus when the user presses Tab, the control must have its
Tab Stop property set to true. When you add a Windows control to a
form, it is directly made part of that group because its Tab Stop
property is set to Yes. If you want to remove a control from this group, you
can set its Tab Stop property to No. Of course, an alternative is to
set its Enabled property to No. |
|
AutoFormat |
|
|
|
Microsoft Access Design Templates |
|
|
|
We saw that, when you create a database using the Database Wizard, you have the option of applying one of the designs provided by Microsoft Access and you can apply it to your forms and reports. In the same way, if you create a form using the Form wizard, as we have done in previous lessons, you can select one of the designs and apply it to the form. This concept also applies to reports. If you create a form or report in Design View, you would have only the Standard design. You can still apply one of the designs supplied by Microsoft Access. To do that, open the form or report in Design View. Then, on the main menu, click Format -> AutoFormat... The AutoFormat would appear and allow you to select any of the available designs. After selecting a design, you can click OK |
|
Creating a Form Template |
|
|
|
If you design a good looking form or a report and want to use its design in other databases, you can add it to the list of designs of the AutoFormat dialog box. To do that, open the form or report in Design View, then, on the main menu, click Format -> AutoFormat... On the AutoFormat dialog box, click Customize. The Customize AutoFormat dialog box allows you to modify or delete one of the existing designs, or create a new one. |
|
|
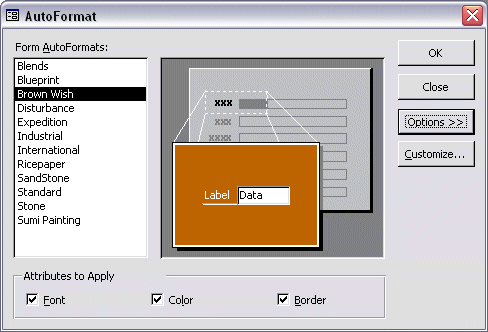
|
|
|
|
|
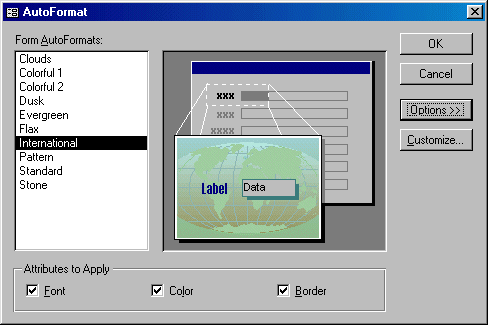
|
MOUS Topics |
|
|
|
S22 |
Switch between object views |
|
S37 |
Move and resize a control |
|
S38 |
Modify Format Properties (font, style, font size, color,
caption, etc.) |
|
S39 |
Use the Control Toolbox to add controls |
|
Exercises |
|
|
|
Yugo National Bank |
|
|
5.
Change the Status Bar text of the following text boxes:
6.
Save and close the form 7.
Open the Employees form in Design View. Change the caption of the
form to
|
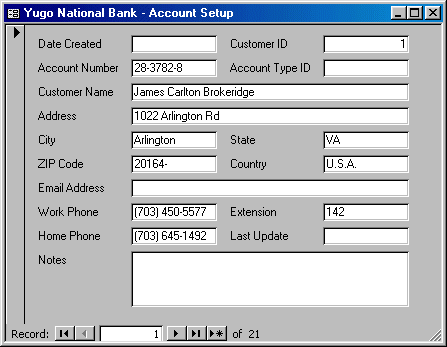
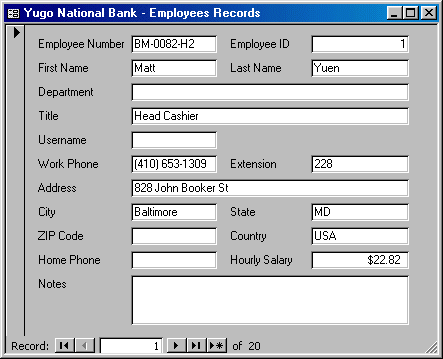
|
Tenley Associates |
|
|
5.
Save and close the form |
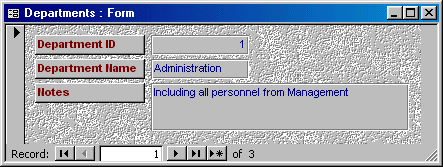
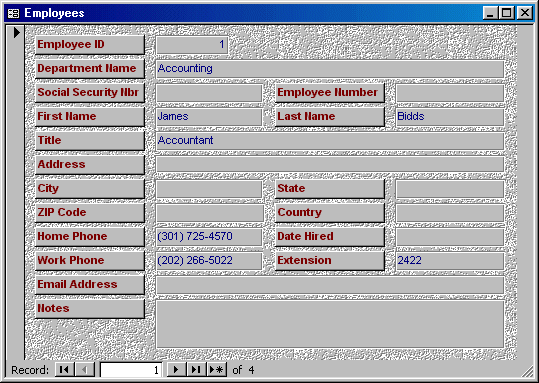
|
Watts A Loan |
|
|
2.
Save and close the table
6.
|
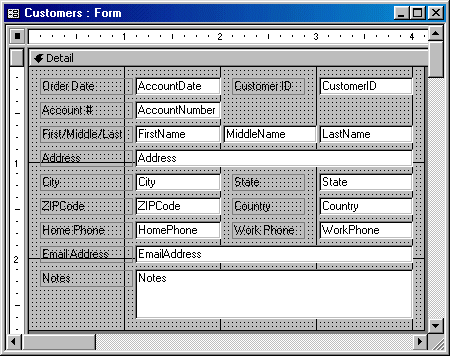
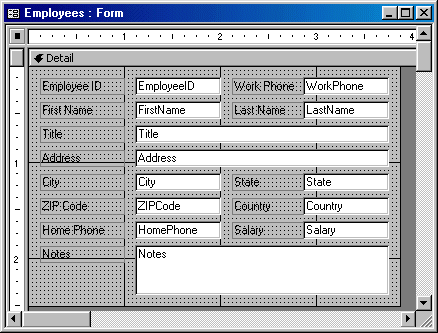
9.
|
Database Operators and Operands |
|
|
|
|
The fields we have been using allow the user to enter,
view, or change data of a database. Because there are so many types of values
a user can be asked to deal with, the values in the fields are categorized by
types. In the next lesson, we will see how to specify what type of value
should or can be entered in a field and what type of value should be
prevented. At this time, we will review the categories of data that are
considered in a database.
The data fields we have used so far were created in tables and then made available to other objects, queries, forms, and reports, so those objects can implement their own functionality without worrying about displaying empty or insignificant fields. In various scenarios, you will need to display a field that is a combination of other fields. For example, you may need to combine a FirstName to a LastName fields in order to create a FullName field, or, to calculate an employee’s weekly salary, you may need to retrieve the value of a Salary field and multiply it with the value of a total number of hours worked in a week. Most, if not all, of these expressions use what we call operators and operand. An operation is a technique of using a value or a field, or to combine two or more values or data fields to either modify an existing value or to produce a new value. Based on this, to perform an operation, you need at least one value or field and one symbol. A value or field involved in an operation is called an operand. A symbol involved in an operation is called an operator. A unary operator is one that uses only one operand. An operator is referred to as binary if it operates on two operands.
In order to provide a value to an existing field, you can use an operator called assignment. Its syntax is: VariableName = ValueOrVariable The operand on the left side of the = operator is referred
to as the left value or Lvalue. This operand must always be able to be
written to. In other words, it cannot be a type of constant we will review
next. The operand on the right side of the operator is referred to as the
right value or Rvalue. It can be a data field or a constant.
In some other cases, the assignment operator will be part of a longer expression. We will see examples we move on. |
|
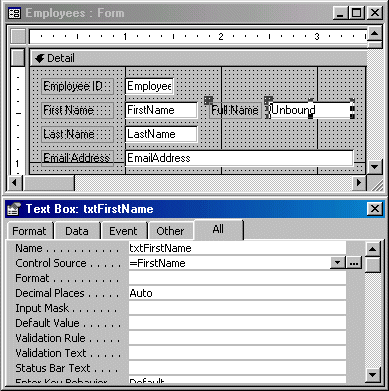
|
The Positive Unary Operator + |
|
|
|
Algebra uses a type of ruler to classify numbers. This fictitious ruler has a middle position of zero. The numbers on the left side of the 0 are considered negative while the numbers on the right side of the 0 constant are considered positive: |
|
|||||||||||||||||||||||||||||||||||||||||||||||||||
|
A value on the right side of 0 is considered positive. To express that a number is positive, you can write a + sign to its left. Examples are +4, +228, +90335. In this case the + symbol is called a unary operator because it acts on only one operand. The positive unary operator, when used, must be positioned to the left side of its operand. As a mathematical convention, when a value is positive, you do not need to express it with the + operator. Just writing the number without any symbol signifies that the number is positive. Therefore, the numbers +4, +228, and +90335 can be, and are better, expressed as 4, 228, or 90335. Because the value does not display a sign, it is referred as unsigned. |
|
The Negative Unary Operator - |
|
|
|
As you can see on the above ruler, in order to express any
number on the left side of 0, it must be appended with a sign, namely the -
symbol. Examples are -12, -448, -32706. A value accompanied by - is referred
to as negative. The - sign must be typed on the left side of the number it is
used to negate. |
|
Constants |
|
|
|
Introduction |
|
|
|
A constant is a value that does not change. The constants
you will be using in your databases have already been created and are
built-in Microsoft Access. Normally, Visual Basic for Applications (VBA), the
version of Microsoft Visual Basic that ships with Microsoft Access also
provides many constants. Just in case you are aware of them, you will not be
able to use those constants, as Microsoft Access does not inherently
“understand” them. For this reason, we will mention here only the constants
you can use when building regular expressions. |
|
True or False |
|
|
|
In Boolean algebra, something is considered True when it
holds a value. The value is also considered as 1 or Yes. By contrast, if
something does not hold a value, it is considered non-existent and not worthy
of consideration. Such a thing has a value of False, 0, or No. In reality,
everything in your database has a value, as far as the database engine is
concerned. To retrieve such a value, you can just find out if the value of a
field is existent or not. |
|
NULL |
|
|
|
While the True and False constants are used to find out
whether a check box is marked or not, the database provides another constant
used to find out whether a field is empty. This can be done using the Null
constant. |
|
Microsoft Access Operators |
|
|
|
The Square Brackets Operator: [] |
|
|
|
When reviewing name rules for our objects in Microsoft
Access, we saw that we should use names that are made of one word (no space).
In reality, Microsoft Access, as mentioned already, is particularly flexible
with names. It uses a mechanism to delimit a name when such a name is
involved in an operation. The operator used to specify the beginning of a name
is the left or opening square bracket [. At the end of a name, a right or
closing bracket is used. To be safe, whether a name is made of one or more
words, Microsoft Access prefers including it in square brackets. |
|
|
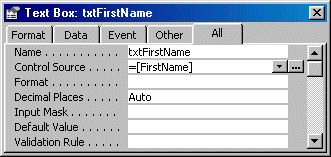
|
The Collection Operator: ! |
|
|
|
The objects used in Microsoft Access are grouped in
categories called collections. For example, the forms belong to a collection
of objects called Forms. The reports belong to a collection of objects called
Reports. The data fields belong to a collection called Controls. Based on
this, all forms of your database project belong to the Forms collection, all
of your reports belong to the Reports collection, and all controls you are
using belong to the Controls collection.
The name of the collection is used to perform what is
referred to as qualification: the name of the collection “qualifies” the
object. In other words, it helps the database engine locate the object by
referring to its collection. This is useful in case two objects of different
categories are being referred to. Since you cannot have two fields with the
same name on the same form or report, it is safe to omit the Controls name of
the collection when referring to a field. |
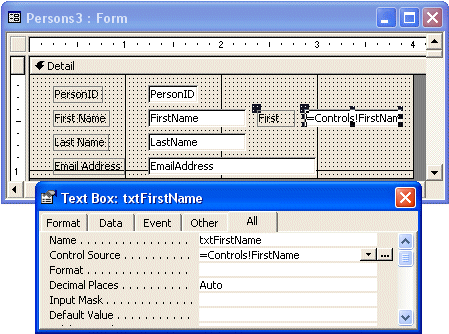
|
|

|
The Period Operator: . |
|
|
|
In previous lessons, we learned that a property is something that characterizes or describes an object. For example, users mainly use a text box either to read the text it contains, or to change its content, by changing the existing text or by entering new text. Therefore, the text the user types in a text box is a property of the text box. To access the property of an object, type the name of the object, followed by a period, followed by the name of the property you need. The syntax used is: Object.PropertyName The property you are trying to use must be a valid property of the object. In Microsoft Access, to use a property of an object, you must know, either based on experience or with certainty, that the property exists. Even so, unfortunately, not all properties are available. |
|
Double Quotes "" |
|
|
|
A string is an empty space, a character, or a group of characters that you type or provide to a control and you want this character or this group of characters to be considered "as is". In other words, the expression or the control that receives the string should keep it or them the way you supplied it or them, unless you specify otherwise. A string can be an empty space or one character, such as $ or w; a group of characters, like home or Manchester United or Verbally speaking, I mean… Ah forget it. Most of the time, you will want the database to keep this character or group of characters exactly the way you or the user supplied them. In order to let the program know that this is a string, you must enclose it in double quotes. From our examples, our strings would be "$", "w", "home", "Manchester United", and "Verbally speaking, I mean… Ah forget it". To assign a string to a field, in the Control Source of the field, you can type the assignment operator followed by the double-quoted string. Here is an example: |
|
|
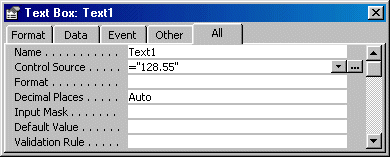
|
The String Concatenator: & |
|
|
|
The & operator is used to add one string to another. It can also be used to append the contents of two controls, or expressions. This is considered as concatenating them. For example, it could allow you to concatenate a first name and a last name, producing a full name. The general syntax of the concatenation operator is: Value1 & Value2 To display a concatenated expression in an unbound field, use the assignment operator on the field. Here is an example:
Here is an example of the form in Form View:
Once again, you should include the name of a field in square brackets. To concatenate more than two strings, you can use as many & operators between any two expressions as necessary. After concatenating the strings or values, you can assign the result to another value or expression using the assignment operator. The syntax used is: =Field1 & Field2 & Field_n Here are examples =FirstName & " " & LastName This would display, for example, Boniface Dunkirk =[LastName] & ", " & [FirstName] This would produce, for example, Chang, Helene =[Address] & " " & [City] & " " & [State] & " " & [ZIPCode] & " " & [Country] This would display a complete address in a field |
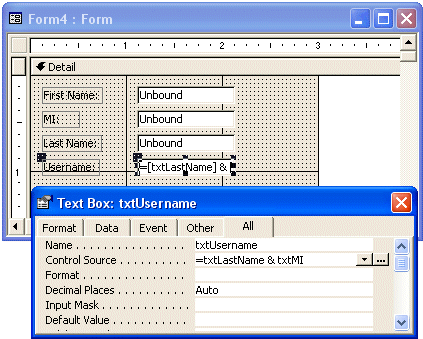
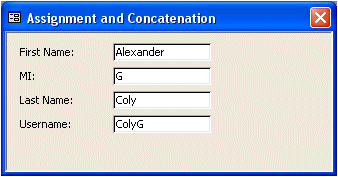
|
The Parentheses Operators: () |
|
|
|
Parentheses are used in two main circumstances: in procedures or in operations. The parentheses in an operation help to create sections in an operation. This regularly occurs when more than one operators are used in an operation. Consider the following operation: 8 + 3 * 5 The result of this operation depends on whether you want to add 8 to 3 then multiply the result by 5 or you want to multiply 3 by 5 and then add the result to 8. Parentheses allow you to specify which operation should be performed first in a multi-operator operation. In our example, if you want to add 8 to 3 first and use the result to multiply it by 5, you would write (8 + 3) * 5. This would produce 55. On the other hand, if you want to multiply 3 by 5 first then add the result to 8, you would write 8 + (3 * 5). This would produce 23. As you can see, results are different when parentheses are used on an operation that involves various operators. This concept is based on a theory called operator precedence. This theory manages which operation would execute before which one; but parentheses allow you to control the sequence of these operations. |
|
Arithmetic Operators |
|
|
|
The Addition: + |
|
|
|
The addition is used to add one value or expression to another. It is performed using the + symbol and its syntax is: Value1 + Value2 The addition allows you to add two numbers such as 12 + 548 or 5004.25 + 7.63 After performing the addition, you get a result. You can provide such a result to another field of a form or report. This can be done using the assignment operator. The syntax used would be: = Value1 + Value2 |
|
The Subtraction: - |
|
|
|
Subtraction is performed by retrieving one value from another value. This is done using the – symbol. The syntax used is: Value1 - Value2 The value of Value1 is subtracted from the value of Value2. After the operation is performed, a new value results. This result can be used any way you want. For example, you can display it in a control using the assignment operator as follows: = Value1 - Value2 |
|
The Multiplication: * |
|
|
|
Multiplication allows adding one value to itself a certain number of times, set by the second value. The multiplication is performed with the * sign which is typed with Shift + 8. Here is an example: Value1 * Value2 During the operation, Value1 is repeatedly added to itself, Value2 times. The result can be assigned to the Control Source of a field as. The expression would be written as follows: = Value1 * Value2 |
|
The Integer Division: \ |
|
|
|
Dividing an item means cutting it in pieces or fractions of
a set value. For example, when you cut an apple in the middle, you are
dividing it in 2 pieces. If you cut each one of the resulting pieces, you
will get 4 pieces or fractions. This is considered that you have divided the
apple in 4 divisions. Therefore, the division is used to get the fraction of
one number in terms of another. Value1 \ Value2 This operation can be performed on two types of valid numbers, with or without decimal parts. After the operation, the result would be a natural number. The result of the operation can be assigned to a field using the assignment operator: = Value1 \ Value2 |
|
The Division: / |
|
|
|
The second type of division results in a decimal number. It is performed with the forward slash "/". Its syntax is: Value1 / Value2 After the operation is performed, the result is a decimal number. The result of the operation can be assigned to a field using the assignment operator: = Value1 / Value2 |
|
The Exponentiation: ^ |
|
|
|
Exponentiation is the ability to raise a number to the power of another number. This operation is performed using the ^ operator (Shift + 6). It uses the following mathematical formula: yx In Microsoft Access, this formula is written as y^x and
means the same thing. Either or both y and x can be values or expressions,
but they must carry valid values that can be evaluated. =y^x |
|
The Remainder Operator: Mod |
|
|
|
The division operation gives a result of a number with or without decimal values, which is fine in some circumstances. Sometimes you will want to get the value remaining after a division renders a natural result. The remainder operation is performed with keyword Mod. Its syntax is: Value1 Mod Value2 The result of the operation can be used as you see fit or you can display it in a control using the assignment operator as follows: = Value1 Mod Value2 |
|
||
|
9b Database Operators and Operands |
|
|
|
|
||
Databases and other programming environments provide operators you can use to perform data analysis. The operators used are called logical operators because they are used to perform comparisons that produce a result of true or false (there is no middle result: something is not half true or half false or "Don't Know"; either it is true or it is false).
The equality operator is used to compare two values for similarity. The syntax of this operation is: Value1 = Value2
To find out if two fields hold different values, you can
use the inequality operator which is represented by <>. Its syntax is:
This shows you that the equality (=) and the inequality (<>) operators are opposite each other. |
|


|
Less Than < |
|
|
|
The "Less Than" operator uses the following
syntax: |
|
|
|
Less Than Or Equal <= |
|
|
|
When comparing two values, you may want to know whether two fields hold the same value or if one is lower than the other. This comparison can be performed with the "Less Than Or Equal To" operator. It is represented by <=. Its syntax is: Value1 <= Value2 If both operands (Value1 and Value2) hold the same value, then the comparison produces a True result. If Value1 holds a value that is lower than that of Value2, the comparison still produces a True result. By contrast, if the value of Value1 is higher than that of Value2, the comparison renders a False result:
Note that the > and the <= operators are opposite each other. |

|
Logical Operators: Greater Than > |
|
|
|
The > operator is used to find out whether one value is "Greater Than" another. Its syntax is: Value1 > Value2 The operation is performed on the values of Value1 and Value2. If Value1 holds a value greater than that of Value2, then the comparison produces True. Otherwise, the comparison produces False. That is, if the value of Value2 is greater than or equal to that of Value1, then the comparison produces False: |
|
|

|
Greater Then Or Equal >= |
|
|
|
If you have two values and want to find out whether they hold similar values or the first is greater than the second, you can use the >= operator whose syntax is: Value1 >= Value2 If both Value1 and Value2 hold the same value, then the comparison renders a True result. Similarly, if the left operand, Value1, holds a value greater than that of the right operand, Value2, the comparison still produces True. If the value of Value1 is less than the value of Value2, the comparison produces a False result:
Therefore, < and >= are opposite. |
|
The NOT Operator |
|
|
|
To deny the presence, the availability, or the existence of a value, you can use the Not operator. This operator is primarily used to reverse a Boolean value. For example, we have learned that False is the opposite of True. In the same way, True is the opposite of False. If you want to compare a value as not being True, the Not True expression would produce the same result as the False value. For the same reason, the expression Not False is the same as True. |
|
The IS Operator |
|
|
|
To validate something as being possible, you can use the IS operator. For example, to acknowledge that something is NULL, you can use the IS NULL expression. In the same way, to validate that something is not null, you can use the expression Is Not NULL. |
|
The IN Operator |
|
|
|
The IN operator is used to check whether a record or a group of records is found in a group. |
10.
|
Introduction to Data Types |
|
|
|
|
|
|
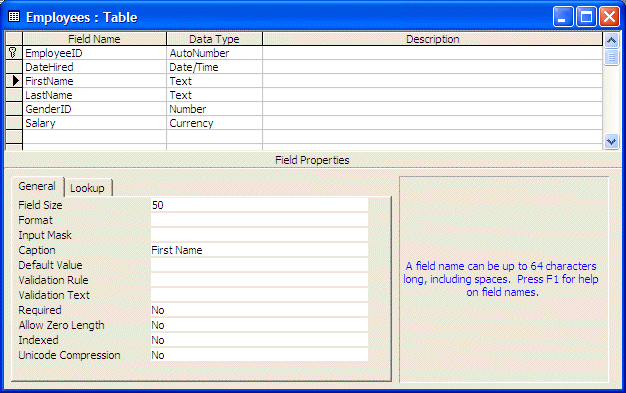
|
Strings and Data Types |
|
|
|
Introduction |
|
|
|
We have defined a string as an empty text, a letter, a word or a group of words considered “as is”. This type of data is created on a table by selecting the Text data type. A Text data type allows the user to type any kind of characters or group of characters. This field can hold up to 255 characters. |
|
|
|
|
|
|
Field Size |
|
|
|
The size of a string is usually considered as the number of characters it contains or may hold. When creating a field that would hold text, the default size provided is 50 characters, as the number 50 is set in the Field Size property. You can therefore decrease or increase this size for any number between 1 and 255. The default value, 50, is enough in most cases, such as providing a (short) description for a product. When setting the Field Size property by itself, the database would make sure that the user can only type so many characters. For example, it is very unlikely to have a first name of a person that is 50 characters. In this case, you can safely reduce the number of characters to 20 or 30. On the other hand, if you are creating a column whose length is hard to predict, you can set the length to a reasonable value. There are other ways you can decrease the number of characters that are allowed in a field. Over all, you should be able to predict the types of values that would be entered in the fields of a column. |
|
|
|
|
|
|
Text Input Masks |
|
|
|
Because users can be tempted or distracted to enter just
anything in a Text field, Microsoft Access provides techniques to
control what goes in a field and what must be prevented. This is the role of
a mask. A mask is a technique of creating sections, also called placeholders,
in a field. A section can be configured to accept only a letter, only a
digit, a character or a digit, any symbol, nothing, or to display a
particular symbol that the user cannot change. When creating the mask, you
will use some predefined characters and create a combination of your choice.
If none of the masks suits your need, you can create a new one and add it to the list. To do this, click the Edit List button. This would bring the Customize Input Mask Wizard dialog box:
After creating a new mask, click Close. Once you have
located the desired mask, you can click it and click Next to continue. The
second page of the wizard allows you to accept or customize the mask you had
selected. Once you are ready, you can click Next. The third page presents an option that allows you to specify
how the value in the field will be stored in the database. It presents two
radio buttons and you can either accept the suggestion or select the other
and click Next. The fourth page of the wizard does not do much. It simply
lets you know that the wizard is ready to create the mask. Therefore, you can
click Finish. |
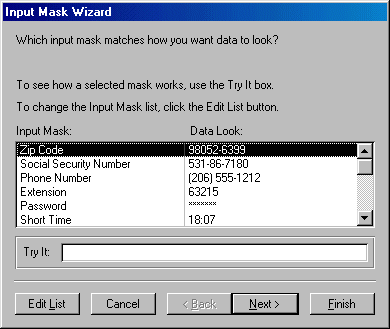
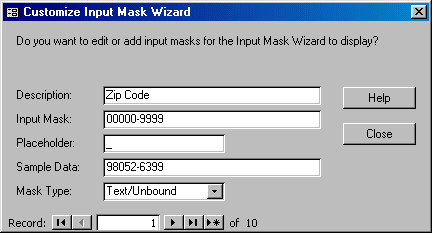
|
|
You can use any of these symbols to create a mask. If you want to include a word or sentence as part of the mask, type it in any section as desired. Here are examples of Custom Masks: |
|
|
|
|
|
|
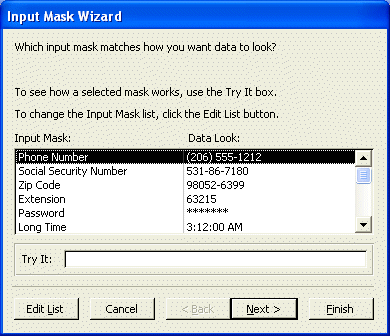
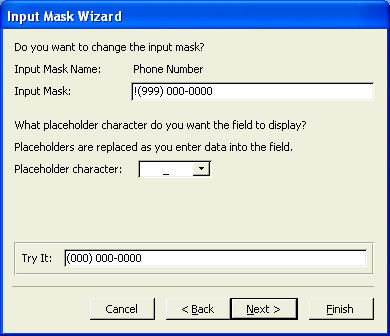
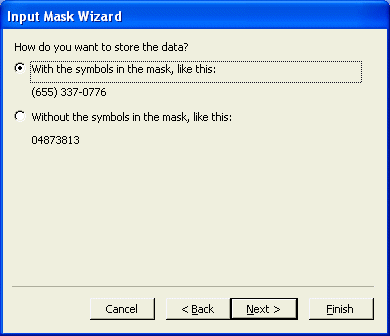
|
Strings Formats |
|
|
|
After a user has entered data in a field, without or without the influence of a mask, you can specify how the value of the field should be displayed. This is controlled by the Format property. To assist you with this configuration, the Format property depends on the type of data set for the field. After creating a mask, if you want to prevent duplicate data, remember to specify this in the Indexed property. |
|
|
|
|
|
|
The Memo Data Type |
|
|
|
The Memo data type functions like the Text except that it can hold a longer text up to 64000 characters. The text is mostly provided as ASCII. This means that there is no formatting. |
|
|
|
|
|
|
MOUS Topics |
|
|
|
S1 |
Determine appropriate data inputs/outputs for your database |
|
S12 |
Use multiple data types |
|
S15 |
Use the Input Mask Wizard |
|
Exercises |
|
|
|
Yugo National Bank |
|
|
|
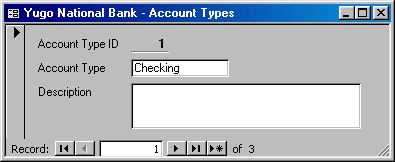
|
Tenley Associates |
|
|
|
|
|
|
Watts A Loan |
|
|
|
11.
|
Using Data Types |
|
|
|
|
|
|
|
|
|
|
|
|
Automatic Numbers |
|
|
|
If you create a column that will be used to keep an index of records as they are entered and/or deleted, you can set its Data Type to AutoNumber. This would ask Microsoft Access to complete that field with automatically generated numbers for a column whose numbers you don't need to control. This technique is highly used for the first field of a table. |
|
|
|
|
|

|
Real Numbers |
|
|
|
A real number is a number that displays a decimal part. This means that the number can be made of two sections separated by a symbol that is referred to as the Decimal Separator or Decimal Symbol. This symbol is different by language, country, group of languages, or group of countries. In US English, this symbol is the period as can be verified from the Regional (and Language) Settings of the Control Panel:
On both sides of the Decimal Symbol, digits are used to
specify the value of the number. The number of digits on the right side of
the symbol determines how much precision the number offers. |
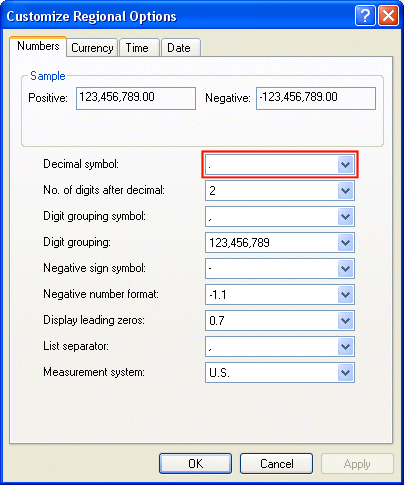
|
Currency Numbers |
|
|
|
The Currency data type is used for a column made for
monetary values. For such a column, set its Data Type to Currency.
During data entry, the user can type a decimal number and press Enter, Tab or
click somewhere else. The number would then be converted to represent a
monetary value. The number would also display the currency symbol on its
left. Like the Decimal Symbol, the character used for currency depends on the
country or a group of countries. It can also be verified in the Regional (and
Language) Settings of Control Panel in the Currency section. |
|

|
|
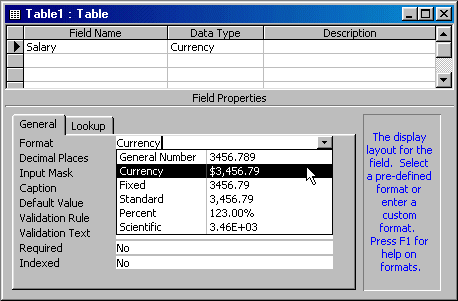
|
|
|
|
|
|
Boolean Data Types |
|
|
|
Introduction |
|
|
|
A datum is referred to as Boolean when it can assume only one of two values. It can be either Yes or No, True or False, On or Off, non-zero or 0. Such a field is appropriate when you want the user to indicate the state of a value. To specify that a field is Boolean, set its Data Type to Yes/No. |
|
Boolean-Based Options |
|
|
|
To support different ways of expressing a Boolean field, Microsoft Access provides various options. After setting the Data Type of a field to Yes/No, you can control how the field would be presented to the user. The most classic way of representing a Boolean value consists of displaying a check box:
With this layout, the user can either click the check box or give it focus and press the space bar. Alternatively, if you prefer, you can let the user type a value. In this case, after setting the field’s data type to Boolean, in the lower section of the table in Design View, click the Lookup property page and, on the Display Control combo box, select one of the available items:
The default option is Check Box. If you select Text Box, then the user will be able to type True, False, Yes, No, On, Off, 0, or any number. Once the user types one of these values and presses Enter, Tab, or clicks somewhere else, you can control how the field would display the value. To do this, in the lower section of the table in Design View, click the General property page and, in the Format property, select one of the available options:
If you set the Format property to Yes/No and if the user types 0, the field would display No; if the user types any other number, the field would display Yes. If you set this property to True/False and if the user types 0, the field would display False; if the user types any other number, positive or negative (but it must be a number) the field would display True: |
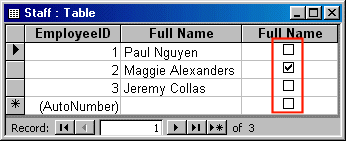
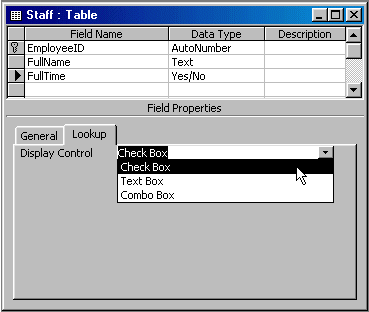
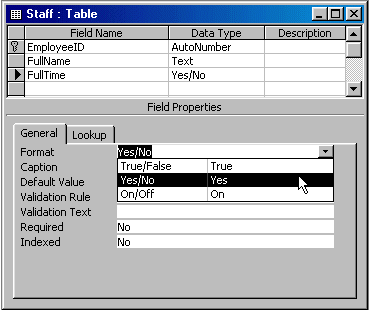
|
|
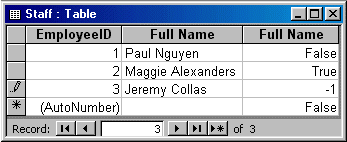
|
|
|
|
|
|
Document and Object Linking |
|
|
|
Introduction |
|
|
|
Object Linking and Embedding (OLE) is a technique that
consists of adding in your database (not just database, but our discussion
will stop to Microsoft Access databases as if OLE had to do only with
Microsoft Access) an object that was created using another application. The
technique used to include such an object is particularly easy. Its
configuration or involvement can be the subject of speculation. Over all,
Microsoft Access does not care much what type of object you want to add to,
or include in, your database. It is left to you to decide why you want to
include the object and what type of object this would be. Some objects (can
tremendously) increase the size of your database. |
|
Objects and Data Fields |
|
|
|
After setting the Data Type of a field as OLE Object, since
the object is external, there are not too many options or properties provided
by the table. The application in which you created or will create the object
should control it. To actually include an external object into the field,
whether using the table Datasheet View or the form in Form View, the user can
right-click the field and click Insert Object. This would open the Insert Object
dialog box that presents two options to create or select the object:
|
|
|
|
|
|


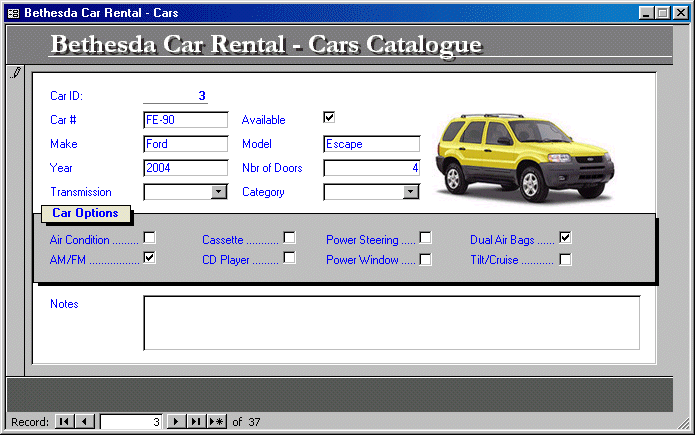
|
Hyperlinks |
|
|
|
As mentioned already, an object created with an external application can be added to a database and the object would be included “as is”. When this is done, Microsoft uses an encryption technique to make the object become part of the database so you do not have to remember to include the object when distributing the database. Because of this, objects such as pictures can highly increase the size of a database. This can be convenient at times. Fortunately, the alternative to this scenario is to provide only a link to the document or file from the database to the external document. The Hyperlink data type allows you to create a field that, when clicked, would open another document on the same computer, on another connected computer, or on the Internet. |
|
Date and Time |
|
|
|
Introduction |
|
|
|
Dates and times in Microsoft Access are grouped in a
category referred to as Date/Time. Over all, dates and times are considered
differently but, to specify that a field would use date, time, or both, set
its Data Type to Date/Time. Because there are different ways to display date
and time values, the Format property is used to specify how this value should
appear. The Input Mask is used to assist the user with data entry. |
|
|
|
|
|
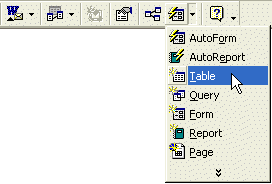
|
Dates Formats |
|
|
|
After a valid date value has been entered in a field, you can specify how the date would display, not necessary how the date was entered. The Format combo box provides already created formats you can use. Those are the most popular formats use for dates. If none of those satisfies you, you can use the following characters or symbols to create a desired format: |
|
|
To use these letters, simply type the desired combination in the Format field. Here is an example:
This is configured to display a single digit for a day of the month if the day is less than 10, followed by the complete name of the month, followed by the year in 4 digits. During data entry, the clerk can enter a valid date. Once the field looses focus, it displays the date based on the format. Here is an example:
Based on this, you can use any combination of the formats
but you should use a combination most regularly used in your language so the
users would not be confused. |


|
|
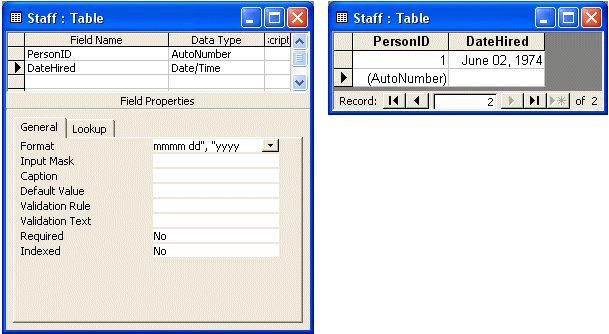
|
|
|
|
|

|
Times Formats |
|
|
|
Like dates, time values follow the Regional (and Language) Settings of Control Panel when they display. To make this display friendlier, Microsoft Windows provides some characters you can use to format a time:
To control how time values should display in a field, after setting its Data Type to Date/Time, use the Format property. The characters used to create a format are:
When combining these characters to create a format, you should abide by the rules of your language. You should refer to the formula set in the Time property page of the Regional (and Language) Settings of Control Panel. Microsoft Access also refers to it for the character separator. If you want to include any other character, type it in double-quotes. |
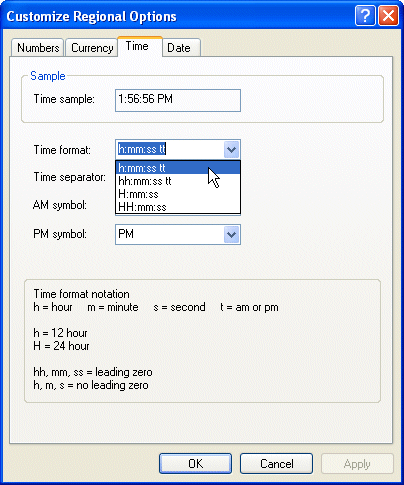
|
|
|
|
|
|
Date and Time Masks |
|
|
|
As done with Text based fields, you can use the Input Mask
property to assist the user with data entry on date and time-based fields.
The idea is to create sections and include character separators in the field
to help the user know where a number, a month, a year, an hour, a minute, a
second, or the AM/PM can be entered. Once again, you have two main
alternatives: using a wizard or creating your own mask. |
|
|
|
|
|
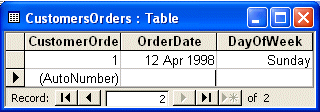
|
MOUS Topics |
|
|
|
S1 |
Determine appropriate data inputs/outputs for your database |
|
S12 |
Use multiple data types |
|
S44 |
Add Hyperlinks |
|
Exercises |
|
|
|
Yugo National Bank |
|
|
3.
Save the form and set this field as follows for the following
employees:
4.
Close the form
8.
Close the form |
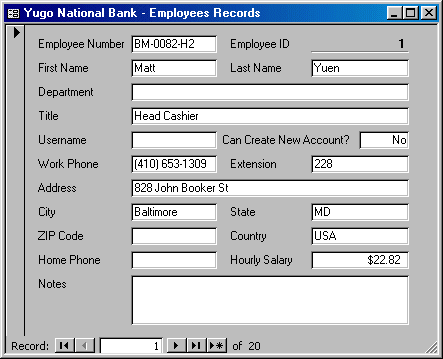
12.
|
Introduction to Relationships |
|
|
|
|
|
Overview of Relationships |
|
|
|
Introduction |
|
|
|
Data entry as we have performed it so far consisted of typing the necessary value in each field. Because a regular database is made of various tables, these objects work as an ensemble to create a product as complete and efficient as possible. As there can be so many objects, one of the rules a database developer should follow is to avoid duplicate entry of data: the same piece of information should not be entered in two different objects. For example, when a person is opening a bank account at a bank, a clerk enters the customer’s information in an object such as a form or a table:
|
|

|
|

|
|
|
|
2.
Then click OK
25.
(To get the © character, you can open Microsoft Word, type (c)
then select and copy it. Then paste it in the Caption property of the table
field)
|

12b.
|
Introduction to Relationships |
|
|
|
|
|
Lookup Fields |
|
|
|
Unbound Lookup Fields |
|
|
|
The fields we have been creating so far were classic text box fields that allow the user to simply type to create a value. Instead of letting the user type the values of a field, if you want, you can establish a list of values that are valid for a certain field. This would allow the user to simply select from that list. Such a field is called lookup field. The simplest type of lookup field consists of creating a list whose items you know at the time you are creating the database. For example, if a clerk must specify the gender of persons whose records she is creating, since there are only two genders, you can create a list that |
|

|
contains only male and female items. Since there would not
be suspicion of a new value, you can safely create such a list. The lookup
list is provided through a combo box. To set or change a value in the field,
the user can expand the combo box and select an item. The item selected in
stored in the field and is stored as a string (as text)
Any of these actions would launch the Lookup Wizard. Since in this case you would be creating a known list, you should select the second radio button and proceed. |
|
|
|
|
|
|
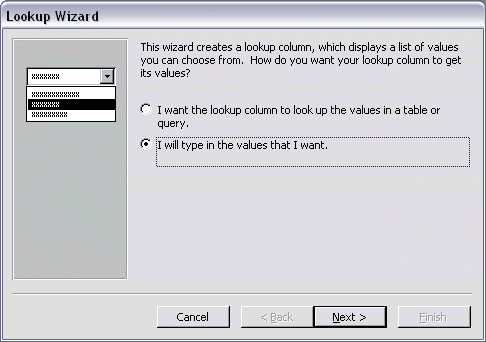
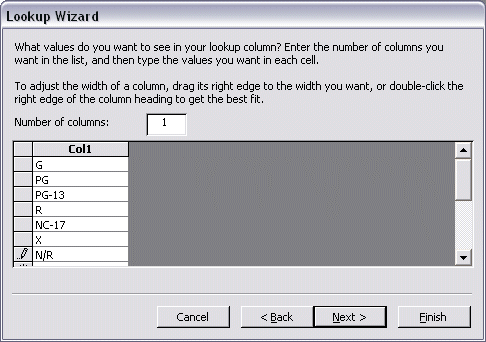
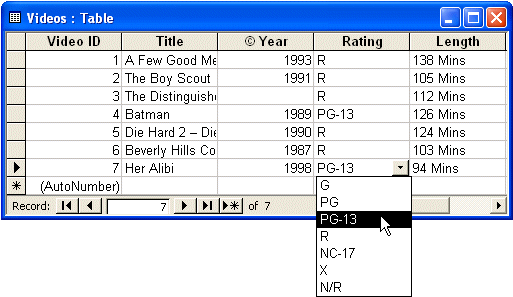
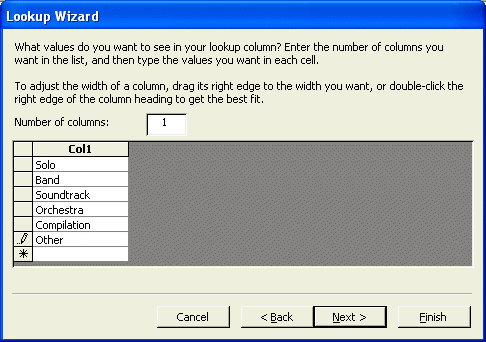
|
Bound Lookup Fields |
|
|
|
As done with the simple lookup, you can create a field whose data would be selected from a list. As opposed to an unbound lookup fields whose values you can predict at the time you are creating a database, a bound lookup field is one whose values are not known in advance. The values for such a field become available as the database is growing. We mentioned earlier that tables could be linked to exchange information. Based on our illustration, a foreign key field from a table can be used to provide information to its table by |
|

|
retrieving it from the originating table. When creating
such a relationship, you should know what table would be providing such
information and how the relationship would be managed. |
|
|
|
|
|
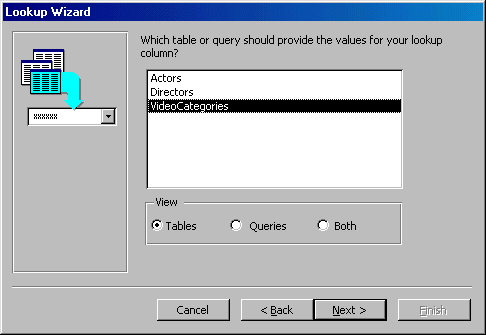
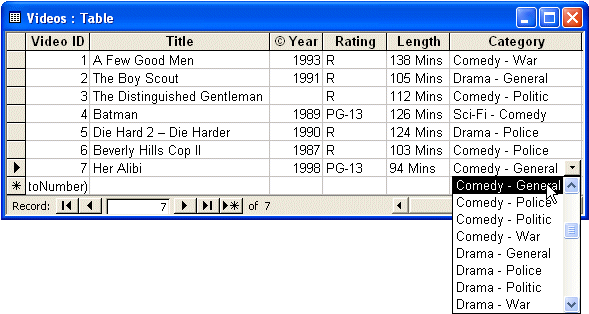
|
MOUS Topics |
|
|
|
S3 |
Establish table relationships |
|
S10 |
Set primary keys |
|
S13 |
Modify tables using Design View |
|
S14 |
Use the Lookup Wizard |
|
S33 |
Establish relationships |
|
Exercises |
|
|
|
Watts A Loan |
|
|
2.
Save it as TypesOfLoan and close it
|
|
Tenley Associates |
|
|
|
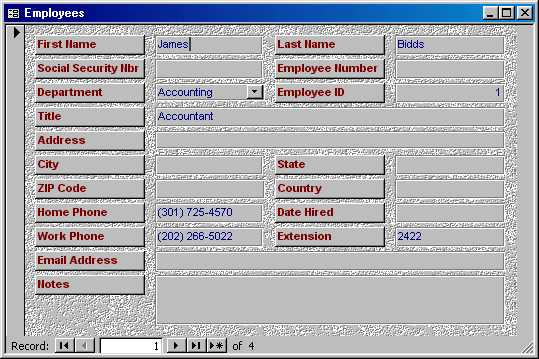
|
|
|
Yugo National Bank |
|
|
2.
Save it as ChargeReasons and close it
5.
Close the form |
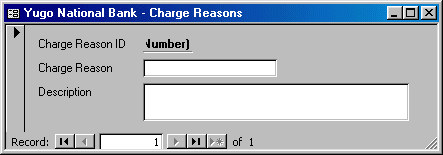
13.
|
Managing Relationships |
|
|
|
|
|
Numeric Fields Referencing |
|
|
|
Most of your data entry will be performed on forms. This is done to protect your tables from (even unintentional) corruption. This means that, during table design, you should be aware of what table is doing what and why. The combo boxes we have created so far provide a good mechanism for data entry but as long as you know what data a field is holding, you don't necessarily have to create these combo boxes on tables. The only piece of information a foreign key field really needs is a number: the number is what connects it to the Primary Key field of the originating table. Therefore, once you understand the use of relationships and lookup fields, you can simply create a numeric field that acts as a liaison between two tables. |
|

|
|
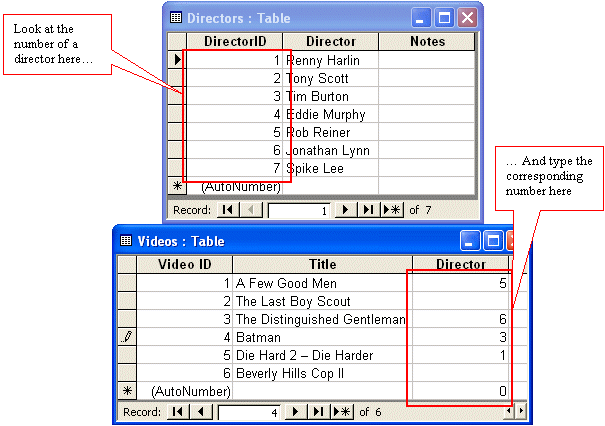

|
In our earlier illustration, we saw that a foreign key
field created in a table acts as an ambassador. To make this effective, a
formal relationship must be created between that field and the primary key
field of the table it represents. There should be some type of link between
both fields. |
|
|
|
|
|
|
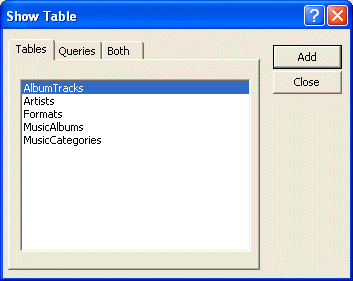

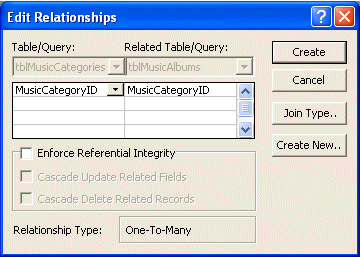
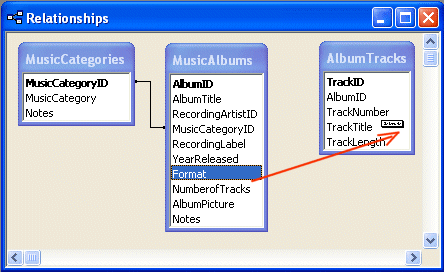

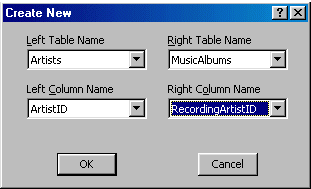
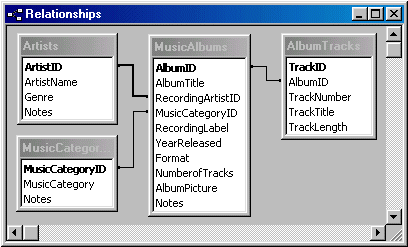
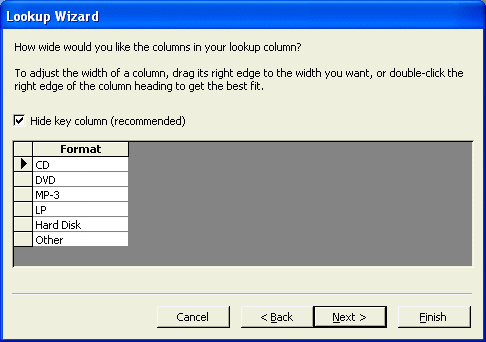
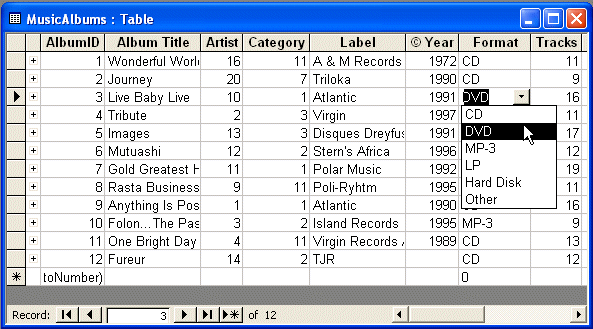

|
MOUS Topics |
|
|
|
S3 |
Establish tables relationships |
|
S13 |
Modify tables using Design View |
|
Exercises |
|
|
|
Watts A Loan |
|
|
2.
Save it as LoanProcessing and close it
|
|
Yugo National Bank |
|
|
·
b) Save the table as Transactions |
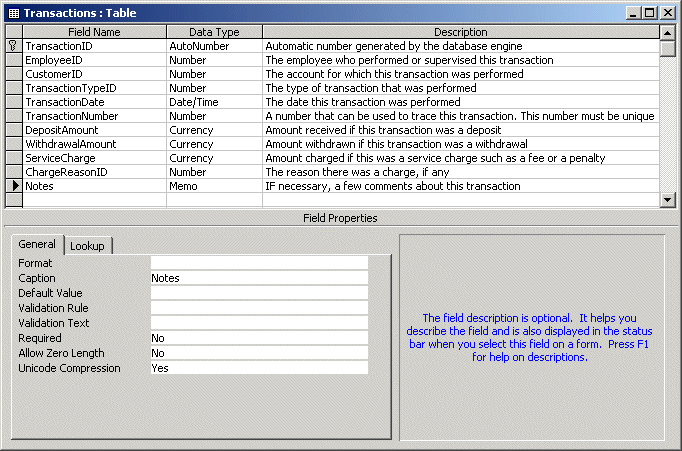
14.
|
Referential Integrity |
|
|
|
|
|
Cascades |
|
|
|
Introduction |
|
|
|
At this time, we know that there is useful functionality to
creating relations between tables as they allow the user to select existing
information instead of typing it. This flow of information brings up issues
about what happens if data that exists in a parent table gets deleted while
such information has been made available to another table. |
|
|
|
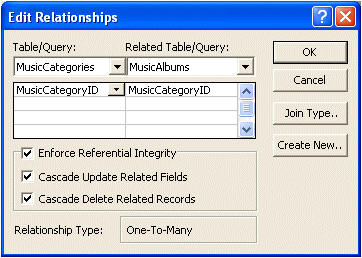
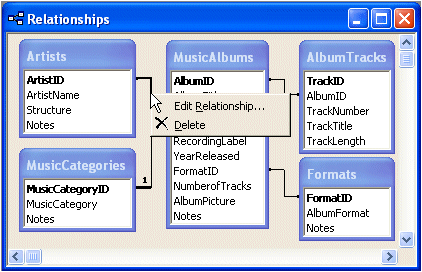
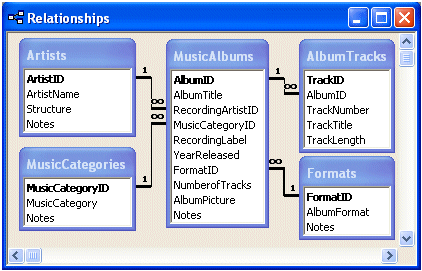
|
The Many-to-Many Relationship |
|
|
|
Although one-to-many is the most common type of relationship applied on tables, in some databases, you may need to create a relationship in which many records from one table A can have many related records in another table B and vice versa. This type of relationship is known as many-to-many. For example, in our Video Collection database:
To implement this type of relationship, you can create what is called a junction table. A junction table is a table whose main purpose is to bring together fields from other tables, creating a type of cross relationship for the necessary fields. A junction table can be very helpful for data analysis and sub-forms/sub-reports:
A junction table is usually made of three or four fields
(usually not less than three and usually not more than four; a classic
junction table has only three fields). The first field, almost less engaged,
is used as the primary key, the same type of field almost every table has.
The other fields hold data that would emanate from other tables.
You can also switch to either view to create a junction table. In other words, you can create one field in one view and create the other field in the other view. |
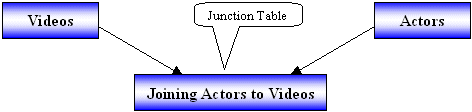
|
|
|
|
|
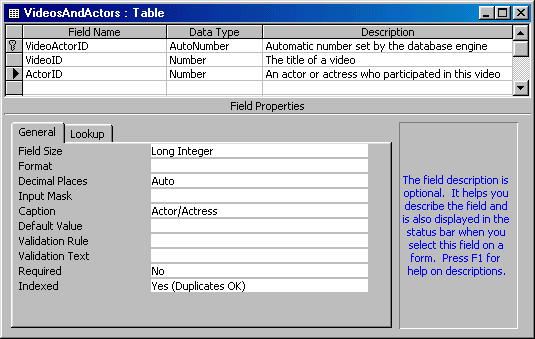

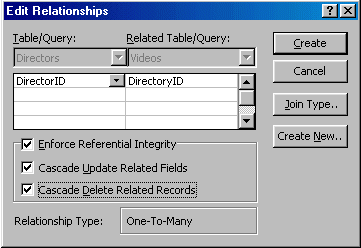
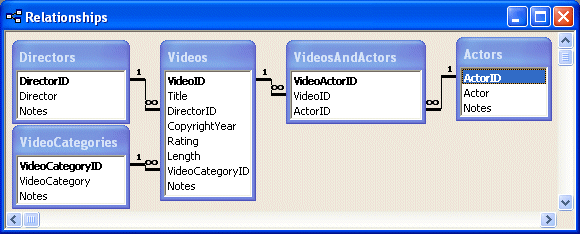

|
The One-to-One Relationship |
|
|
|
|
A one-to-one relationship is the type of junction between two tables A and B so that one record in a table can have only one corresponding entry in table B and vice versa. Because this is similar to one table of records, this type of relationship is hardly used since you can as well simply create one table. |

|
Subdatasheets |
|
|
|
A sub datasheet provides a technique of creating or
displaying relationships in a table in a Datasheet View. It can help you or
the user see information that is stored in another table. For example, when
using a music collection database, it can should the music tracks that are
part of an album by displaying an album in a table as long as a relationship
has been created and configured. |
|
|
|
|
|
|

|
MOUS Topics |
|
|
|
S30 |
Display related records in a subdatasheet |
|
S34 |
Enforce referential integrity |
|
S45 |
Print database relationships |
|
Exercises |
|
|
|
Watts A Loan |
|
|
|

|
Yugo National Bank |
|
|
|
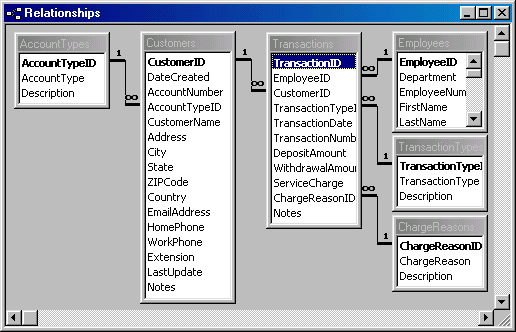
15.
|
Introduction to Data Analysis |
|
|
|
|
|
|

|
For this reason, you can sort records on a field, not
because you want to get the alphabetical order, but because you would like to
find out what record(s) need(s) to be completed. This could be used to find
out what student doesn't have an e-mail address yet. |
|
|
|
|
|
|
Record Sorting on Forms |
|
|
|
When reviewing forms, we saw that a form can display in Datasheet View, like a table or a query. With that type of form, you can apply the same techniques we used to sort records on a table. If you display a form in its regular and most usual format, where it displays one record at a time, you can still perform the same sorting operations as done on a table. This allows you to view one record at a time. |
|
|
|
|
|
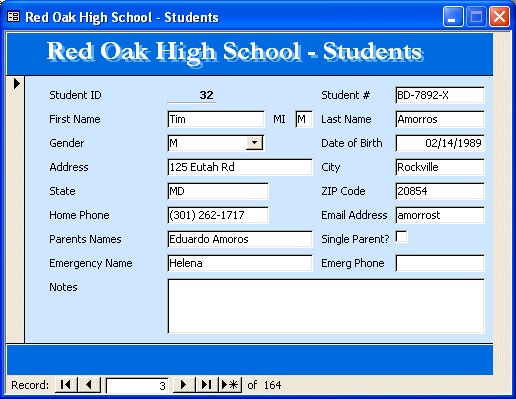
|
Record Filtering on Datasheet and Form Views |
|
|
|
Introduction |
|
|
|
So far, we have built fairly simple queries that consisted of displaying all records that are part of a table. The only thing we were doing was to select the necessary fields. In some circumstances, you may want to set a limit on the number of records to display or make available to the user. To do this, you must create a rule and ask Microsoft Access to apply it to a set of records (also called a Recordset). The rule works like a funnel that decides what to let through and what to retain. The rule is also called a criterion. For example, you can set a criterion that asks a query to consider the list of all students in a school but to restrict the list only to female students. |
|

|
A filter is a criterion or a set of criteria that must be applied to a Recordset to create a list of records that abide by a common rule. Filters can be used to isolate records on a table, a query, a form, or a report. There are differences on the way each type of value handles it. |
|
Records Filtering Using Selections |
|
|
|
While sorting is used to rearrange data in alphabetical,
incremental, or decremental orders, filtering allows you to isolate data. For
example, when you order the Gender column alphabetically, you get a list of
girls first (F for Female), then the boys (M for Male). Using a filter, you
can create a list that would include only one of these categories.
Imagine you want to have a list of only movies that are rated R. To do that, you can click an R field and filter by selection:
|
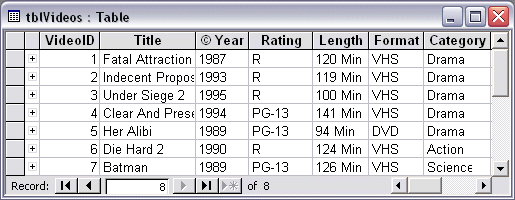
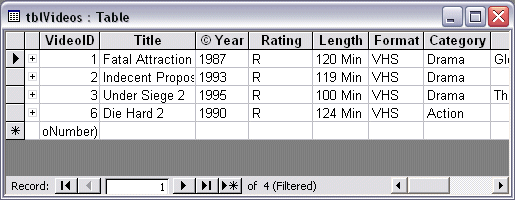
|
Unlike the sorting techniques, filtering hides data. In
order to execute another filter on all records, you must remove the previous
filter, unless, as we will see shortly, you want to combine filters. The
context menu provides the same options available on the toolbar. |
|

|
|
|
|
|
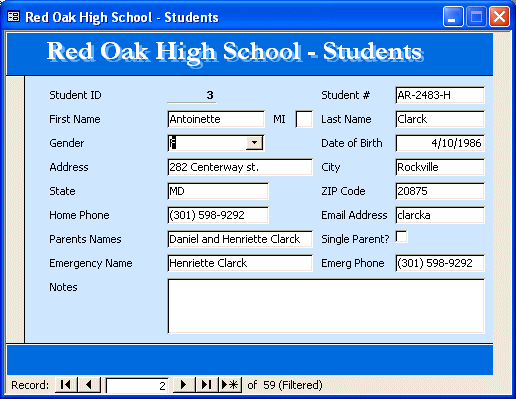
|
Filter By Exclusion |
|
|
|
Instead of using a field's content as a basis for inclusion, you can ask the table to deny or hide the records that respond to a certain field. This is referred to as filtering by exclusion. In Microsoft Access, this is done using Filter Excluding Selection. Imagine that, on your Videos table, you want to get a list of movies that are not rated R, you can right-click an R field in the Rating column and click Filter Excluding Selection. |
|
|
|
|
|
|
Filter By Form |
|
|
|
|
The techniques we have used so far to analyze our data consisted of looking for a particular field content as a basis for our filtering. Microsoft Access provides another technique that allows you to select a criterion from an empty field. Using this technique, the whole table is emptied and all records get hidden. You can then select your criterion from the column of your choice. Although the fields appear empty, each column equips its first and only field with a combo box that displays a list of all records of that column, thereby allowing you to select, which one of the fields responds to your choice. This technique is referred to as Filter By Form. |

|
|
|
|
|
|
Data Analysis With Operators |
|
|
|
Introduction |
|
|
|
Queries are meant to provide advanced techniques of performing data analysis. Because they use the SQL, they use a syntax that is not directly available to tables and reports. In fact, queries provide a good alternative to creating the record sources that can be used to populate forms and reports. To make this effective, it is a good idea to know what the SQL has to offer. To perform data analysis, besides the techniques of selection, exclusion, and form we have used so far, you can use operators. We have already reviewed some of the operators used |
|
|
throughout Microsoft Access. Such operators can also be used when filtering records. Besides those, the SQL provides additional operators to further filter data. To provide a more refined criterion to filter data, the table and form can present a special text available from right-clicking the object. This is presented as Filter For. When the text box displays, you can use operators to write an expression and apply it as the criterion. |
|
Advanced Filter By Selection |
|
|
|
All of the techniques we used to filter data by selection, exclusion, and form on tables are also available on queries. As done on tables and forms, such criteria do not get saved. This is used to preserve data even if a filter was previously applied to an object. If you want to create a list that permanently reduces the number of records available, you can use a query. Based on its structure, a query uses operators to filter data and saves the criteria. To create a query to filter records by selection, you should open it in Design View and use Criteria field to write the expression that will be applied. To write an expression that would be used as the criterion of data filtering on a Datasheet View of a table or a query or the Form View of a form, right-click the object. Then, in the Filter For text box, type the expression and press Enter. There are a few rules you should observe:
Of course, there are situations in which these rules can or must be applied differently. When in case, you will be appropriately directly. |
|
|
|
|
|

|
Data Analysis and Filtering by Comparison |
|
|
|
Databases and other programming environments provide operators you can use to perform data analysis. We have already reviewed the logical operators used because they apply to other scenarios. These operators can also be very valuable for data analysis and/or filtering. Comparisons are performed on Boolean, numbers, date, time, or string fields or values. To perform a comparison on a Boolean field, you can right-click it, click Filter For and type the desired value as True or as False. After pressing Enter, the database would perform the comparison and display the result. When comparing date-based or time-based values, include the date or time value between two # signs. For example, to get a list of records that occur before 1/1/1950, you would type an expression such as <=#1/1/1950# |
|
|
|
|
|
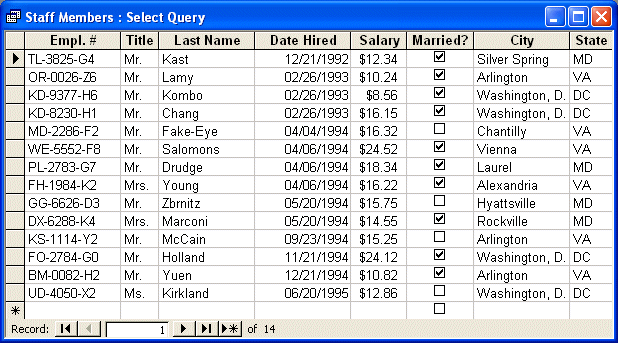
|
MOUS Topics |
|
|
|
S27 |
Sort records |
|
S28 |
Apply and remove filters (filter by form and filter by
selection) |
|
S29 |
Specify criteria in a query |
|
Exercises |
|
|
|
Yugo National Bank |
|
|
|
|
Watts A Loan |
|
|
|
16.
|
The Structured Query Language |
|
|
|
|
|
Introduction to SQL |
|
|
|
Overview |
|
|
|
So far, to create a query we have learned to use either the Query Wizard or the Design View of a query. In both cases, we were selecting fields and adding them to the query. This concept of building a query is based on the Structured Query Language abbreviated SQL. In fact, all queries are based on SQL and this language is used by most database development environments, including Microsoft Access. |
|

|
|
SQL can be pronounced Sequel or S. Q. L. On this site, we will
consider the Sequel pronunciation. For this reason, the abbreviation will always
be considered as a word, which would result in “A SQL statement” instead of "An SQL
statement". Also, on this site, we will regularly write, “The SQL”
instead of “The SQL language, as the L already
represents Language. |
|
|
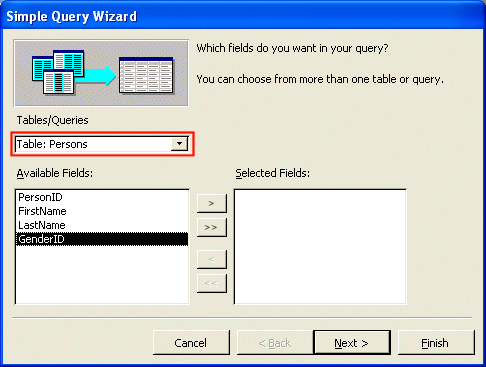
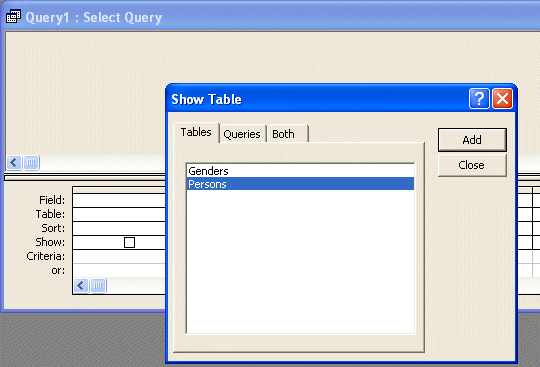
|
The most fundamental keyword used by SQL is SELECT. In order to process your request, you must specify what to select. This is done using the FROM keyword. Therefore, the SELECT keyword uses the following syntax: SELECT What FROM WhatObject; Over all, the SQL is not case-sensitive. This means that SELECT, Select, and select represent the same word. To differentiate SQL keywords from "normal" language or from the database object, it is a good idea to write SQL keywords in uppercase. A SQL statement must end with a semi-colon. |
|

|
In the SQL, the object is specified after the FROM keyword and by the WhatObject parameter of our syntax. For example, if you want to create a query based on a table named Persons, you would write the statement as: SELECT What FROM Persons; We also saw that, after specifying the object that holds the fields, you can then select each desired field and add it to the query. If you are using the Simple Query Wizard, you can double-click the field in the Available Fields list: |
|
|
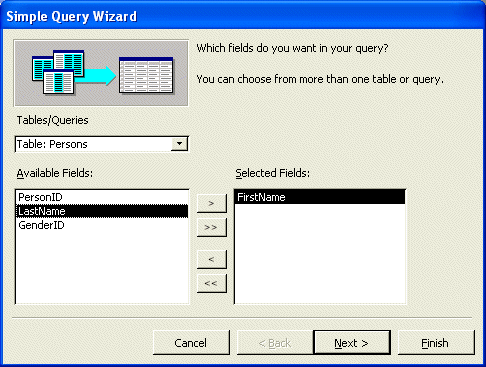
|
If you are using the Select Query window, you can drag the field from the list and drop it in the lower section of the view: |
|
|

|
In the SQL, to select a field, enter its name after the SELECT keyword. For example, to select the LastName field of the Persons table, you would type SELECT LastName FROM Persons; If you want to include more than one field from the same table, separate them with a comma. For example, to select the first and last names of the Persons table and include them in your query, you can use the following statement: SELECT FirstName, LastName FROM Persons; We also saw that, to select all fields from an object and include them in your query, you could drag the asterisk field and drop it in the lower section of the query in Design View. In the same way, to include everything from the originating table or query, use the asterisk * as the field. Here is a statement that results in including all fields from the Persons table: SELECT * FROM Persons; |
|
|
|
|
|
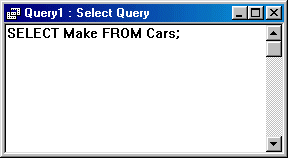
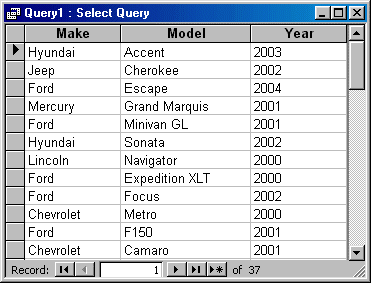
|
Record Sorting on Queries |
|
|
|
All of the techniques used to sort records on a table can also be applied to a query
that displays in Datasheet View. To create more advanced queries, the SQL
allows you to sort a field on a query and use this arrangement as part of the
query. SELECT What FROM WhatObject ORDER BY WhatField; The field used as the basis must be recognized as part of the selected columns. Imagine you have created a list of staff members made of their first and last names in a table named StaffMembers. If you want to order the list in alphabetical order based on the LastName column, you would use a statement such as: SELECT FirstName, LastName FROM StaffMembers ORDER BY LastName; If you use the * operator to include all fields, you can order the list based on any of the table's fields, as we learned during data analysis. Imagine that you have created a query that includes all fields. The following statement would list the records of the StaffMembers table based on the alphabetical order of the LastName column: SELECT * FROM StaffMembers ORDER BY LastName; By default, records are ordered in ascending order. Nevertheless, the ascending order is controlled using the ASC keyword specified after the based field. For example, to sort the last names in ascending order of a query that includes the first and last names, the above statement can also be written as follows: SELECT FirstName, LastName FROM StaffMembers ORDER BY LastName ASC; The second statement can be written as: SELECT * FROM StaffMembers ORDER BY LastName ASC; If you want to sort records in descending order, use the DESC keyword instead. It produces the opposite result to the ASC effect. To sort records in reverse alphabetical order, the above two statements can be written as: SELECT FirstName, LastName FROM StaffMembers ORDER BY LastName DESC; The second statement can be written as: SELECT * FROM StaffMembers ORDER BY LastName DESC;
|
|
|
|
|
|

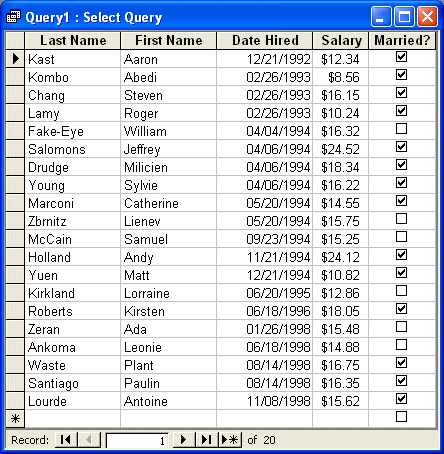
|
SQL and Filter By Selection |
|
|
|
Filter By Selection in SQL is performed using the WHERE clause in a SQL statement. Its basic syntax is: SELECT What FROM WhatObject WHERE Expression; We learned that, to perform data analysis, a criterion is specified using an expression. The expression could be that records should only be about students who live in a single parent home. The same types of expressions are used in SQL, following some rules. We saw that, to get a list of employees who live in Maryland, in Filter By Form, we could type an expression such as =MD or ="MD" (remember that if you type =MD and press Enter, Microsoft Access would change it to ="MD"). In SQL, to create a list of staff members who live in Maryland, we can write the following statement: SELECT FirstName, LastName, State FROM Staff WHERE State="MD"; To build your expressions, you can use any of the Boolean, logical, and comparison operators we have studied. |
|
|
|
|
|
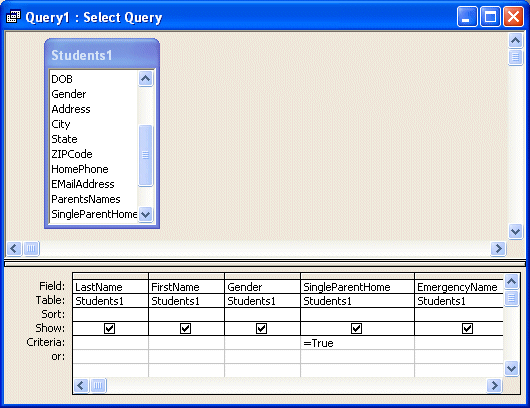

|
Microsoft Access and SQL Statements |
|
|
|
Qualifying Fields in Statements |
|
|
|
While Microsoft Access is faithful to the SQL, it adds its own little details when creating or interpreting the statements it is confronted with. Instead of using field names as we have done so far, Microsoft Access likes recognizing the object that holds a field just by looking at the referred field. When studying operators, we saw that the name of a field should be delimited by square brackets to reduce confusion in case the name is made of more than one word. We also mentioned that the square brackets provide a safeguard even if the name is in one word. Based on this, to create a statement for a query that includes the first and last names of a Persons table, you can write it as follows: SELECT [FirstName], [LastName] FROM [Persons]; To identify a field as belonging to a specific table or query, Microsoft Access usually associates its name to the parent object. This association is referred to as qualification. To qualify a field, you consider the object that is holding the field, then add a period followed by the name of the field. The basic syntax of a SELECT statement would be: SELECT WhatObject.WhatField FROM WhatObject; Imagine you want to get a list of Persons by their last names from data stored in the Persons table. Using this syntax, you can use a statement as follows: SELECT Persons.LastName FROM Persons; Or SELECT [Persons].[LastName] FROM [Persons]; In the same way, if you want to include many fields from the same table, qualify each and separate them with a comma. To list the first and last names of the records from the Persons table, you can use the following statement: SELECT Persons.FirstName, Persons.LastName FROM Persons; Or SELECT [Persons].[FirstName], [Persons].[LastName] FROM [Persons]; If you want to include everything from a table or another query, you can qualify the * field and qualify it as you would any other field. Here is an example: SELECT Persons.* FROM Persons; Or SELECT [Persons].* FROM [Persons]; |
|
Statement Lining |
|
|
|
Some of the SQL keywords are used to control blocks of sub-statements. Such words as we have seen so far are SELECT and FROM. A good technique of making a SQL statement easy to read consists of isolating each major keyword and its sub-statement on its own line. Using this approach, a basic SELECT statement would follow this syntax: SELECT WhatObject.WhatField FROM WhatObject; Here is an example: SELECT Persons.FirstName, Persons.LastName FROM Persons; |
17.
|
Queries and Relationships |
|
|
|
|
|
Introduction |
|
|
|
When creating relationships among tables, we were selecting the primary key of one table and the foreign key of a dependent table to join them. Once such a relationship is created, you can create a query that combines both tables to create a set of records, also called a record set, or a Recordset, that would include either all records or isolate only the records that have entries. For example, imagine you have created a Persons table as follows where the Gender of a record is selected from a lookup field: |
|

|
|
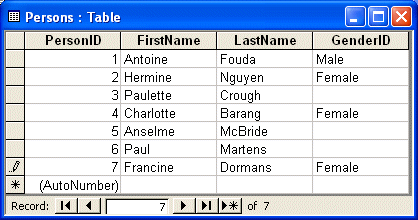
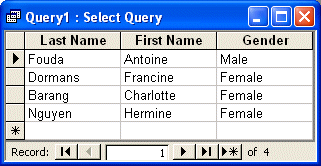
|

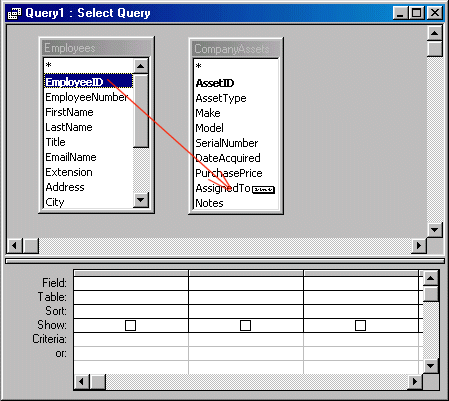
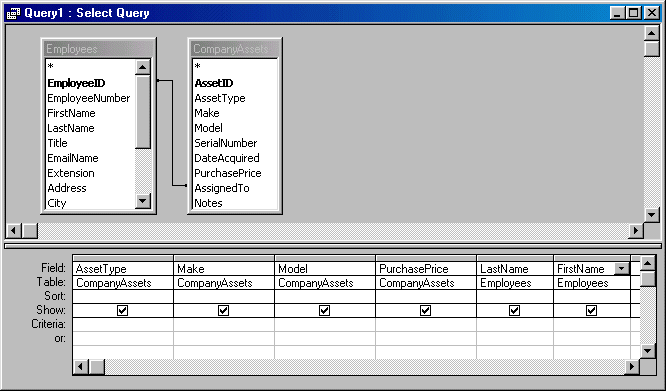

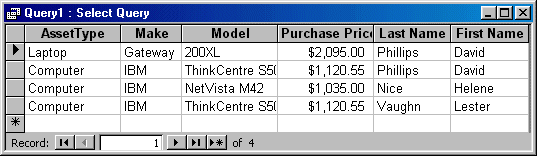

|
Outer Joins |
|
|
|
The queries we have used so far and that were based on
related tables allowed us to get only the columns that had entries based on
the established relationships. Columns that didn't
follow the rules were excluded. Instead of excluding columns, the SQL allows
you to create a query that includes all fields, not just those that follow
rules, as long as the records are part of either table. Such a query is
referred to as outer join. To manage the result of this type of query, the
SQL considers the direction of a relationship. |
|
|
|
|
|

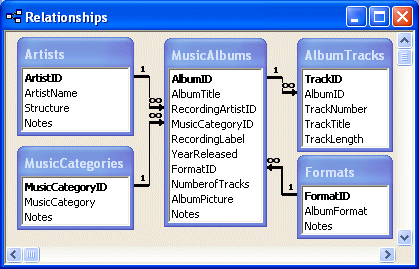
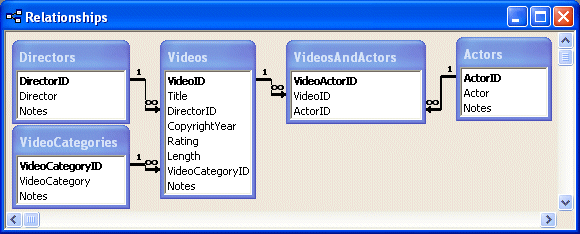
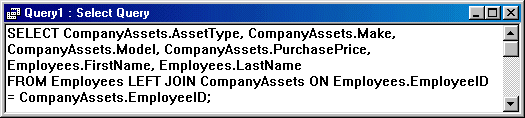
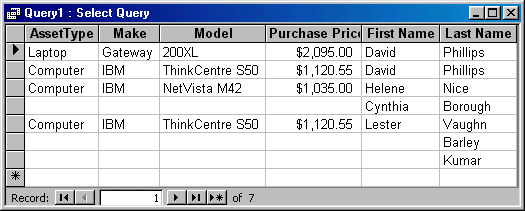
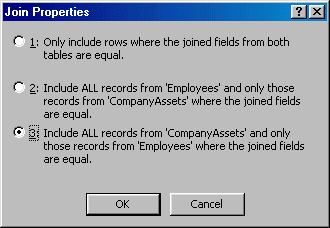
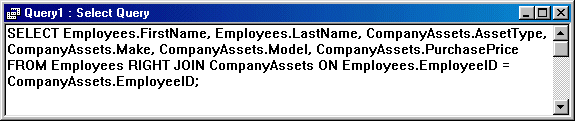
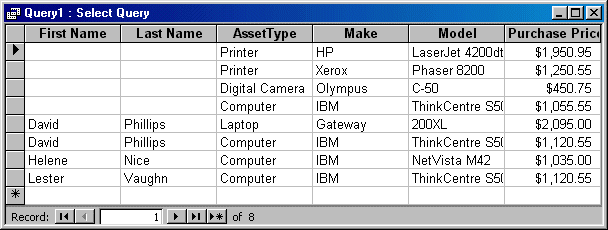
|
MOUS Topics |
|
|
|
S32 |
Create and modify a multitable select query |
|
S33 |
Establish relationships |
|
Exercises |
|
|
|
Watts A Loan |
|
|
|
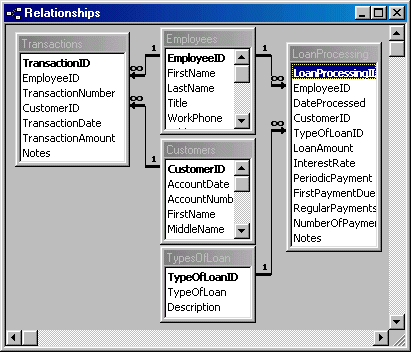
|
Yugo National Bank |
|
|
|
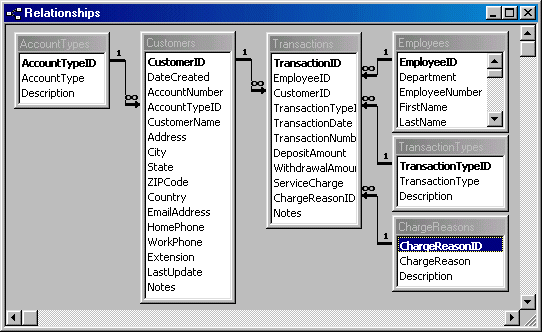
18.
|
Exploring Data Analysis |
|
|
|
|
|
Combinations of Operations |
|
|
|
Overview |
|
|
|
To further enhance your filtering capabilities, you can use Boolean algebra combined with the operators we have used so far. Besides the logical operators we know already, Boolean algebra adds extra operators used to concatenate expressions. Boolean Algebra works on logical statements. A statement is a sentence |
|

|
|
|
Logical Conjunction: The And Operator |
|
|
|
Imagine that you are reviewing the students’ records of a school and you want to make sure that you know whom to contact in case of emergency for each student. For example, imagine that you are trying to make sure the record of each student provides an emergency telephone number. The statement to evaluate would be:
If the record of the student referred to contains an emergency phone number, the statement is true. If the record does not provide this information, our goal is not met and the statement is false. Imagine that, on the other hand, we want to find out if the record of each student displays the name to contact in case of emergency. The statement considered would be:
If the record considered displays an emergency name, the statement is true. Imagine that a student's record indicates an emergency telephone number but does not provide an emergency name. What if a student's record indicates an emergency name but no emergency telephone number? It appears that in the absence of one of these pieces of information, it would be hard to perform an effective contact. To make a record complete or to accomplish our goal, we want each record to have both an emergency name and an emergency telephone number. We can combine both of the above statements as follows:
Evaluating the combined statement would produce the following results:
To resume, our goal is met only
if BOTH the first and the second statement are TRUE. |
|
|
|
|
|
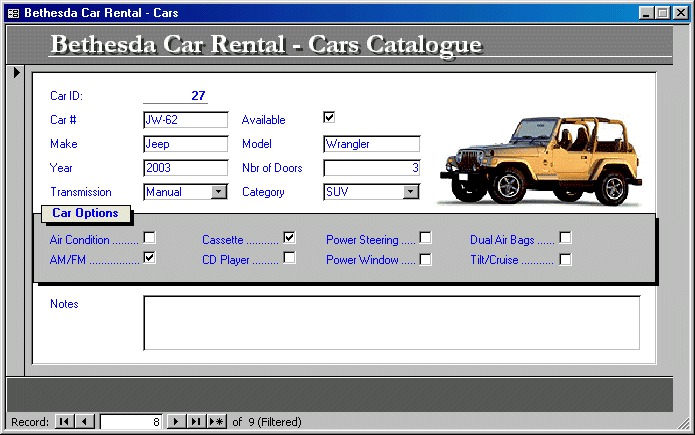
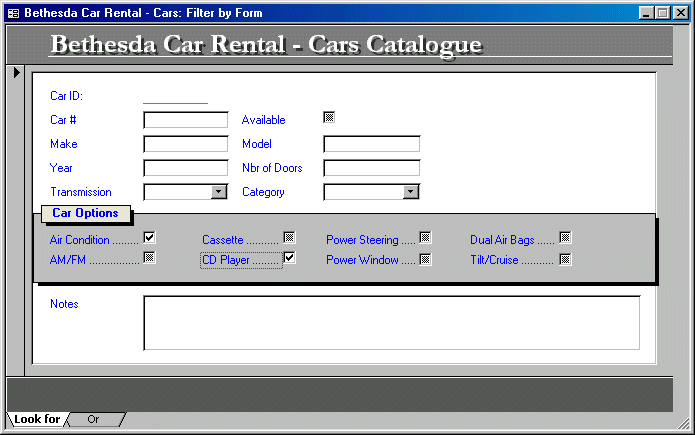
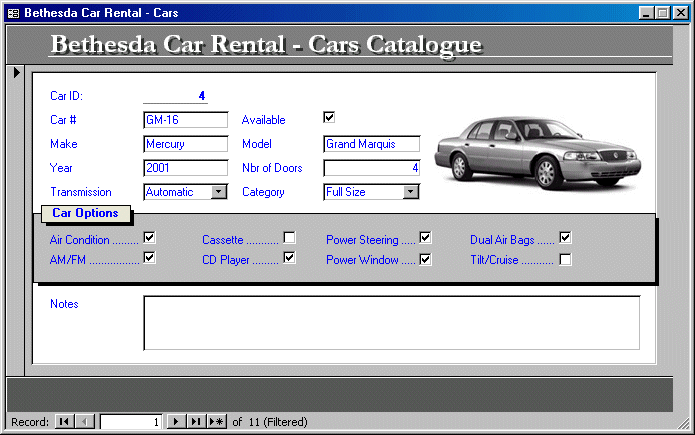
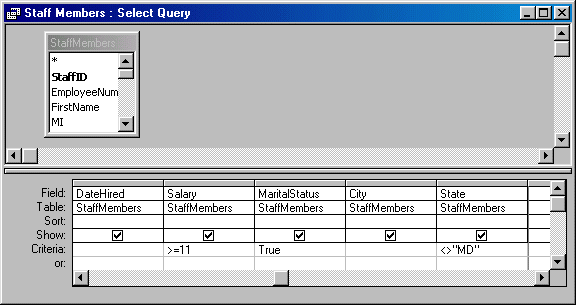
|
Logical Disjunction: The OR Operator |
|
|
|
Imagine that our main goal is to make sure that we have a number we can use to contact somebody for the student. In this case, either the home phone number or the emergency number would be fine. We already have the following two statements:
To get either number, we can concatenate these two statements and evaluate the truthfulness of either one of them. We create a new statement as follows: "This student's record indicates a home phone number" OR "This student's record provides an emergency phone number" The comparative evaluation produces the following results:
The logical disjunction shows us that a combined statement
is true if EITHER of its two statements IS TRUE. The logical disjunction
produces a false result if BOTH of its two statements are FALSE. |
|
|
|
|
|
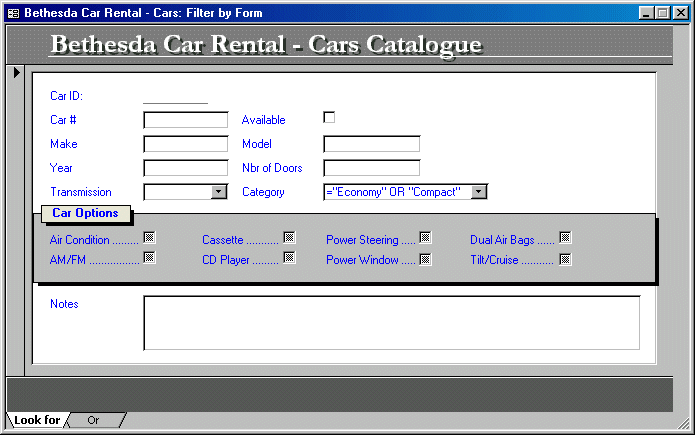

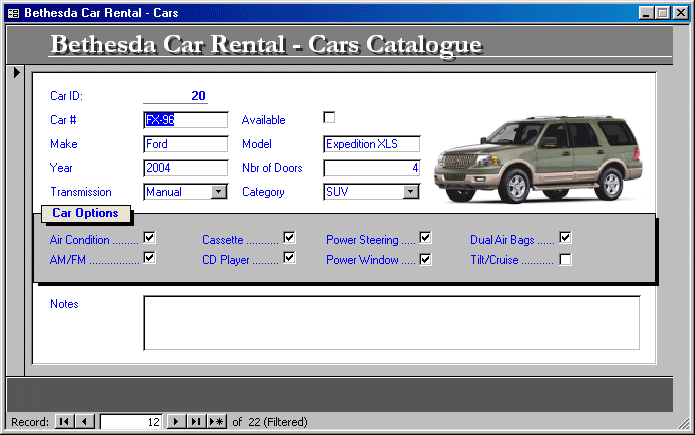
|
Combination of Logical Operators |
|
|
|
You can apply more restrictive filters by combining logical
operators, as long as you follow some rules. Imagine that in your database of
students, you want to get a list of girls whose records indicate either a
home telephone number or an emergency telephone number. On the other hand,
imagine that, at your car rental company, a customer wants to rent a small
car that has a cassette player. To find these records, you should proceed by
logic thinking and combine filters that can produce the right result. Because
databases are varied and scenarios are different, there is no strict recipe
to follow, just some suggestions.
Then click the OR tab and proceed the same for both the Gender combo box and the emergency telephone number field:
After applying the filter, you would notice that the list
displays only boys whose records have either of both telephone numbers.
|
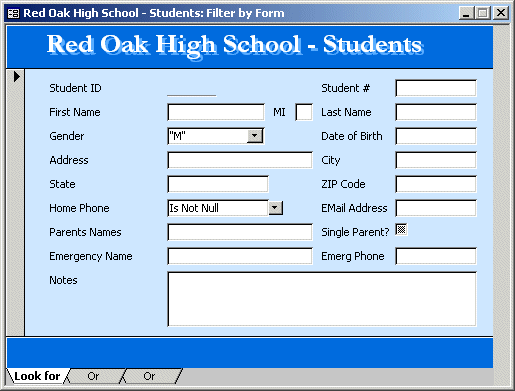
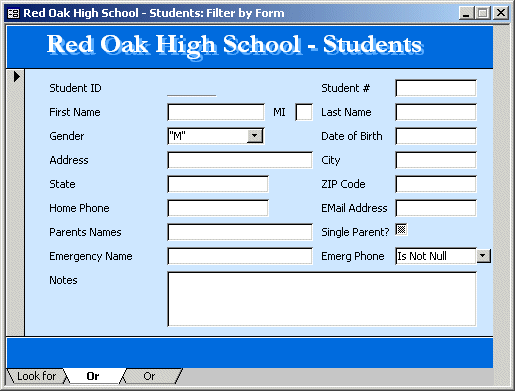

|
|
|
|
|
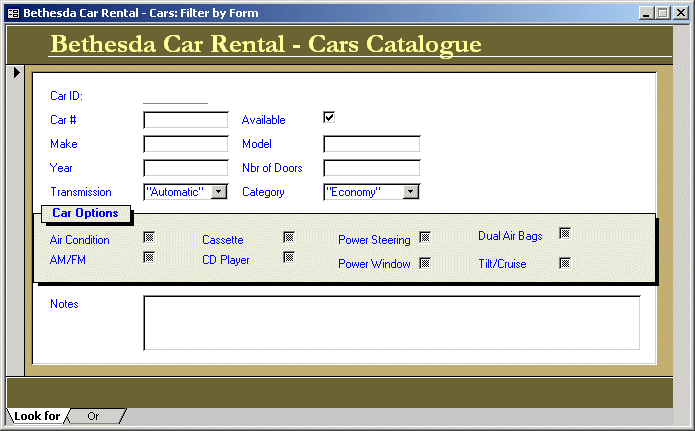

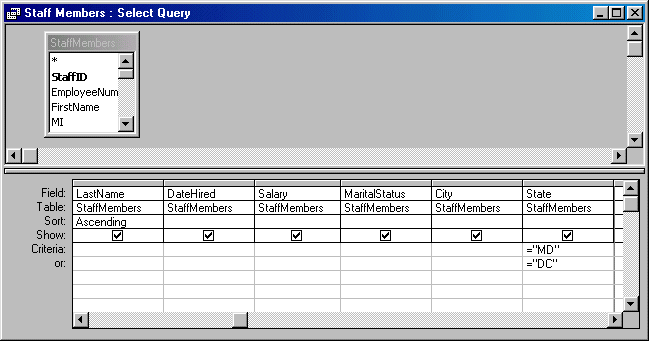
|
Logical Operators: Between |
|
|
|
The Filter By Form feature allows you to filter records by assigning appropriate criteria. The Filter By Form is like a dialog box in the form of a datasheet where you decide how to set the criteria. A technique used to filter records between ranges of values involves the use of the BETWEEN keyword. The Between comparison is usually combined with the AND operator to get a list of records between two values. |
|
|
|
|
|
|
Like Wildcards |
|
|
|
A wildcard is a character or a group of characters that specify a criterion the database should follow to find records. When performing filtering, wildcards are usually used with the LIKE operator. |
|
|
|
|
|
19.
|
Data Analysis With Charts |
|
|
|
|
|
Overview of Charts |
|
|
|
Introduction |
|
|
|
A chart is a technique of displaying data using pictures and graphical representations instead of numbers or simple words. It works by drawing figures that would represent numbers, giving a dramatic effect to the information presented. Good created and formatted charts can help people and businesses make decisions based on the impact that their images provide to the users. While data analysis as we have seen it so far was performed on a record displayed on sheets or forms, data analysis on charts is done using graphics that present pictures. In addition to the pictures, you can add words, also called labels to indicate what the pictures represent. Because a chart is used to present data in a graphical format, before creating a chart, you should plan it. That is, you should prepare it. There are two pieces of information you should have before starting: The numbers that you want to represent and the type of chart you want to use.
The information used to create a chart is the one you would have stored in a table. In some other cases, you can use a query as queries do a good job at isolating records or counting them. Therefore, before creating a chart, you should prepare it so it can be easily recognizable. Data used on a chart can be made of natural numbers. In some other cases, you may want to use percentages. You can also present a series of repeating words and let the chart engine count the occurrences of such words before using them as numbers. Once the data is ready, to create a chart, display the New Form dialog box and in it, select the Chart Wizard. This would give you is selecting the information needed for analysis followed by the type of chart you want to use. There are different types of charts, ranging from columns to pies, from lines to surfaces, etc, as we will review them. To present its information more efficiently, a chart is made of different sections. The main area allows users to view the graphical display of data. A legend explains the meaning of various colors on the chart. A title indicates what the chart is used for.
|
19b.
|
Types of Charts |
|
|
|
|
|
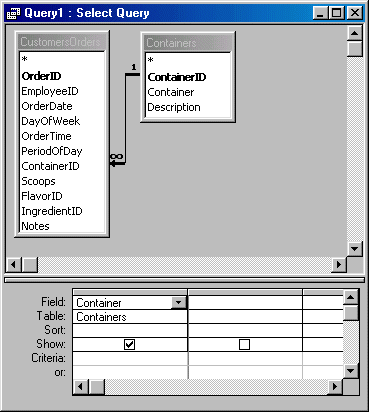
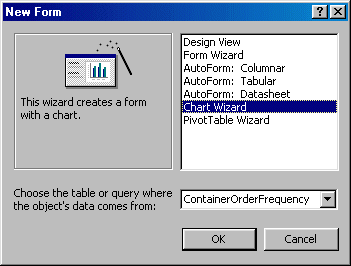
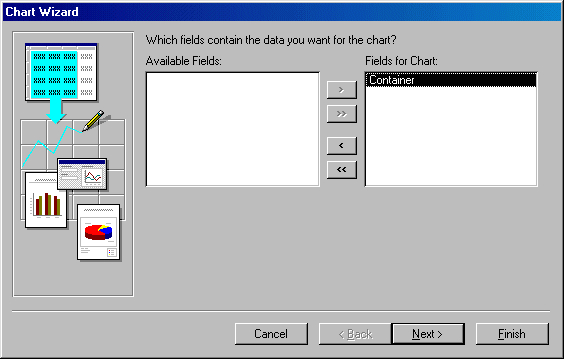
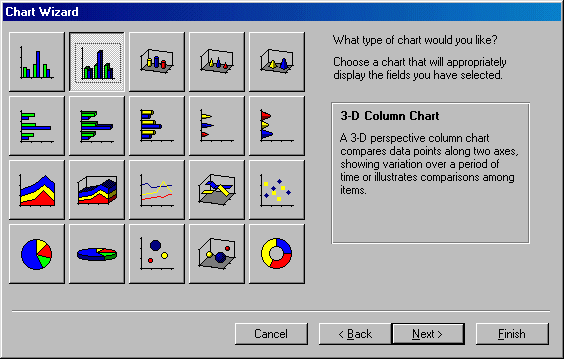
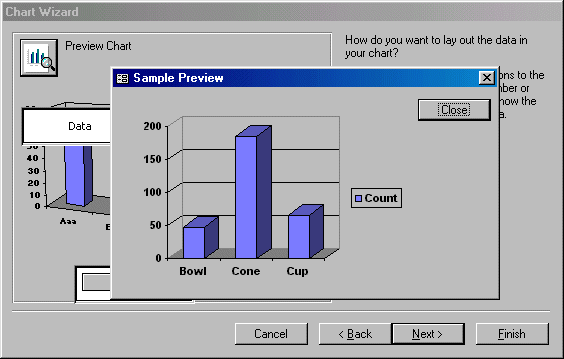
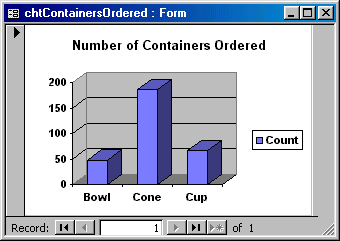
19c.
|
Types of Charts |
|
|
|
|
Like the Column, the Bar chart is used to compare values of the same category on a common scale. This time, the chart is drawn horizontally. You create a Bar chart using the same process as the Column, except that you should select the Bar in the second page of the wizard. In the following chart, we will see the frequent number of scoops that customers order.
1.
To create a new query, on the main menu, click Insert ->
Query and, in the New Query dialog box, double-click Design View 2.
In the Show Table dialog box, double-click CustomersOrders and
click Close 3.
In the CustomersOrders list, double-click Scoops and press Tab.
That will put the caret in the second column 4.
In the second column, type 5.
Save the query as TypesOfScoops
6.
Switch the query to Datasheet View to preview it. Then close it 7.
To create a new chart, on the main menu, click Insert -> Form
8.
In the New Form dialog box, click Chart Wizard and, in
the bottom combo box, select TypesOfScoops and click OK 9.
In the first page of the Chart Wizard, in the Available Fields
list, double-click NumberOfScoops to include it in the Fields For Chart list:
10.
Click Next 11.
In the second page of the Chart Wizard, click the chart in the
1st column - 2nd row Bar Chart
12.
Click Next twice 13.
Set the Title to Number of Scoops/Order and click Finish 14.
Save the form as chtNumberOfScoopsPerOrder
15.
After viewing the chart, print then close the form |
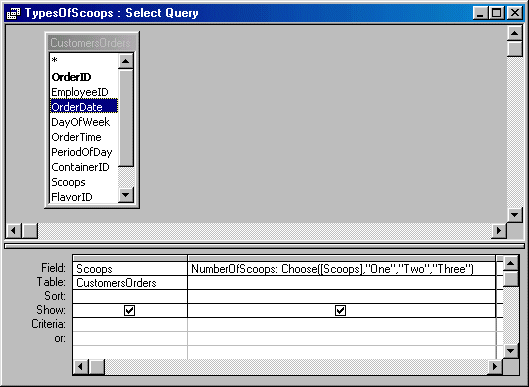
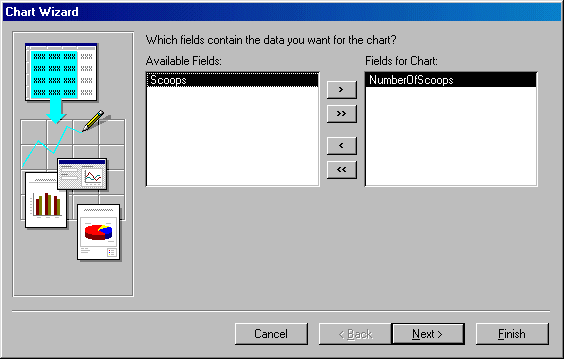
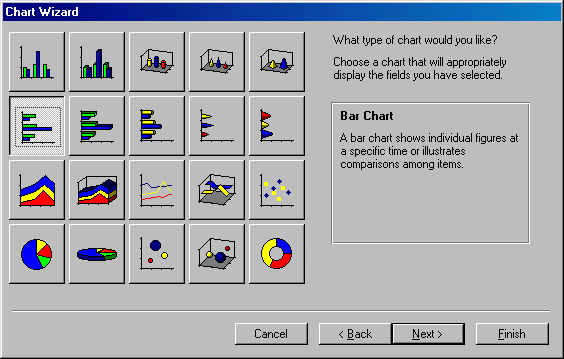
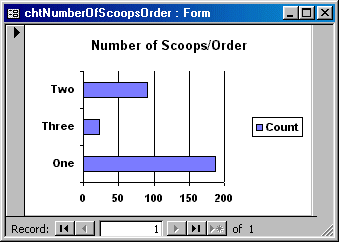
19d.
|
Types of Charts |
|
|
|
|
A Line chart is used to analyze ups and downs of a tendency in a range of values. You can define it with one series of values where you will judge the evolution of an item over a period. When used with more than one series, this chart can be very helpful in comparing values of the same category over the same period. The Line chart can also be used to analyze values that don't share the same periodic variable. For example, you can use it to compare library attendance with regard to the real population number (which could be in hundreds of thousands or millions) with the number of people attending the library. In the latter situation, if the same axes are used to analyze, one category will almost disappear from the chart. The alternative is to separate their axis on the same chart. In the following chart, we are picking a sample week of the year. We then isolate the names of weekdays to evaluate the tendency of customers orders. What we want to know is what days produce more orders and what days are slow. This type of information can help the management decide what days they need more cashiers because there are more customers. On the slow days of the week, the business doesn't need many employees, at least not too many cashiers serving customers. To prepare data to be used, we will create a query that uses the dates orders are placed. Fortunately, we also have a column that evaluates weekdays. This second column will be the actual source of data for the chart. The first column allows us to specify the criteria, which consists of considering only one week as our sample.
1.
To create a new query, on the main menu, click Insert ->
Query and, in the New Query dialog box, double-click Design View 2.
In the Show Table dialog box, double-click CustomersOrders and
click Close 3.
In the CustomersOrders list, double-click OrderDate 4.
In the Criteria field for the new column, type >=#01/06/2002#
And <=#01/12/2002# and press Enter 5.
In the CustomersOrders list, double-click DayOfWeek to put it in
the second column 6.
Save the query as SecondWeekOfJanuary2002
7.
Switch the query to Datasheet View to preview it. Then close it 8.
To create a new chart, on the main menu, click Insert -> Form
9.
In the New Form dialog box, click Chart Wizard and, in
the bottom combo box, select SecondWeekOfJanuary2002 and click OK 10.
In the first page of the Chart Wizard, in the Available Fields
list, double-click DayOfWeek to include it in the Fields For Chart list and
click Next 11.
In the second page of the Chart Wizard, click the chart in the
3rd column - 3rd row Line Chart
12.
Click Next twice 13.
Set the Title to Daily Orders in a Sample Week and click
Finish 14.
Save the form as chtSampleDailyOrders
15.
After viewing the chart, close the form 16.
Print the chtSampleDailyOrders form |
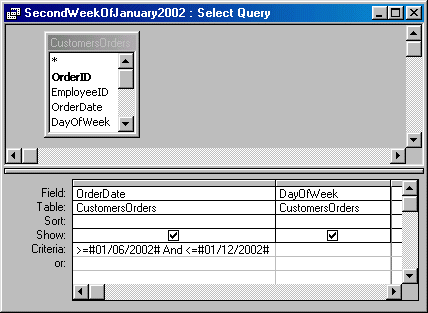
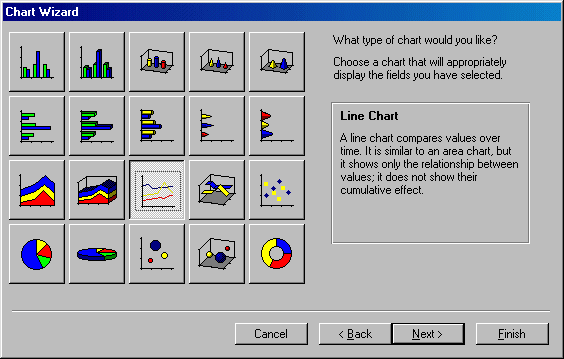
19e.
|
Types of Charts |
|
|
|
|
1.
In the Database window, click Queries
if necessary. 2.
In the Show Table dialog box, double-click CustomersOrders
followed by Flavors and click the Close button 3.
In the Flavors list, double-click Flavor 4.
To view the result, switch the query to Datasheet View 5.
Save the query as FlavorOrderFrequencies and close it 6.
On the main menu, click Insert -> Form 7.
In the New Form dialog box, click Chart Wizard and, in
the bottom combo box, select FlavorOrderFrequencies, and click OK 8.
In the first page of the Chart Wizard, as the Flavor item is
already selected in the Available Fields list, click the select one button 9.
In the second page of the Chart Wizard, click the chart in the
1st column - 4th row Pie Chart
10.
Click Next 11.
To take a glimpse at the chart, click the Preview Chart button
12.
Click Close and click Next 13.
Set the Title to Frequency At Which A Flavor Is Ordered
and press Enter 14.
After viewing the chart, save the form as chtFlavorFrequency
and close it |
|
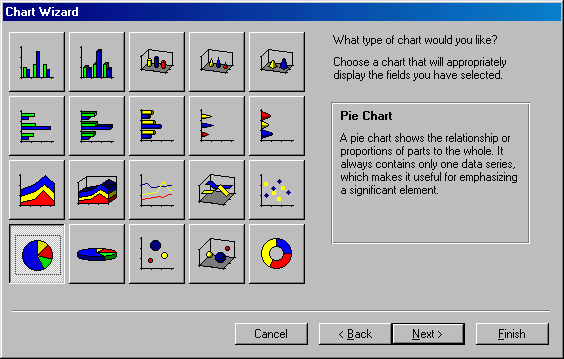
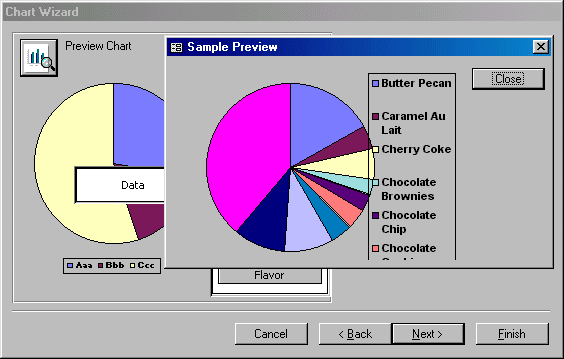
19f.
|
Types of Charts |
|
|
|
|
A Doughnut chart is an alternative to the Pie chart as both use the same types of values. The main difference between both types of charts is that a Doughnut chart can include more than one series of data.
1.
To create a new query, on the main menu, click Insert ->
Query and, in the New Query dialog box, double-click Design View 2.
In the Show Table dialog box, double-click Ingredients
followed by CustomersOrders and click Close 3.
In the Ingredients list, double-click Ingredient 4.
Run the query to preview it 5.
Save the query as ChoiceOfIngredient then close it 6.
To create a new chart, on the main menu, click Insert -> Form
7.
In the New Form dialog box, click Chart Wizard and, in
the bottom combo box, select ChoiceOfIngredient and click OK 8.
In the first page of the Chart Wizard, click the select one
button 9.
In the second page of the Chart Wizard, click the chart in the
last column - last row Doughnut Chart 10.
Click Next twice 11.
Set the Title to Customers Choice of Ingredient and click
Finish 12.
Save the form as chtChoiceOfIngredient
13.
Print the chtChoiceOfIngredient form 14.
After viewing the chart, close the form |
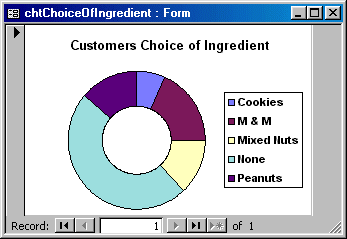
19g.
|
Types of Charts |
|
|
|
|
The cone is made of a circular base topped by a higher point. When used with various data, the higher values will have the complete cone while the lower values will share portion of the geometric figure. The cone chart should be used with values that can take advantage of its graphing dimensions. The Pyramid chart resembles the cone chart with a difference on their respective base. Both are constructed the same and can be used in similar scenarios. When analyzing data for geographical purposes, the Pyramid chart can render very dramatic effects.
1.
To create a new query, on the main menu, click Insert ->
Query and, in the New Query dialog box, double-click Design View 2.
In the Show Table dialog box, double-click CustomersOrders
and click Close 3.
In the CustomersOrders list, double-click DayOfWeek 4.
Run the query to preview it 5.
Save the query as DailyCustomerAffluence and close it 6.
To create a new chart, on the main menu, click Insert -> Form
7.
In the New Form dialog box, click Chart Wizard and, in
the bottom combo box, select DailyCustomerAffluence and click OK 8.
In the first page of the Chart Wizard, click the select one
button 9.
In the second page of the Chart Wizard, click the chart in the
last column - 1st row Pyramid Column Chart 10.
Click Next twice 11.
Set the Title to Daily Customer Affluence and click
Finish 12.
Save the form as chtDailyAffluence and print it 13.
After viewing the chart, close its form |
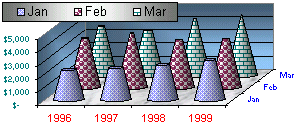
19h.
|
Types of Charts |
|
|
|
|
In some cases you may want to analyze two or more series of data, either concurrently or as they relate to each other. For example, in our ice cream application, you may want to know how often customers who order the Butter Pecan flavor are likely to add an ingredient to their order (since butter pecan already has some nuts in it). Also, if another analysis reveals that Vanilla is most often ordered, is it related to a particular time of the day? To analyze data from two series, when preparing it, make sure you create a way for the chart engine to figure out how to reconcile the numbers. Also, not all charts are made for multiple series.
1.
To create a new query, on the main menu, click Insert ->
Query and, in the New Query dialog box, double-click Design View 2.
In the Show Table dialog box, double-click CustomersOrders
followed by Containers and click the Close
button 3.
In the CustomersOrders list, double-click PeriodOfDay
4.
In the Containers list, double-click Container 5.
To view the result, switch the query to Datasheet View 6.
Save the query as ContainerByPeriodOfDay and close it 7.
On the main menu, click Insert -> Form 8.
In the New Form dialog box, click Chart Wizard and, in
the bottom combo box, select ContainerByPeriodOfDay, and click OK 9.
In the first page of the Chart Wizard, click the select all
button 10.
In the second page of the Chart Wizard, click the chart in the
2nd column - 1st row Pie Chart
11.
Click Next twice 12.
Set the Title to Container by Period of Day and press
Enter 13.
After viewing the chart, save the form as chtContainerByPeriodOfDay
14.
Print the form and close it |
20.
|
Formatting Charts |
|
|
|
|
|

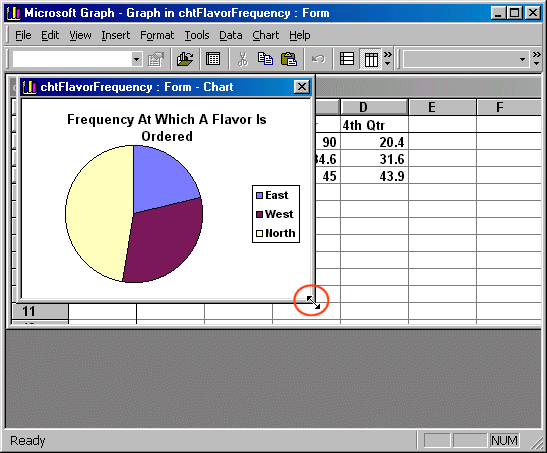

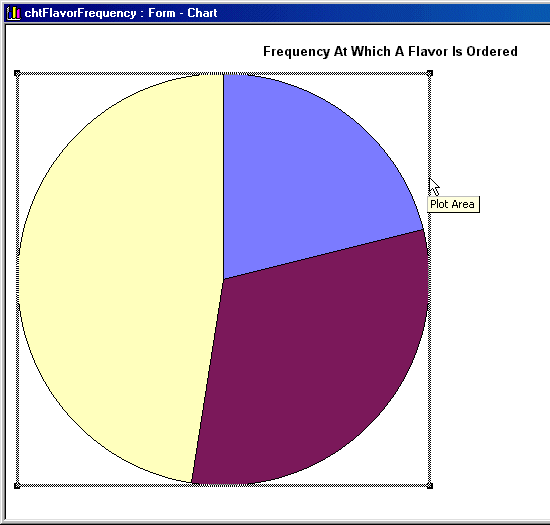
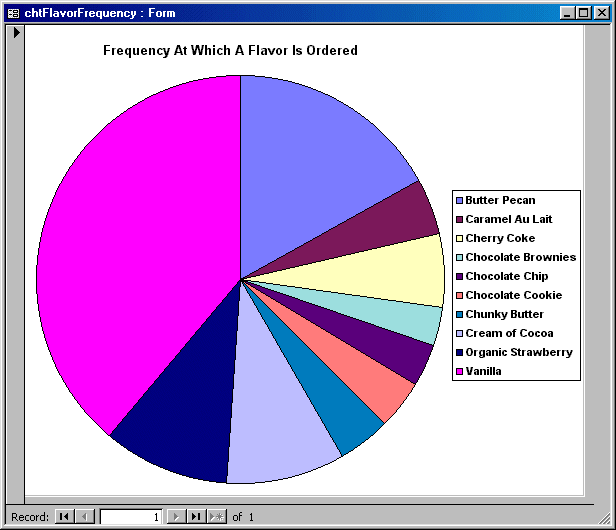
20b.
|
Formatting Charts |
|
|
|
|
The Chart Wizard is equipped with various kinds of charts. In each category, different sub-types are used to accomplish a unique purpose. Although they share a lot of characteristics, some charts in the sub-type can tremendously change or alter the intended goal. You should know what options are available, and then act accordingly. Many charts can be changed from one kind to another, sometimes completely different. For example, you can change a chart from a flat column to 3-D. You can also change a chart from a bar to a cylinder, etc. To actually change a chart, after displaying its parent form in Design View, you can double-click it. This would open the Microsoft Graph application. From there, you can right-click any part of the chart to make the necessary changes. Any area you right-click presents a particular menu. This is because a chart is made of various sections. To change the type of chart, you can right-click a white area on the Form - Chart window and click Chart Type. This would bring up the Chart Type dialog box. It presents the various available types of charts and you can click one of them. If none of the available types suits you, you can click the Custom Type tab for more options.
1.
Open the chtDailyAffluence form in Form View and switch it to
Design View 2.
Right-click on a white area on the chart and click Chart Type… 3.
In the Chart Type dialog box, make sure the Standard Types
property page is displaying
4.
Click OK 5.
As done for the the chtFlavorFrequency chart, resize the chart
window 6.
Close the Microsoft Graph window to return to Microsoft Access 7.
Once again, resize the form and the chart to occupy as much
space as possible 8.
Save and close the form |


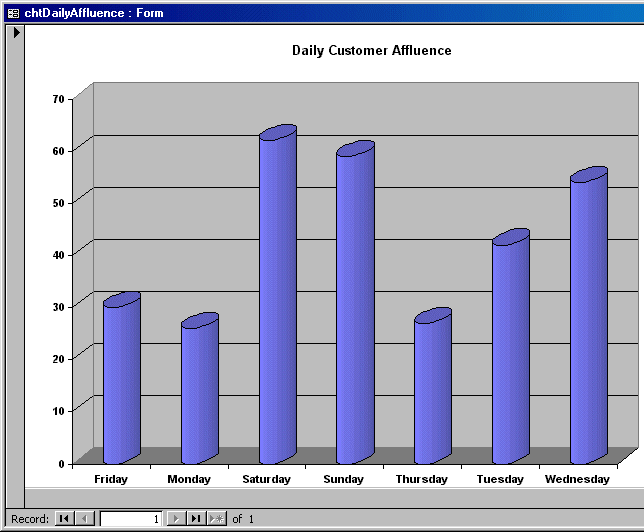
20c.
|
Formatting Charts |
|
|
|
|
As mentioned already, to present its information and explain it, a chart is made or various sections.
Most or everyone of these aspects can be hidden, displayed or changed. To perform any action on these parts, after displaying the form or report that holds the chart in Design View, you can double-click the chart. Then, in Microsoft Graph, click or right-click the desired part.
To indicate what it is used for, a chart can be equipped with a title. The title is a string that typically displays in the top section of a chart. In some rare cases, a title can also be positioned under the chart. To move the title, click and drag it in the desired direction. To format the title, you can either double-click it or right-click it and click Format Chart Title. By default, the chart displays without a border, in bold Arial. You change reformat it using the Format Chart Title dialog box.
1.
From the Forms section of the Database window, double-click the chtContainerByPeriodOfDay
form and switch it to Design View 2.
Double-click the chart to open the Microsoft Graph window and
enlarge the window that contains the chart 3.
Right-click the Container by Period of Day title and click Format
Chart Title... 4.
In the Format Chart Title dialog box, click the Font property page 5.
In the Font combo box, select Times New Roman 6.
In the Size combo box, select 18 7.
Click arrow of the Color combo box and select Blue
8.
Click OK 9.
Close the Microsoft Graph window 10.
Adjust the chart to fit the form 11.
Save and close the form 12.
Right-click the chtFlavorFrequency form and click Design View 13.
Double-click the chart to open Microsoft Graph 14.
Click the title on top twice (that is, click it and click it
again; not double-click) to put it into edit mode 15.
Edit it to display PercentageOrdered 16.
Click between Percentage and Ordered then press Enter to create
a new line 17.
Click somewhere else to deselect 18.
Move the title to the top left section and double-click it.
Change its font to Haettenschweiler, Bold, 14, Red
and click OK |
|

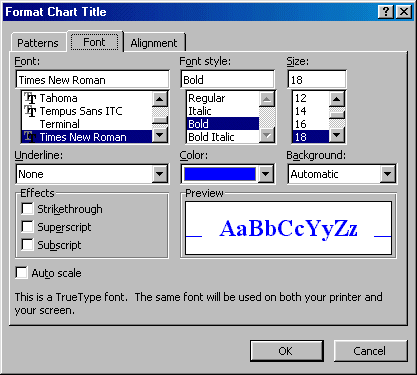
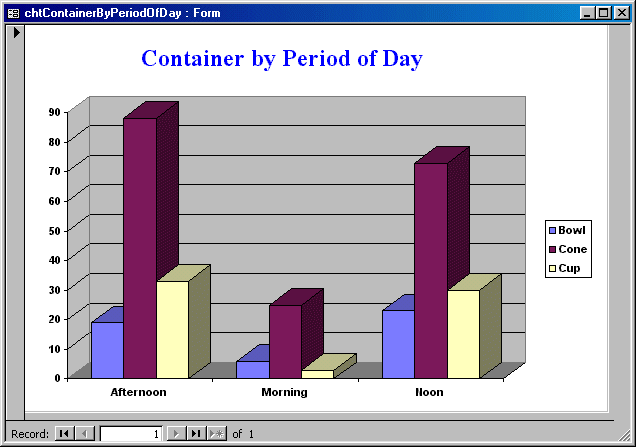
|
Chart Figures |
|
|
|
To represent its numbers to the user, a chart draws some geometric figures, depending on the type of chart. These figures can be rectangles, pie slices, triangles, cones, etc. By default, the chart engine uses some randomly selected colors from its own list. You can either change these colors or apply some preset drawings available. You can also design and use any custom picture to paint the chart's shapes. To format the geometric figures of a chart, you can right-click one of them and click Format Data Series. |
|
|
|
|
|
|
A Chart's Legend |
|
|
|
When a chart draws its graphics, if the data is made of different types of values, the chart engine uses a different column for each type of value to differentiate them. Because this can become confusing, a small box is created as a guide. This box, by default displayed to the right of the chart, is called a legend. In the legend, a small painted square displays a color and a label on its right. The color is one of the colors used on the graphics of the chart. The label indicates what that part represents |
|
|
|
|
|
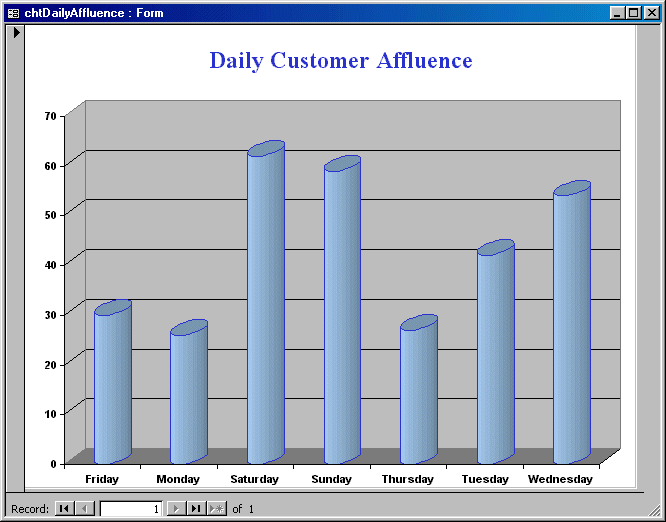

|
Chart's Labels |
|
|
|
By default, when a chart is drawn, it is equipped with shapes and a separate legend. If you want, you can display the value of each part and possibly its name close to it. This is done through a label. On a large chart, a label can also be used in the absence of a legend. In fact, you can delete a legend and simply make use of a label. Labels are created using the same approach as we have done with the legends and titles. |
|
|
|
|
|
|
Chart's Walls |
|
|
|
The wall is in fact the background of a chart. By default, it is painted either white or gray, depending on the chart. You can use a different color to paint it, a design pattern or a picture to cover it. |
|
|
|
|
|
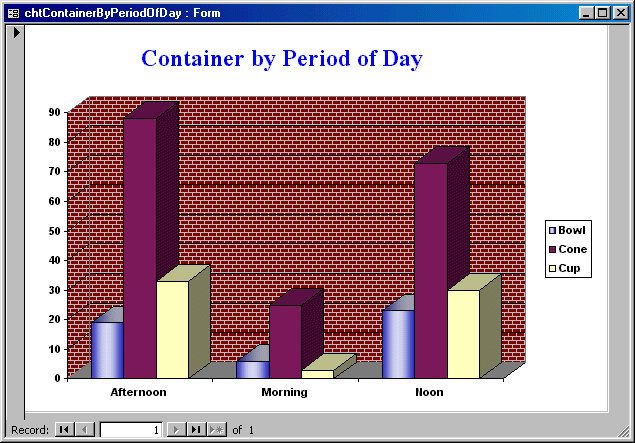
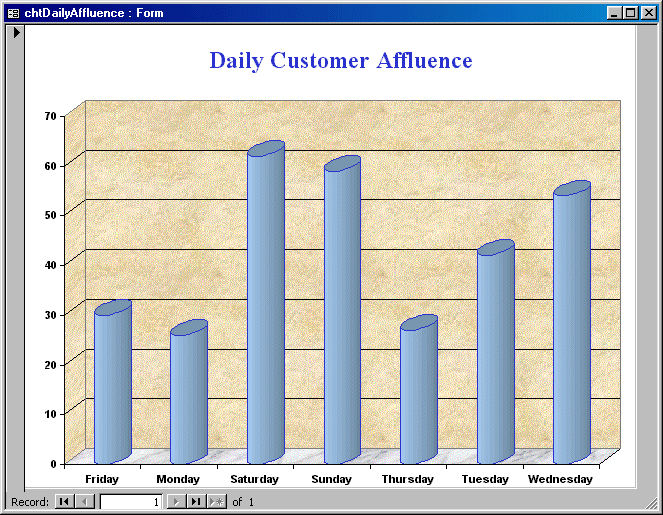
21.
|
Action Queries |
|
|
|
|
Creating a database is usually the first action you perform
in order to have one. Of course, you can also open an existing database.
Creating a Microsoft Access database is
done visually as you must create its file without using SQL code, contrary to
many other database environments. The second action to take is probably to
create a table.
|
|
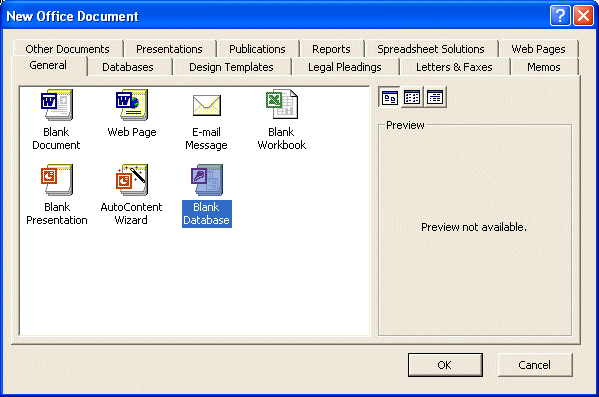
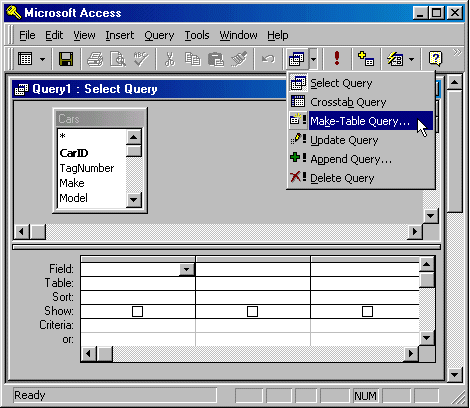
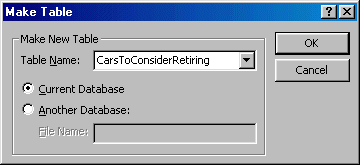
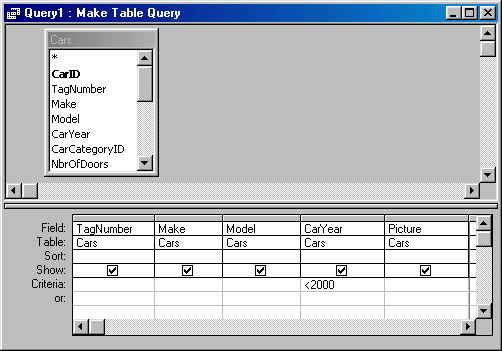
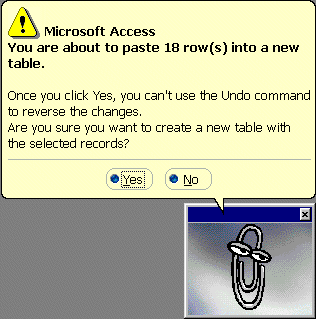
|
SQL and Table Creation |
|
|
|
As a computer language, the SQL is
equipped to perform all basic and necessary operations of a database. As
such, it can be used to create a table. Although you will usually use the
visual means of Microsoft Access, you can still use a SQL statement to create
a table. CREATE TABLE TableName
As you have probably realized by now, every table must have at least one column. The list of columns of a table starts with an opening parenthesis “(“ and ends with a closing parenthesis with an optional semi-colon “);”. If the table will be made of more than one column, you can separate them with a comma. The syntax used would be: |
|

CREATE TABLE TableName (Column1, Column2, Column_n);
To make the statement easier to read, and because some columns can be long, you can create each on its own line. The syntax would become: CREATE TABLE TableName ( Column1, Column2, Column_n ) To create a column, you specify its name, followed by its data type, and some possible options. Therefore, the syntax of creating a (one) column is: ColumnName DataType Options Notice that there is only space that separates the sections of the syntax. For this reason, the name of a column should be in one word because, if you put space after the first word, the SQL engine would treat the next word as a data type. For example, the following statement would produce an error: CREATE TABLE Test ( Marital Status ) If you want to use space in a column name, include the name between an opening square bracket “[“ and a closing square bracket “]”. The above statement would be changed to: CREATE TABLE Test ( [Marital Status] ) After (or on the right side of) the column name, you must specify the type of information, also called the data type, that will be stored in the cells under that column. Here are the SQL data types supported in Microsoft Access:
CREATE TABLE Persons ( FirstName VARCHAR, [Last Name] Text, Gender int, [Date Of Birth] DateTime, MaritalStatus Integer, IsMarried Bit, PersonalIncome Money, HouseholdIncome Currency );
When studying techniques of creating fields in a table’s
Design View, we saw that a property called Field Size can be used to
specify the size of value used on a field. In the SQL also, this property is
fixed for most fields expect those that are text-based. Therefore, when
creating a field whose data type is char, text or varchar,
you can specify the desired number of characters that the field should allow.
If you are creating a char or a varchar column, you should
(strongly) specify the number of characters instead of letting Microsoft
Access assign the default. The text usually doesn't use a number of characters. CREATE TABLE Persons ( PeronID long Primary Key, FirstName VARCHAR NULL,[Last Name] Text, Gender int NULL,[Date Of Birth] DateTime, MaritalStatus Integer, IsMarried Bit NULL,PersonalIncome Money, HouseholdIncome Currency ); If you don't specify the NULL attribute, the nullity
is implied. On the other hand, if you want to require the values of a field
so the user cannot move to the next record unless the field is filled, type not
null to its right. This would indicate to Microsoft Access that the field
does not allow a null value. CREATE TABLE Genders ( GenderID int CONSTRAINT PKGender Primary Key,Gender char(20) ); To establish a relationship from this table when creating another table, in that other table, create a field. By tradition, this would have the same name as we have mentioned already but this is not a requirement. The requirement is that both fields (the new field and the field it refers to in the parent table) must have the same data type. When creating the relationship, after specifying the name of the field and its data type, type the references keyword followed by the name of the table it is linked to and its primary key as argument. For example, to create a Persons table that is related to the above Genders table, you would type: CREATE TABLE Persons ( PeronID long Primary Key, FirstName VARCHAR NULL, LastName Text Not Null, GenderID int REFERENCES Genders(GenderID),Notes char ); |

|
|
|
|
|
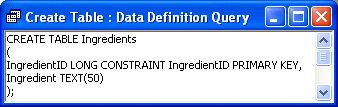
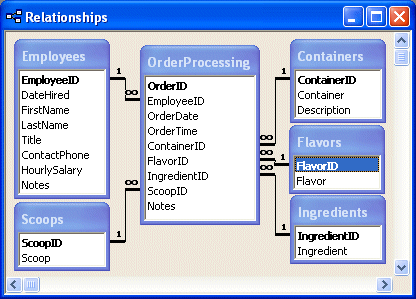
|
SQL and Data Entry |
|
|
|
When using the Make-Table Query of Microsoft Access, you actually perform two actions at once. First you create a table, which is the primary requirement of the Make-Table Query, then, when you execute the query, you fill the new table’s fields with the existing values of the originating table. |
|

|
The SQL allows you to actually perform data entry on a table. In the language’s standard, you can create a table and fill it with values. Alternatively, you can add various new records to the fields of an existing table. This is also referred to as inserting records. In the SQL, data entry is performed using the INSERT INTO expression, followed by the table name, followed by the VALUES keyword, and followed by the values in parentheses. If the table is made of only one column, you can include the desired value in the parentheses. If the table is made of more than one column, you must separate the values with commas. The syntax to use is: INSERT INTO TableName VALUES(Column1, Column2, Column_n) The TableName attribute must be the name of an existing table of the current database. If the name is wrong, that is, if the name is not found in the database, the SQL engine would consider that the table you are referring to does not exist. Consequently, you would receive an error. The VALUES keyword indicates that you are ready to
list the values of each field of the record. The values of the columns must
be included in parentheses. |
|
|
|
|
|
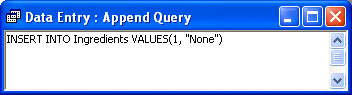
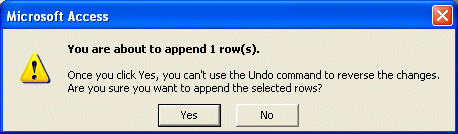
|
Queries and Record Appending |
|
|
|
When working in a sensitive database, if you were the one
in charge of data entry, you may prefer to use a temporary table to create
records to make sure they are validated before actually adding them to the
system. If you had created a significant number of these records and need to
add them to the main table, the work can become overwhelming. Fortunately,
Microsoft Access allows you to create a special query that can be used to add
many records to a table in one step. |
|
|
|
|
|
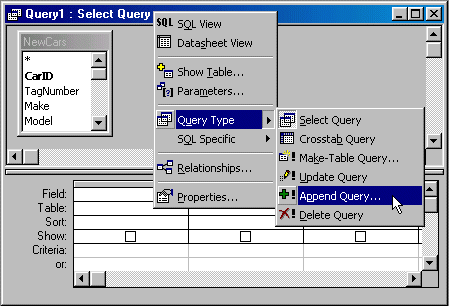
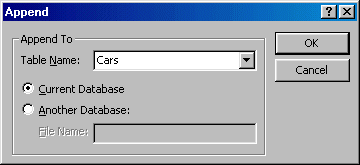
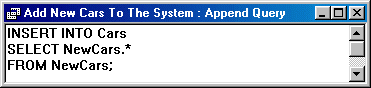
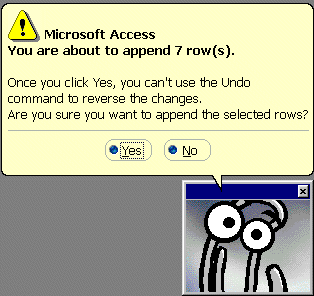
|
Queries and Records Updating |
|
|
|
If you have a large database and all of a sudden, there are
many records that need to receive a common change, you may face an arduous
task. For example, you may have to check every record and make the change
where needed. Fortunately, to apply this type of impact to a set of records,
you can create a special query. |
|
|
|
|
|
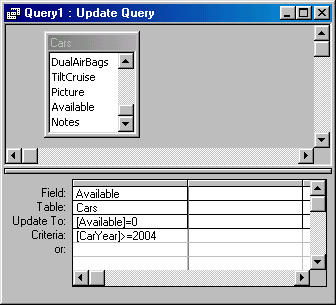

|
Queries and Table Deletion |
|
|
|
Microsoft Access provides various techniques to delete tables. In the next lesson, we will see how this can be done in the Database window. Meanwhile, the SQL provides its own mechanism to delete a table. This is easily done using the DROP command. The syntax is: DROP TABLE TableName; The DROP TABLE command is used only to delete tables (and indexes), not forms or reports. The TableName parameter must be a valid name of a table of the current database. There are two big issues with the DROP TABLE command: it does not warn you and it is not reversible. |
|
|
|
|
|
|
Queries and Record Deletion |
|
|
|
Besides deleting tables, you can also delete individual
records of a table. Microsoft Access provides an easy mechanism of performing
such an operation. To delete a group of records in one action, you can create
a special query called a Delete Query. |
|
|
|
|
|
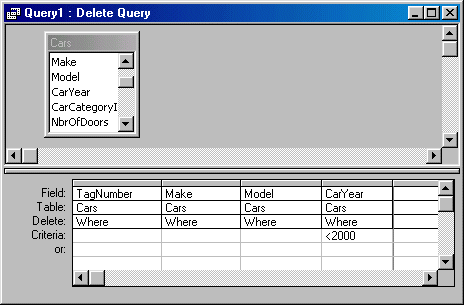
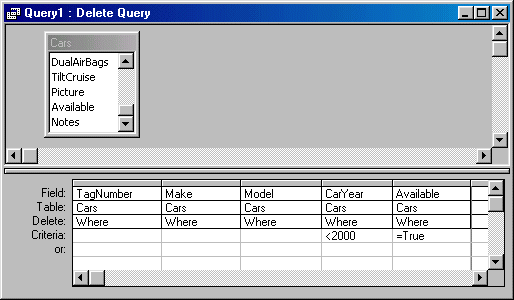

22.
|
Database Maintenance, Import, and Export |
|
|
|
|
A validate rule is a condition that the value entered in a field must meet in order to be valid. This rule is usually created as an expression and entered in the Validation Rule property of a field when the table or the form is opened in Design View.
When the condition in the Validation Rule field is not respected, you can display a message box to let the user know. The message for that text box can be created as a string in the Validation Text field.
|
|
|
Value Required for a Field |
|
|
|
If you think that there must be an entry for a particular field for each record, you can let Microsoft Access know. The Required property is Boolean value. If you set it to Yes, the user would not be able to move to the next record until he has entered a valid data in the field. Its default value is No. |
|
|
|
|
|
|
Indexed Fields |
|
|
|
When data is entered in fields, it is possible to have the same value for a field in different records, such as two people who live in the same state. This is considered as a duplicate value. In some other cases, this may not be acceptable. For example, you may not want two employees to have the same employee number. This characteristic can be set using the Indexed property that provides 3 values:
|
|
|
|
|
|
|
Data Import/Export |
|
|
|
Introduction |
|
|
|
Importing data allows you to get information from an external source and insert it in your database. Microsoft Access can accept data from various applications, and with a little trick, you can import even from unfriendly applications. Before importing data, you must make sure that it is in a format Microsoft Access can read; even if that data is coming from another application of the Microsoft Office suite. |
|
|
|
|
|
|
Import/Export With Text Files |
|
|
|
As you are already familiar with Microsoft Access
functionality, you know that a cell is delimited with gridlines. If you
intend to import a text document, format it so that Microsoft Access can
recognize where a field starts and where it ends. Such a file can be created
with Notepad. This delimiter is usually done by pressing Tab when creating
the fields' content and pressing Enter at the end of each record. Instead of
the Tab key, you can also use a comma or a semi-colon to separate two fields.
Since a field is usually made of more than one word (such as an address),
enclose the content of each field in double quotes, as in "1600
Pennsylvania Avenue". |
|
|
|
|
|
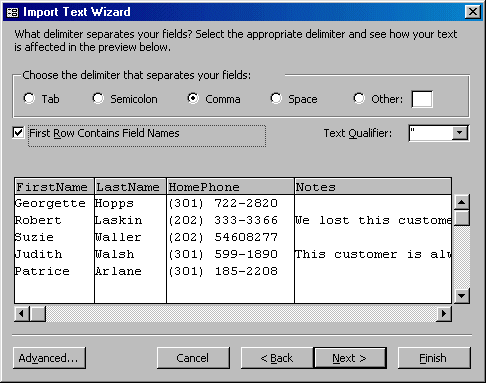
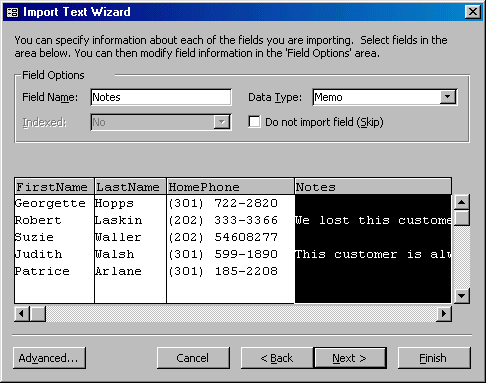
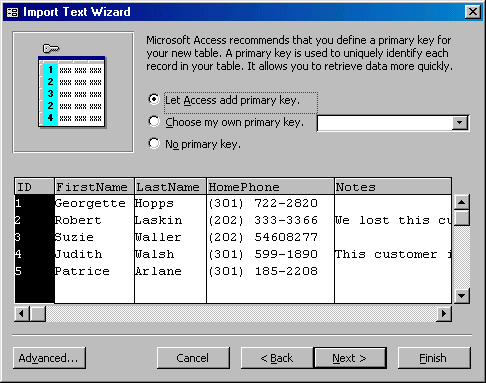
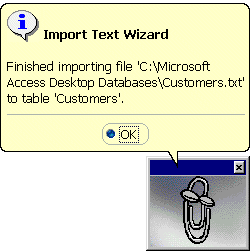
|
Import/Export With Microsoft Access Objects |
|
|
|
Microsoft Access objects are probably the easiest objects to import because, created with of the same application, these objects are already formatted and recognizable. To import objects from another Microsoft Access database, you can use the main menu or the New Table dialog box. |
|
|
|
|
|
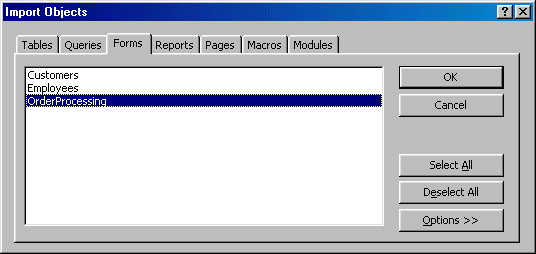
|
Database Objects Linking |
|
|
|
Linking data allows you to connect your database to an external document. Such a table can have its data accessed directly or modified in Microsoft Access. When linking data, since you are making it available to the database, make sure that Microsoft Access can "read" it; otherwise it would not recognize its content. The main reason you link data is to treat your database as one file despite its belonging to another document. Linking to a spreadsheet is usually a straightforward process. Linking to a word processing document usually involves performing a mail merge. |
|
|
|
|
|

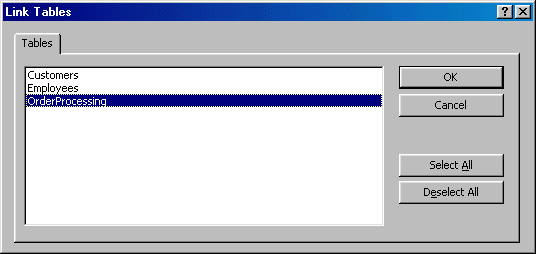
|
Import/Export/Linking With Spreadsheet Files |
|
|
|
When creating a spreadsheet in Microsoft Excel for data
import, you have two alternatives. You can create the column headers at the very top of the worksheet and type a
data field in each corresponding column. Alternatively, you can create data
as on a table, and then create a name range that holds the information you
need in the database. To import a Microsoft Excel spreadsheet, on the main
menu, you can click File -> Get External Data -> Import. Locate the
file that holds the spreadsheet and click Import. You would be asked to
specify what to import, a whole spreadsheet or a named range. |
|
|
|
|
|
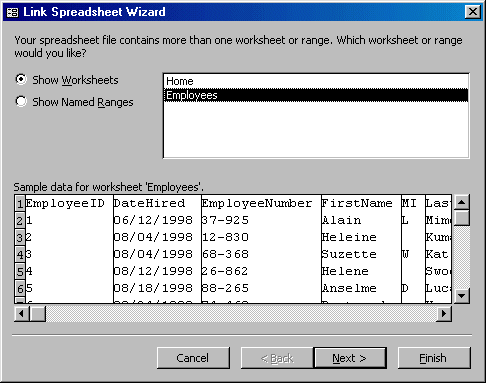

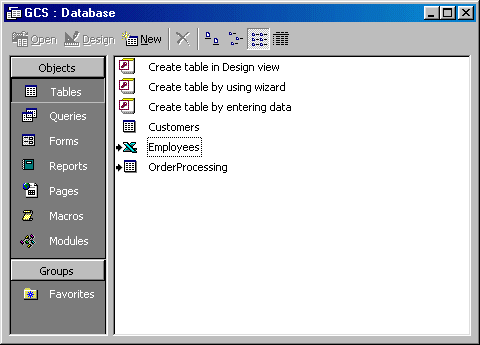
|
Import/Export With Microsoft Outlook |
|
|
|
Importing a Microsoft Outlook document is mainly done on the address book level and is as smooth as what we have seen so far. All you have to do is have the address book already created and you are ready to go. The following exercise is not supposed to be performed here; it is provided as a guide
|
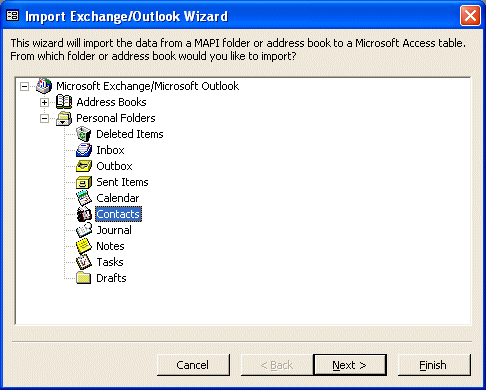
|
Saving a Database Object As a Web Page |
|
|
|
|
Microsoft Access allows you to create a web page based of your database. The process of doing this is different from one version of Microsoft Access to another. We will cover only Microsoft Access 2000. |

|
|
|
|
|

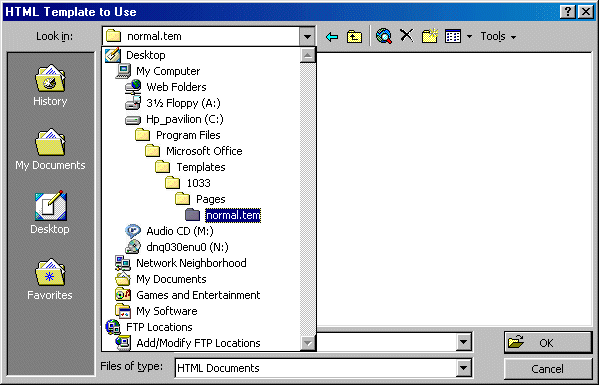
|
Mail Merge |
|
|
|
Mail merging allows you to use data on your database to create letters, labels, envelopes, and other documents that require external data originating from another document. When performing a mail merge, you usually do not need all the fields that are part of a table. Although you can use all fields on a table, it is recommended that you create a query made only of fields you need for your document. This would include the name and address of the recipient. Perform the following exercise only if you have Microsoft Word |
|
|
|
|
|

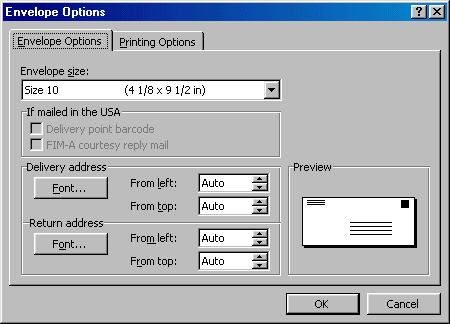
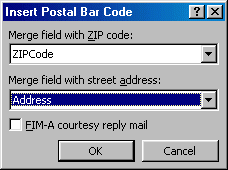

|
Considerations on Data Entry |
|
|
|
The Computer Regional Settings |
|
|
|
The information in a database is stored in tables, although you will usually not allow users to get access to such objects. The table is therefore the most principal means of data entry. The computer controls how it is supposed to display some pieces of information such as date and time values. These also affect internal settings of databases and other programs used on a computer. To view, control or set these properties, the computer bases its decisions on the Regional Settings dialog box from the Control Panel window. To review the Regional Settings of your computer, you can click Start -> Settings -> Control Panel. If you are using MS WinXP, you can click Start -> Control Panel. From the Control Panel window, you can double-click Regional Settings. If you are using WinXP, click Regional and Language Options. Click each of the property pages: Number, Currency, Date, and Time |
|
|
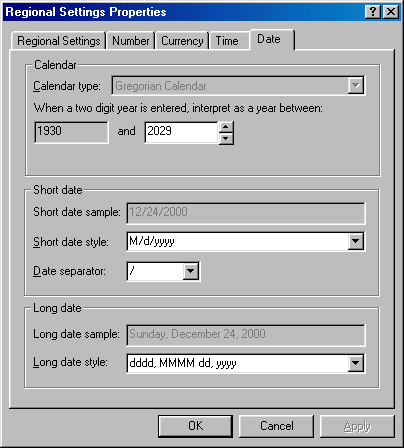
|
|
|
|
|
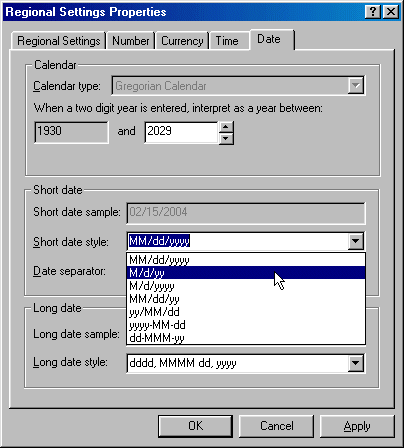
|
The Office Clipboard |
|
|
|
|
If you are using Microsoft Access 97, skip this section |
|
The computer clipboard is a non-spatial object used to temporarily hold a piece of data. In fact, it is one form of memory in which you can store information to be retrieved. The word temporary implies two things. First, the clipboard can hold its data only as long as the computer is On. If you turn the computer Off, the clipboard gets emptied and looses its data. Second, the clipboard can hold only one type of data. The good news is that the clipboard is not strictly confined to one type of information. This means that it can hold a picture (any type) OR text (any length), anything. This was the behavior of the classic clipboard. Microsoft Access 2000 brought tremendous improvement to the clipboard. The new Microsoft Office clipboard can hold up to 12 items. Each item is independent of the others and can individually be anything. In fact, information held by one of these memories can origin from any application. To use Microsoft Office Clipboard, you should first display it. To do this, you can first open an object such as a table or a form. Then, on the main menu, you can click View -> Toolbars -> Clipboard. To copy an object to the clipboard, you can just press Ctrl + C or Edit -> Copy from the main menu. You can also select something and then click Copy on the Clipboard toolbar. |
|
The Size of a Database |
|
|
|
A database is primarily a computer file, just like those
created with other applications. As such, it occupies an amount of space in
the computer memory. In some circumstances, you should know how much space
your product is using. This can be important when you need to back it up or
when it is time to distribute it. Also, when adding and deleting objects from
your database, its file can grow or shrink without your direct intervention. |
|
|
|
|
|
|
Deleting Database Objects |
|
|
|
As we have seen so far, there are various reasons you create objects in your database. Some will be made part of the final product. Some others are used to test conditions, values, data entry, etc. When such temporary objects are not needed anymore, you can delete them. To delete a table, we learned that you could use the DROP TABLE expression in a SQL statement and specify the name of the table. To delete any database object (table, query, form, etc), you can click to select it, and then press Delete. Unlike some other database environments (like Corel Paradox), a Microsoft Access table is not a stand-alone object, which means you cannot access it as its own entity outside of its database. For this reason, when you delete a database object such as a table or a form, it does not go into the Recycle Bin. Therefore, the deleting action is irreversible. Whenever in doubt, do not delete a database object, especially a table. |
|
|
|
|
|
|
Compact and Repair of a Database |
|
|
|
As mentioned already, once you have created a database file, it occupies a certain amount of memory space that can grow or shrink without your direct intervention:
When you add an object to the database, the database's file grows as needed. When you remove an object, the memory space it was occupying is left empty. This also applies when you keep removing objects:
The computer is supposed to recuperate the space those previous objects were using. Unfortunately, that is not the case. Most of the time, that space is left empty but cannot be accessed by the computer. This means that the memory space cannot be made available to other applications. To recover this memory space, you can compact the database. When this is done, the file is shrunk to occupy only the necessary amount of space and free the unused sections:
To compact a database, on the main menu, you can click Tools -> Database Utilities -> Compact and Repair (in Microsoft Access 97, the Compact Database and the Repair Database are separate menu items). |
|
|
|
|
|
|
Maintenance of Imported Objects |
|
|
|
Like most other computer applications, a database is a product that can benefit from regular revisions and improvements. There are various operations related to database maintenance, including renaming objects, changing the sequence of fields, applying customers’ feed back. We have already performed some of these actions such as renaming fields of a table in Datasheet View and in Design View. Whenever you import a database object from an external source, to be understood by Microsoft Access, its data field would receive some configuration that you may not like. For this reason, after importing a table from a text file or from a Microsoft Excel spreadsheet, you should review it in Design View and customize the fields if necessary. Most of the time, each text field imported would be assigned a field size of 255 characters. If a field in numeric, you should review it and specify the appropriate numeric data type. If you import a spreadsheet a field hold monetary values, its field would be translated with the Currency data type. Microsoft Excel and text files do not have the concept of AutoNumber. When importing data from an external source, if you want to use an AutoNumber field on the new object, you should let Microsoft Access create a new field as the Primary Key. In this case, Microsoft Access would also create it as AutoNumber. If you decide to create your own primary key and if the object already contains data, you cannot change it to an AutoNumber. If you link your database to an external object, you should not modify its structure because your database is not supposed to control this. Your database in this type of scenario is mainly used for data entry. This is why you should make a decision between importing and linking. |
|
|
|
|
|
|
Data Objects Backups |
|
|
|
If you are working on a complex database and need to perform some tests on it, you should avoid use the original objects as a test might mess them. The alternative is to create a copy of either the object or the database itself. It is important to remember that data resides on tables. For this reason, if you copy a form or query and change the data, for example if you delete a record, the record would be deleted from the database. If you copy a table and make record changes on the new table, you would be safe because such a table would have a new and independent set of records. To make a backup copy of any object that is part of your database, you can right-click it and click Copy. Then right click the same window and click Paste. Since two objects (of the same category) cannot have the same name, a dialog box would display to request a new and different name for the object you are copying. |
|
|
|
|
|
|
Database Backup |
|
|
|
When working regularly with a database, you should always
make a backup of your database, in case something bad happens like a computer
complete crash where you may not be able to recover. In most cases too,
especially if you have a customer whose product you have developed, you
should make a copy of the database to give away while keeping the original. |
|

|
You can also make a backup copy of a database to distribute either to colleagues, employees, students, or customers, etc. In this case, you can copy it from Windows Explorer or My Computer and paste it in the floppy drive. If the database is too large, such as the current Bethesda Car Rental (because it has grown a lot after adding the pictures), it would not fit in one floppy disk. In such case, you can zip it using zip software and possibly spread it on various floppy disks. The best alternative is probably to put on a CD-ROM. Since most computers nowadays ship with a CD Writer, this should not be difficult to do. If you have a more advanced backup system for your computer, you can also use it regular to backup your database. As backup systems are different, if you have one, it would give you the information you need to proceed. The following exercises are completely optional. |
|
|
|
|
|
|
MDE Files |
|
|
|
If you have created a database and decide to distribute it or to give it to a customer, colleagues or employees, they may be tempted to open the forms in Design View and possibly modify their structures. There are two disadvantages to such an action. They may compromise or corrupt your hard, possibly rendering obsolete. Some bad eye may decide to cheat on your hard work VBA code. Microsoft Access allows you to make some or most of these actions difficult or impossible. An MDE file is a database compiled by Microsoft Access so the users of the database cannot change the design of forms or reports, create new forms or reports, view its VBA code, or import forms, reports or VBA code. To create an MDE file of your database, after opening it, on the main menu, you can click Tools -> Database Utilities -> Make MDE File… |
|
|
|
|
|
|
MOUS Topics |
|
|
|
S21 |
Use the Office Clipboard |
|
S42 |
Import data to a new table |
|
S43 |
Save a table, query, or form as a Web page |
|
S46 |
Back-up and restore a database |
|
S47 |
Compact and repair a database |
|
Exercises |
|
|
|
Yugo National Bank |
|
|
2.
Save and close the table
4.
Save and close the table
6.
Save and close the table
|
|
Watts A Loan |
|
|
2.
Save and close the table
4.
Save and close the table
6.
Open the LoanProcessing table in Design View and change the
following properties
7.
Save and close the table
|
23.
|
Tables and Queries Aesthetics |
|
|
|
|
|
|
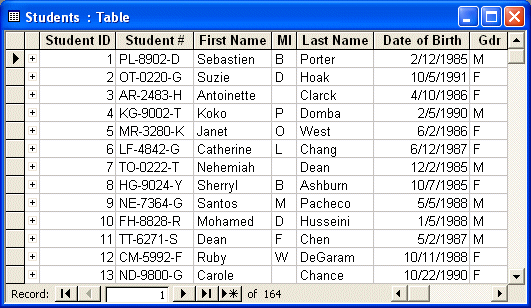
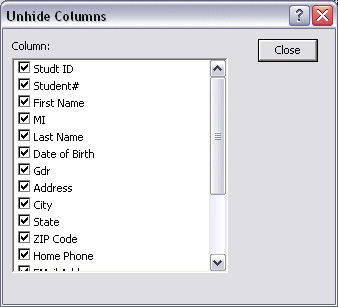
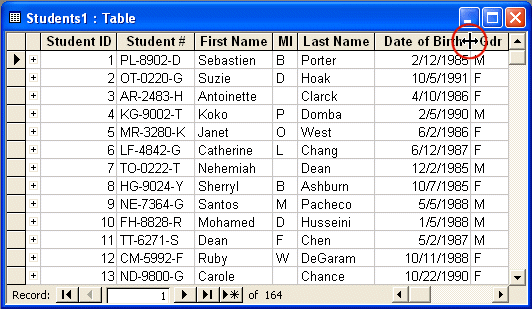
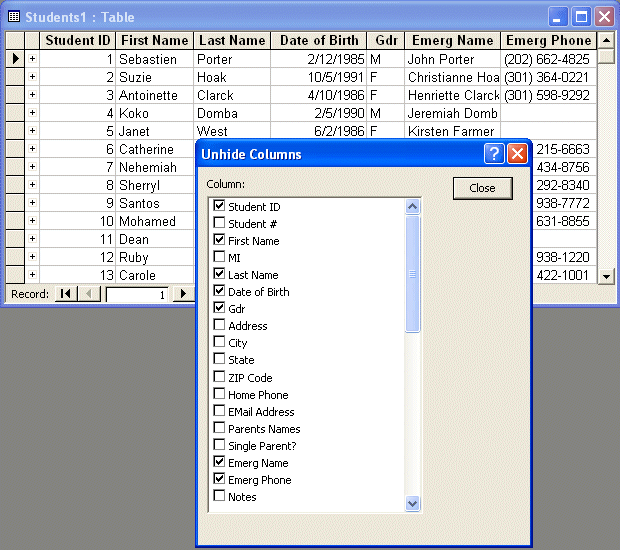
|
Hidden Columns on Queries |
|
|
|
To display or hide a column in a query, you can open the query in Design View and use the Show check box of the column:
If you leave the Show check box of a column, which is the default value, when you run the query, the column would display:
If you clear the check box of a column, the column would still be part of the query but it would not display when the query is run. In the SQL, if you do not want to display a column, you can simply omit or delete it from the statement. For example, the following statement can be used to display the LastName column from the Persons table and the Gender column from the Genders table while both tables are joined by the GenderID primary key of the Persons table and the GenderID foreign key of the Persons table representing the Genders table: SELECT Persons.LastName, Gender.Gender FROM Gender LEFT JOIN Persons ON Gender.GenderId = Persons.GenderID; |
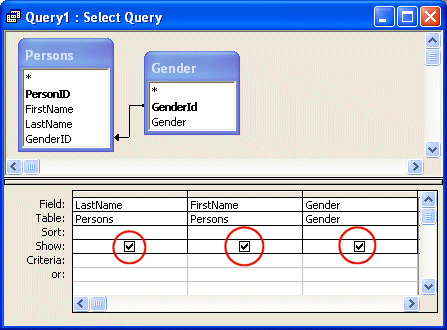
|
|
|
|
|
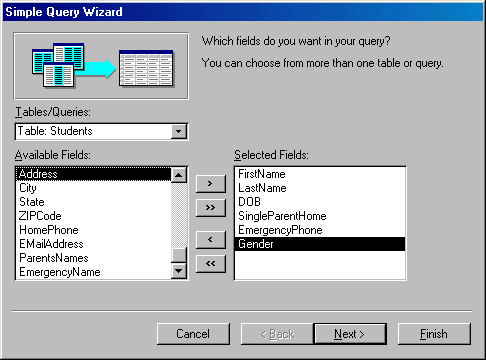
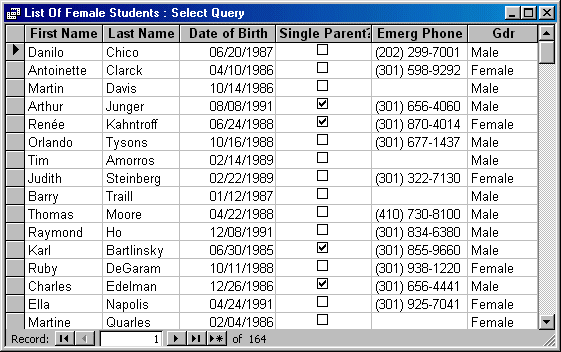
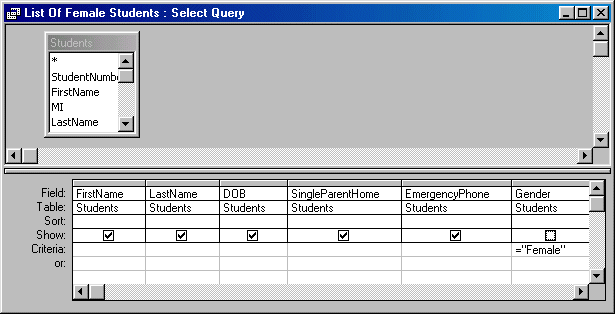
|
Hidden Fields on Forms and Reports |
|
|
|
To hide a field from a form or a report, as done for a query, you can simply avoid adding it to your form or report when designing the form or report. There will be many other cases where you must add the field to the form or report but would not need to show it to the user. In such a case, after adding the field to the form or report, access its Properties window and change the value of its Visible Boolean property:
If you set the value to Yes, the field would display at run time. If you want to hide the field, set its Visible property to No. |

|
Columns Freezing on Tables and Queries |
|
|
|
During table or query data entry or analysis, you have to scroll left and right to navigate from various fields if the table is very large or too wide for your screen resolution. Sometimes, this would be annoying if you do not need access to all fields of all columns. Microsoft access allows you to work in series of records so that you can fix some columns on the left side of the screen and scroll only to its right columns. To freeze a column, you should first click it to select it. Then on the main menu, click Format -> Freeze columns. The column would be moved to the left side of the table and would become the first column. The columns that were on its left would be moved to the right. The frozen column would become static with a thick right border. When scrolling to the right, only the other columns would move. To freeze a group of columns, first select them using the Shift key + click combination. Then freeze them in the same way. The selected columns would be moved to the left of the table and become static. If you scroll to the right, only the other columns would move. The technique applied to the tables in the following Practical Learning section can also be applied to a wide query. |
|
|
|
|
|
|
Table and Query Datasheet Formatting |
|
|
|
Cells Font |
|
|
|
Although you will usually not give access of your database tables to the users, there are techniques you can use to improve the table's appearance just in case people would use it. This is also helpful if you create a form that looks like a table (Datasheet Form). A table appears as a series of cells. Their font is a regular black Arial in size 10. Microsoft Access allows you to modify the font of the text that displays in cells. To do this, you can use the Font dialog box available either from the Format item of the main menu or by selecting Font… after right-clicking the title bar of a table. |
|
|
|
|
|

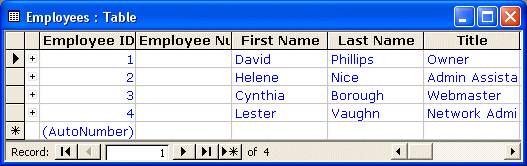
|
Formatting the Table Grids |
|
|
|
A table in Microsoft Access appears as a classic
spreadsheet with a white background and gray grid lines. If this display is
not appealing, you have two options. You can apply a gray background with
white or dark gray grid lines. You can also change the background to one of
the preset colors and change the grid lines to another color. |
|
|
|
|
|
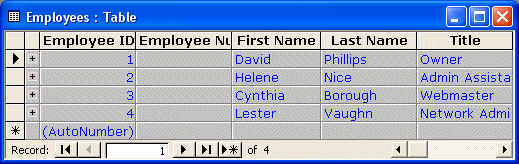
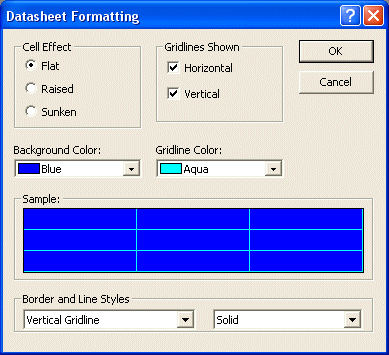
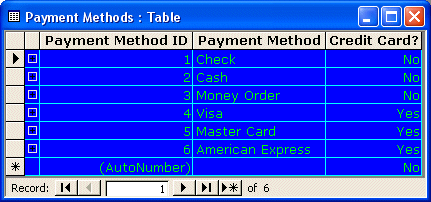
|
Exercises |
|
|
|
Watts A Loan |
|
|
|
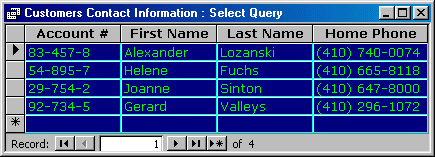
24.
|
Form Design |
|
|
|
|
If you either create a new form or modify the design of an existing form, when you save it, Microsoft Access saves the position of the form then would remember and restore that position the next time you reopen the form. Alternatively, you can ask Microsoft Access to position the form in the center of the screen the next time you open the form, even if it was on one corner of the screen when you saved. To center the form by default whenever it comes, set its Auto Center Boolean property to Yes.
As we have seen so far, the top section of a form is its title bar. It displays an icon on the left side. The system icon is fixed and you should not spend time trying to change it. As mentioned already, the system icon holds a menu that allows the user to perform the regular operations of a Windows container, including minimizing, maximizing, restoring or closing the window. To display this menu, the user can click the form’s system icon:
The presence of the form’s system icon is partly controlled by the Control Box property of a form. In most cases, you should make this system icon and its menu available to the user. If for some strange reason you do not want to provide this functionality, set the Control Box property to No. The form would appear as follows:
If you decide to do this, make sure you provide the user with the ability to close the form and this type of title bar makes it impossible. Of course, a user may know that the form can be closed by clicking the Close menu item under the File group of the main menu or by pressing Ctrl+F4. |
|

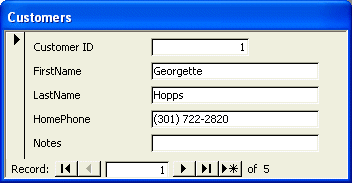
|
The Title Bar |
|
|
|
The middle section of the title bar is actually referred to as the title bar. It can be used to change the view of the form after right-clicking it. The title bar uses a color set in the Advanced Appearance of Control Panel as Active Title Bar:
Since you cannot control and cannot predict how your users will modify their system colors (because most users are free to set their system colors as they wish, even when they work corporate), you should refrain from changing this color when designing your forms, especially if you plan to distribute your product. Otherwise, the result you see on your form may be different from your users computers (and this can invite trouble with users telephone calls asking you why Leonie's form appears with a different color than mine; what did I do to deserve this? Why does everybody hate me?). |

|
|
When designing your forms, try to keep colors to their default
and to their minimum. In this lesson, we are showing most options simply to
let you know that they exist, not because you should or must use them. |
|
|
|
|
|
|
The System Buttons |
|
|
|
The right side of the form’s title bar displays three
system buttons
|
|||||||||||||||||||||||||||||||||
|
Depending on the role and probably the number of Windows controls on a form, you will decide what button to allow or not. |
|
|
|
|
|
|
The Form’s Borders |
|
|
|
Whether you allow the system icon and system buttons or not, the user needs to be able to know where a form starts and where it ends. This is seen by the borders of the form. In most cases, you will not be concerned with this aspect. Otherwise, you can control the borders of a form. The borders of a form are controlled using the Border Style property. If you set it to None, the form would appear without borders:
|
|
The Form's Width |
|
|
|
A form displays on the screen using its dimensions. These are the width and height. The form itself controls only the width. The height is controlled by its sections. To change the width of a form, in the Properties window, type the desired decimal value in the Width field of the Format property page. You can also change the form's width by dragging the right border of one of its sections. |
|
|
|
|
|
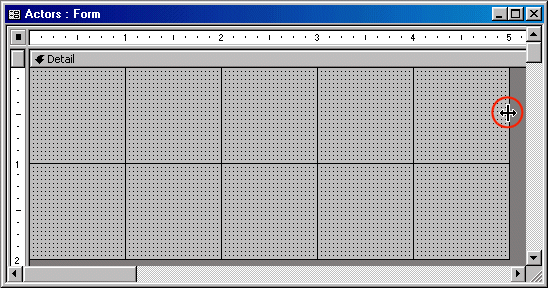
|
The Detail Section |
|
|
|
The most obvious part of a form is an area called Detail.
This section starts on a bar labeled Detail and ends at the bottom unless a
new section starts. The Detail section serves as the main host of other
controls. It can also serve to display messages of various kinds. The Detail
section can be enhanced by manipulating its properties. These properties are
not necessarily related to the parent form but can be used conjointly with
it.
|
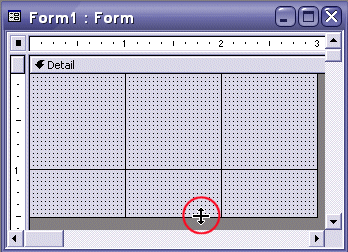
|
|
|
|
|
|
The Header and Footer Sections |
|
|
|
Besides the Detail section, a form can be enhanced with one
or two more sections: Header and Footer. By default, the Header and Footer
sections are created on a form if you use the Form Wizard.
If you still want to delete the Header and Footer sections, you can click Yes; this would un-recoverably delete their content. Like the Detail section, the Header and Footer sections control their own height, which you can change the same way we described above for the Detail section. This also applies for the Back Color property. The Special Effect property allows you to raise or sink a section. |

|
|
|
|
|
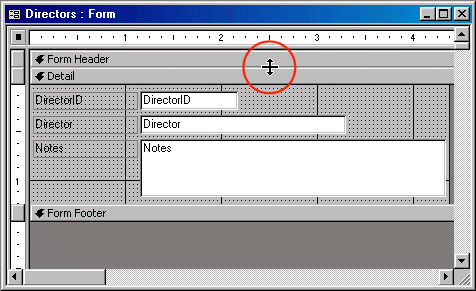
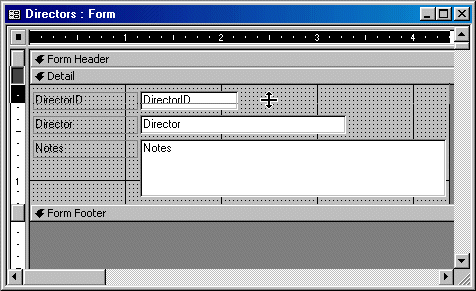

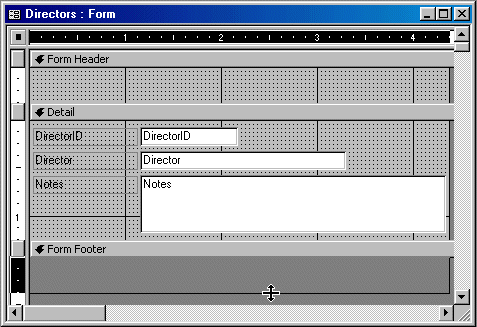
|
Record Selectors |
|
|
|
|
The Record Selector is a vertical bar on the left side of a
form. It allows the user to select all of the fields’ contents of one or more
records and copy them to the clipboard. Such a selection can then be pasted
to another record, other records, or to a text or another type of file (for
example you can paste the record in Notepad, Microsoft Word, Microsoft Excel,
or any text file). |
|
|
|
|
|
|
The Form's Scroll Bars |
|
|
|
As much as you can, you should design your (non-Datasheet)
form to display all of the fields of a record whenever the/a record comes up.
Sometimes this will not be possible. If a form possesses too many fields for
each record, Microsoft Access would equip the form with one or two scroll
bars. A scroll bar allows the user to scroll from one side of the form to
another. The vertical scroll bar is used to scroll up and down while the
horizontal scroll allows scrolling left and right. |
|
|
|
|
|
|
Navigation Buttons |
|
|
|
When studying tables and during form's data entry, we found
out that a form (also a table, a query, or a report) is equipped with some
buttons on its lower section. These buttons allow the user to navigate back
and forth between records. These buttons are very useful during data entry
and data analysis. If you are creating a form that would display the same
content all the time, such as a form that does not actually display records,
you can hide the form navigation buttons. |
|
|
|
|
|
|
Dividing Lines |
|
|
|
A form is equipped with special horizontal lines used to
visually separate sections of a form. They do not perform any other special
function. They can be useful on a continuous form. |
|
|
|
|
|

|
Dialog Boxes |
|
|
|
Introduction |
|
|
|
A dialog box is a rectangular object that is used to host or carry other controls without itselft being hosted by another object:
A dialog box is primarily characterized by two main features: its title bar and its body. The title bar, on top of the dialog box, has a title and the system close button (only, mostly). Although this is the classic appearance of a dialog box, it is not strictly exclusive. Some dialog boxes display the system icon. On the right side of the title bar, a classic dialog box displays only the system Close button made of X. Again, this is not exclusive. It is not unusual for a dialog box to display the minimize and the maximize/restore buttons but, according to Microsoft standards, a dialog box should appear as the one above: no system icon, only the system Close button, and a type of border referred to as Dialog Frame. To use a dialog box, the user must open it one way or
another. Your job is to decide how and when the user will be able to open a
dialog box. |
|
|
|
|
|
|
Modal Dialog Boxes |
|
|
|
A dialog box is characterized as modal if the user must close it before continuing with another task on the same application. |
|
The Date and Time dialog box of WordPad is an example of a
modal dialog box: if opened, the user must close it in order to continue
using WordPad. |
|
|
neither a Record Selectors bar nor the record navigation buttons. Therefore, you should decide how the dialog box would be used. If you want a regular dialog box as defined by the Microsoft standards, you should set the Record Selectors, the Navigation Buttons and the Dividing Lines properties to No each. |
|
|
|
|
|
|
Modeless Dialog Boxes |
|
|
|
A dialog box is referred to as modeless if the user doesn't have to close it in order to continue using the application that owns the dialog box: |
|
|
The Find dialog box of WordPad (also the Find dialog box of
most applications) is an example of a modeless dialog box. If it is opened,
the user doesn't have to close in order to use the application or the document
in the background. |
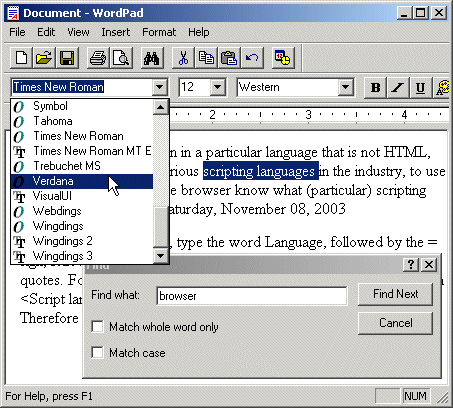
|
dialog box, or to convert a form into a modeless dialog box, when in Design View, set the Popup property to Yes. This makes sure that the user can work on another form and the modeless dialog box or form would remain on top of any other form of the database. |
|
|
|
|
|
|
MOUS Topics |
|
|
|
S29 |
Use form sections (headers, footers, and detail) |
|
Exercises |
|
|
|
Watts A loan |
|
|
3.
|

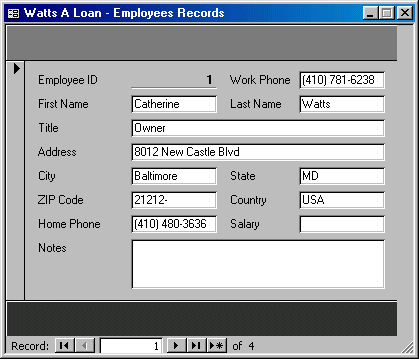
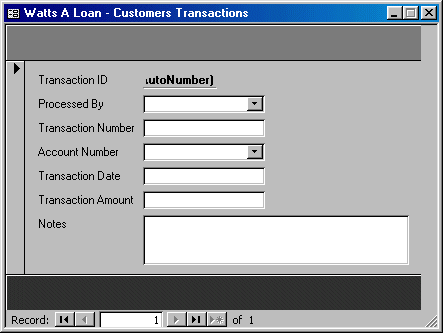
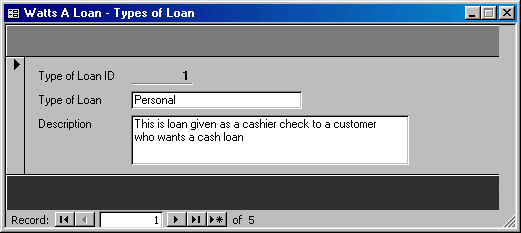
|
Yugo National Bank |
|
|
|

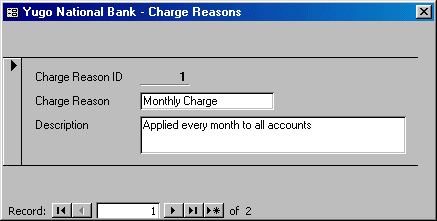
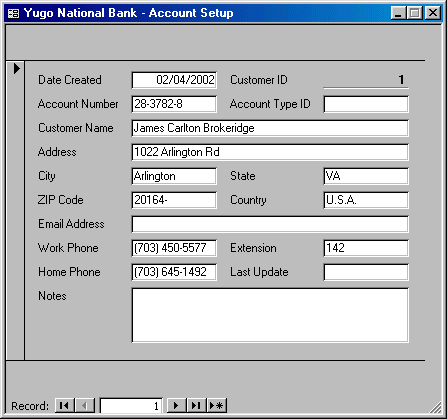

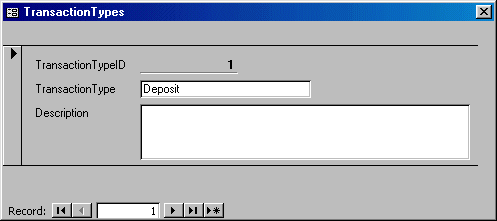
25.
|
Overview of Windows Controls |
|
|
|
|
|
|

|
Text-Based Controls: The Text Box |
|
|
|
Introduction |
|
|
|
A text box is a Windows control used to get or display text for the
user’s interaction. At its most regular use, a text box serves as a place to
fill out and provide information. You can also use it only to display a text
without allowing the user to change its content.
|
|
Properties of a Text Box |
|
|
|
Like every control on a form, the dimensions of the text
box are controlled by its Width and Height properties. The position of a text
box is controlled by its Top and Left properties. |
|
|
|
|
|
|
The Command Buttons |
|
|
|
Introduction |
|
|
|
A command button is a rectangular object that allows the user to dismiss a dialog box or to initiate an action. This is done through a decision making process based on what a form or a dialog box is displaying. This could be an acknowledgement, such as a form displaying a simple message to the user. A user could also be asked to choose one button from a group of buttons on a form or a dialog box. To use a button, the user position his mouse pointer on the desired button and presses the left button. This action is referred to as clicking. Depending on how the button is implemented, it should be obvious to the user what to do with it. To indicate what a button is used for or what action it would lead to, a button can display a string on its top. This string is also referred to as the button's caption. The caption should be explicit enough to let the user know what the button is used for. A caption like OK usually means the user accepts what message the form or dialog box is displaying. A caption like Cancel is usually accompanied by another OK button on the form. When a button has a Cancel button, the user would usually click it as if saying, "Never Mind" or "I change my mind", etc. To create a button, you can click the Command Button control on the Toolbox and click on the desired section of the form. On the Toolbox, if the Control Wizard button was down or clicked, the Command Button Wizard would start to help you create a fully functional button. If you do not want to use the wizard, you can click Cancel on the first page of the Command Button Wizard. Also, if you do not want to use the wizard, on the Toolbox, you can click the Control Wizards button to have it up. |
|
|
|
|
|

|
Characteristics of Command Buttons |
|
|
|
Like all other “visual” controls, a command button has a
Name property, a location (Left and Top), and dimensions (Width and Height).
Because of their anticipated behavior, command buttons are the most commonly
used object to initiate an action. As such, they are used to open other
forms, reports of the same database, or simply to display a message box. |
|
|
|
|
|
|
Combo and List Boxes |
|
|
|
Introduction to Combo Boxes |
|
|
|
A combo box is a Windows control made of two parts: a text
portion and a list. A text box is used to display a selection made from a
list of items. On the right side of the text box, there is a down-pointing
arrow that allows the user to know that the control holds a list. The user
displays the list by clicking the arrow. To use a combo box, the most basic
operation the user can perform is to click the arrow and select an item. Once
an item is selected, the list retracts back like a plastic. |
|
|
|
|
|

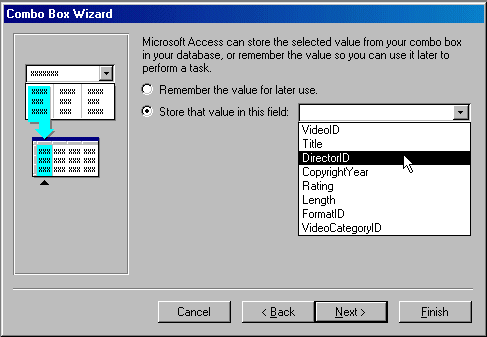
|
Introduction to List Boxes |
|
|
|
A list box presents a list of items to the user. The list appears as a taller text box. The items in the list appear each on its own line. The user makes her selection by clicking in the list. Once an item is clicked, it becomes highlighted indicating that it is the current choice:
Probably the easiest way to create a list is by using the List Box Wizard. This allows you to select the source of data, which would be a table or a query. Then you can select the column that would be displayed as the value of the list box, exactly as done for the combo box. |
|
|
|
|
|
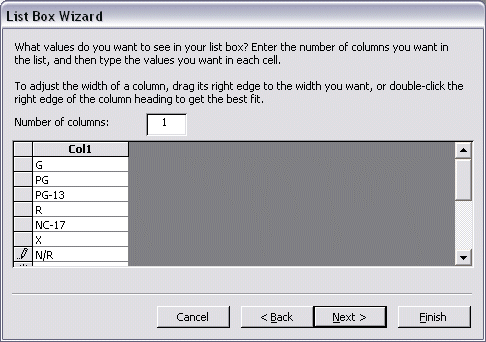
|
Properties of Combo and List Boxes |
|
|
|
The combo box is one of the highly praised features of
Microsoft Access. As the application makes it particular easy to create, it
performs all necessary basic behind-the-scene jobs. The Combo Box Wizard,
used to create a bound combo box, is able to reconcile a relationship between
the primary key of the parent table that holds the actual data to display,
and the selected foreign key that exists on the table that host the foreign
key. After creating the combo box, especially if you used to wizard to
configure it, you can check and adjust the characteristics as you see fit.
Most of the time, when a multi-column list displays, the
user may not be able to identify the items under each column. In this case,
you can display a column header on its column. This column header would
display a label that categorizes the items under it. |
|
|
|
|
|
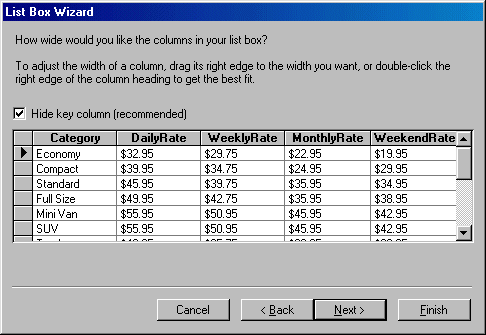
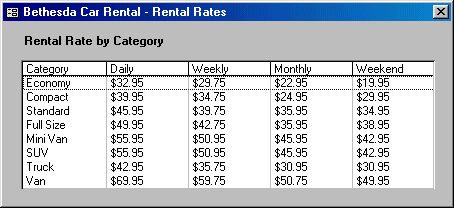
|
Radio Buttons |
|
|
|
Introduction |
|
|
|
A radio button is a Windows control made of a round box O.
In practical usage, a radio button is usually (if not always) accompanied by
other radio buttons. In other words, radio buttons come as a group. The user
makes his or her decision by selecting or clicking one of the round boxes.
Once clicked, the round box is partially filled with a dot. When one button
in the group is selected, the other round boxes of the (same) group are empty
O. The user can select another button by clicking a different choice, which
empties the previous selection. This technique of selecting is referred to as
mutually-exclusive. |
|
|
|
|
|
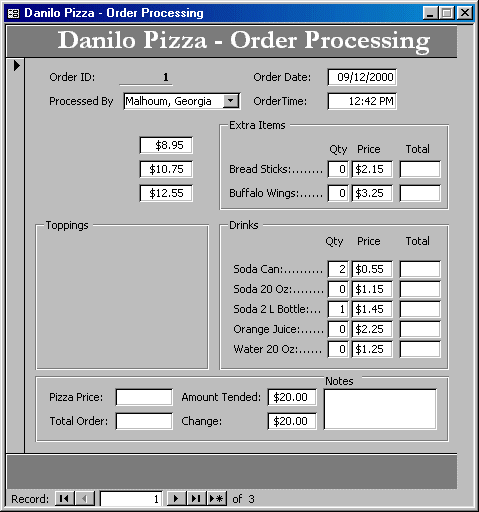

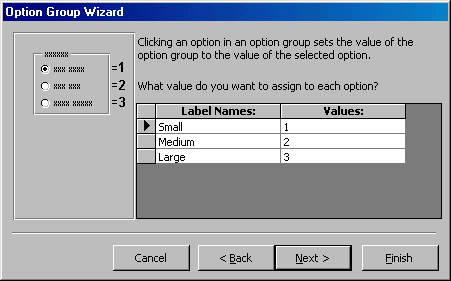

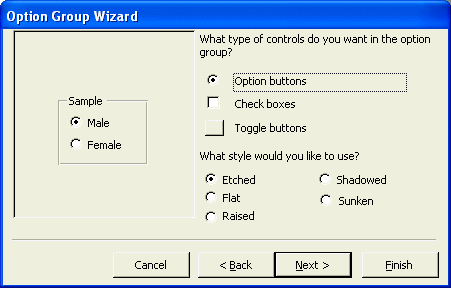
|
Properties of Radio Buttons |
|
|
|
Because the round box of a radio button does not indicate what it is used for, it is usually (if not always) accompanied by a label. The label can be positioned anywhere (to the left, the top, the right, the bottom side) close to the round box but it is usually positioned to the left or the right side. To move or position the round box, click it to select it. Then position your mouse on it to get a pointing finger arrow and drag in the desired direction:
Like most (if not all) other controls, when you include a radio button, Microsoft Access adds a label to the control. If you do not like the string displayed by the label, you can click it twice to put it into edit mode and change the string. |
|
|
|
|
|
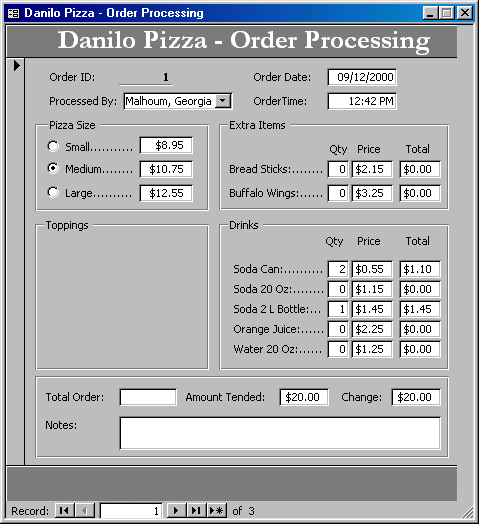
|
Check Boxes |
|
|
|
Introduction |
|
|
|
A check box is a control that allows the user to validate or invalidate an option. A check box appears as a little square box £. The user makes his or her decision by clicking in the square, which toggles a check mark R. Toggling means, that if the square box were empty £, after clicking it, a check mark would appear in it R:
Although it can appear by itself, a check box can come in a group with others, allowing the user to select as many choices as are available, as opposed to radio buttons where only one in the group can be selected
Check boxes provide a non-exclusive choice, which means that if they come as a group, each can behave independently with regards to the other check boxes of the same group. Therefore you can create check boxes anywhere on the form. It is recommended that, when they act as an ensemble, you should include check boxes in a group so their belonging to the same group would be obvious to the user. |
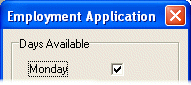
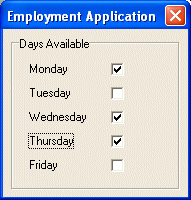
|
|
|
|
|
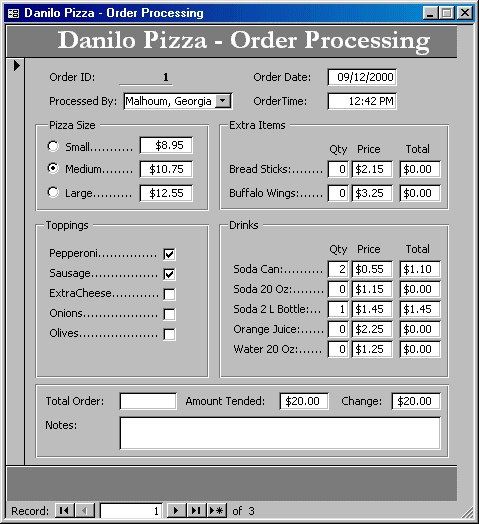
|
Toggle Buttons |
|
|
|
Introduction |
|
|
|
A toggle button is a type of button that behaves like a
check box. The first difference is that it displays like a command button but
behaves like a check box. The second difference is that, while a check box
should be accompanied by a label that indicates what the check box is used
for, a toggle button, like the command button, can display a string on its
“face”. |
|
Properties of a Toggle Button |
|
|
|
Configuring the toggle button is particularly easy. Like the check box, the toggle button should be used for a Boolean field. Therefore, after adding it to a form, in the Control Source of the toggle button, select the field that would carry or show its value. |
|
MOUS Topics |
|
|
|
S17 |
Use the Control Toolbox to add controls |
|
S18 |
Modify Format Properties (font, style, font size, color,
caption, etc.) of controls |
|
Exercises |
|
|
|
Yugo National Bank |
|
|
|
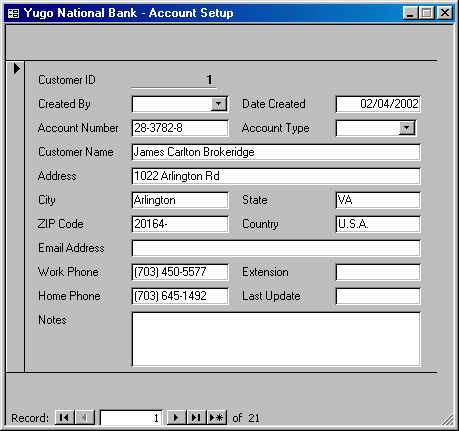
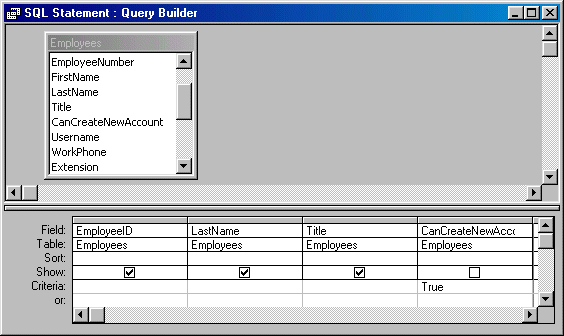
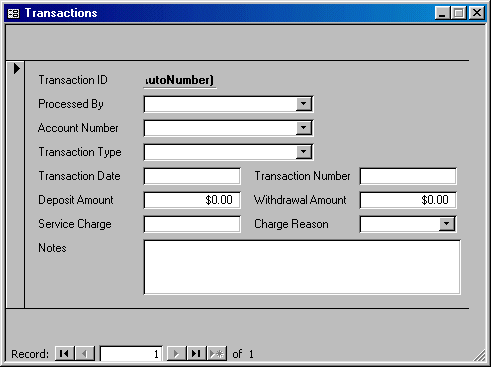
|
Watts A Loan |
|
|
|
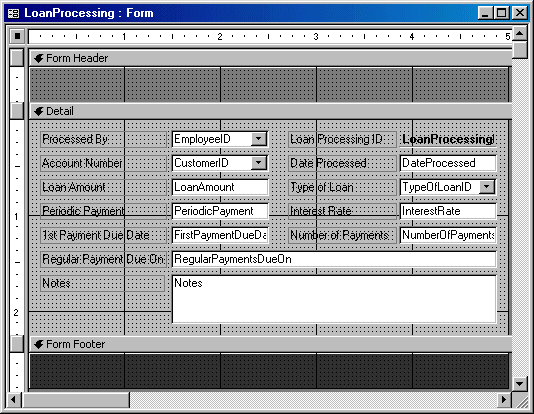
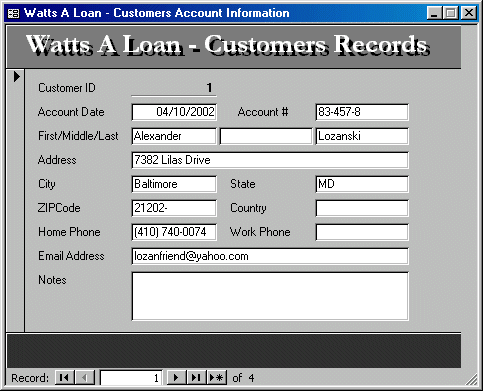

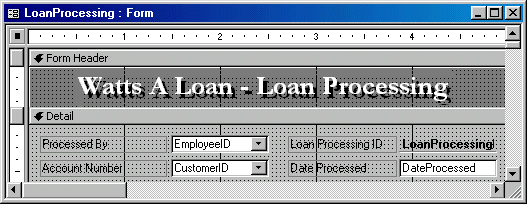
26.
|
Sectional and Tabbed Forms |
|
|
|
|
Besides the page breaks you
can use to divide a form, if you are designing a form for a long list of
fields, you can group them in tabs. A tab control is an object that is used
to hold other Windows controls. This control presents a tab button on its top
section. This tab button should present a label that indicates what the tab
is used for. Sometimes, a tab is also called a property page.
To create a tabbed form, while in Design View, on the Toolbox, click the Tab Control button and click the form |
|

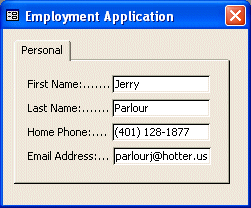
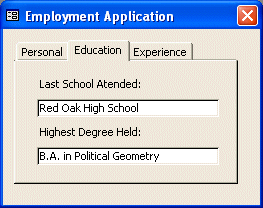
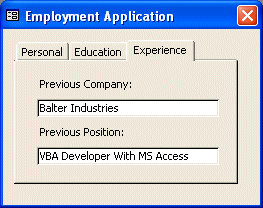
|
|
|
|
|

|
Characteristics of a Tab Control |
|
|
|
By default, after adding a new tab control to a form, it is
equipped with two property pages. Before manipulating a tab control, there
are details you should keep in mind. In the programming world, we consider
that a tab control is actually made of two objects presented as one. A tab
sheet, also called a property sheet is like the desk of a table. If you
listened to your teacher in primary or elementary school, you probably heard
her saying over and over that you should/must not write on the desk of a table.
This is also true here. In real life, every on a table is positioned on that
table, like pieces of paper. On a tab sheet, the tab controls, also called
property pages, are positioned on the tab sheet (in Microsoft Access, you
cannot access the tab sheet, meaning you cannot place anything on it; in some
programming environments, like Microsoft Visual
C++, you can certainly access the property sheet). This discussion is
intended to show you that there is a separation between the tab control and
the area on which it lies. This makes it possible to move all tab controls
with one movement.
When the tab sheet is selected, you can see that its Name
in the Properties window starts with TabCtlX. If you select the tab sheet and
move it, the tab controls, also called property pages, on it would move also.
If you delete the tab sheet, its property pages would be deleted also. For
this reason, the tab sheet is considered their parent. |
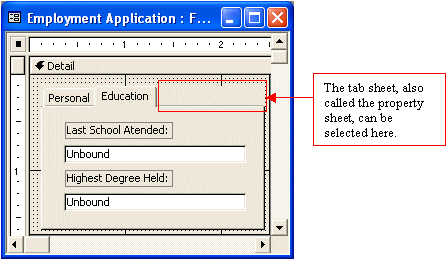
|
|
|
|
11.
|

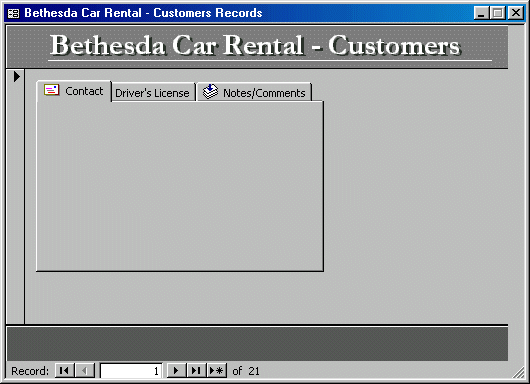
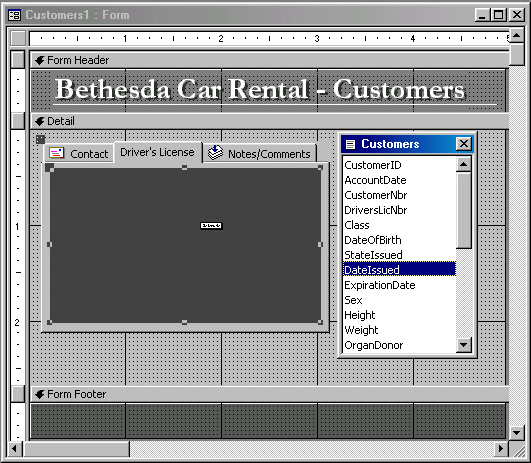
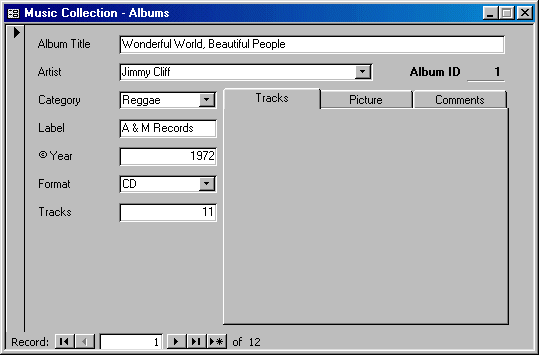
27.
|
Subforms |
|
|
|
|
As done with all the other forms we have used so far, there
are two main techniques you can use to create a subform. Keeping the
tradition of its many wizards, Microsoft Access provides the means of
automatically creating a subform. There is no particular design you need to
follow for a subform. A subform is primarily a form. The only true rule you
must follow is that one of its fields must have a field, usually its primary
key, that will allow it to be related to a field on the form in which it
would be added. If you are not using the Form Wizard, you can still design a
form and make it a subform.
|
|
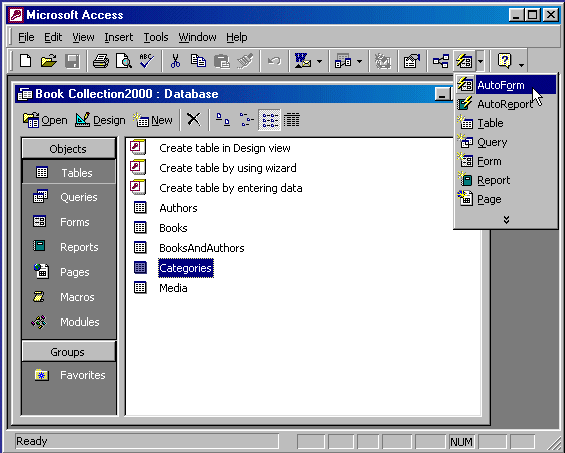
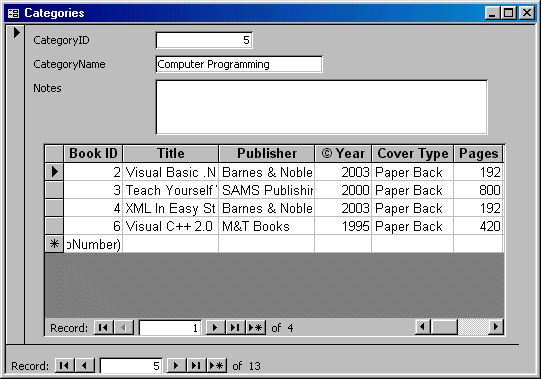
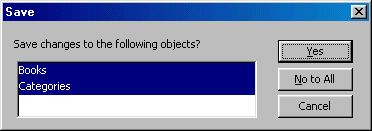
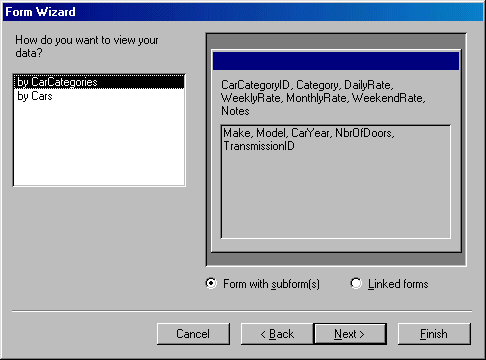
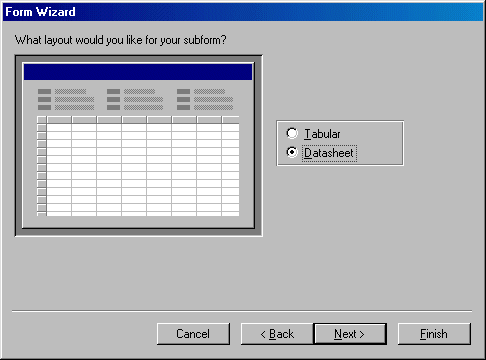
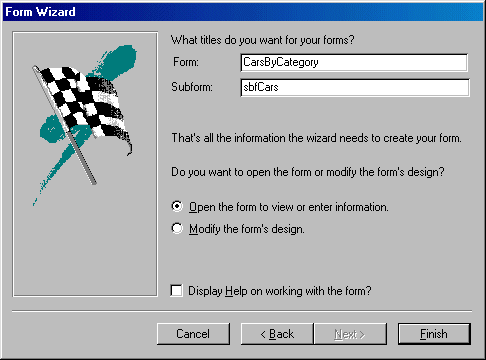
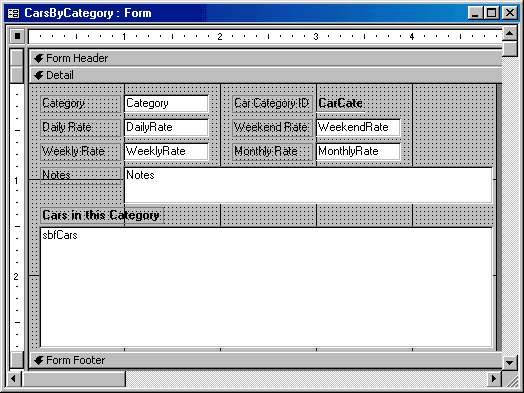
|
Types of Subforms |
|
|
|
Introduction |
|
|
|
Microsoft Access provides various techniques to create a subform. We saw above how a form can be created automatically with a subform. This is sometimes referred to as Master-Detail. Besides using the wizards, you can also design a subform. Subforms typically come in three layouts and each can be used for a specific purpose. |
|
|
|
|
|
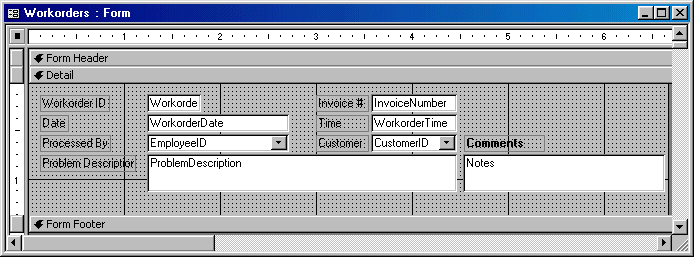
|
The Datasheet Form |
|
|
|
The automatically created forms and reports provide a
simplistic design. Instead of generating such form, or after creating them,
you can design or redesign your subforms. To support this, there are three
types of layout you can use for a subform. |
|
Such a form is designed like any other. To get the
spreadsheet display, select the form in Design View and, in the Properties
window, change its Default View to Datasheet. |
|
|
|
|
|
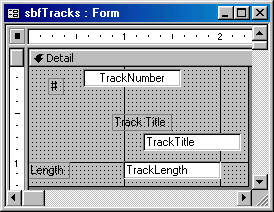
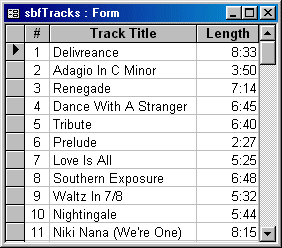


|
The Single Form |
|
|
|
A single form is the type of form that displays its data one record at a time. This concept, which was used on most forms we have used so far, can also be applied to a subform. The single layout can be valuable if you want to show one record from a related form as it is linked to a record on the current form. While a Datasheet form can clearly show that it is an embedded object, the fields of a single form can easily be mixed with those of the hosting form but it is usually determined to be apart. A single subform is designed like a regular form where fields are created in the Detail section and other optional controls can be added to the other sections of the form. When selecting the fields that would be part of the subform, make sure you include only those that can be useful in the form that will host the subform. |
|
|
|
|
|
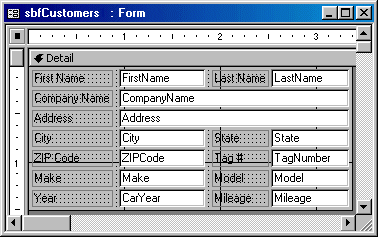
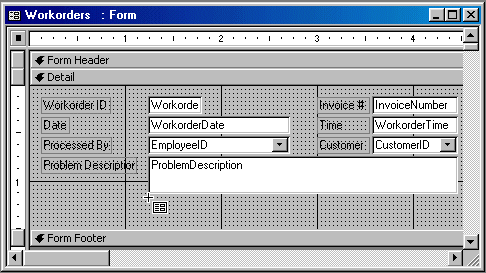
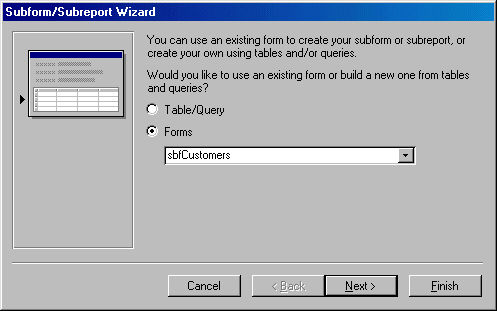
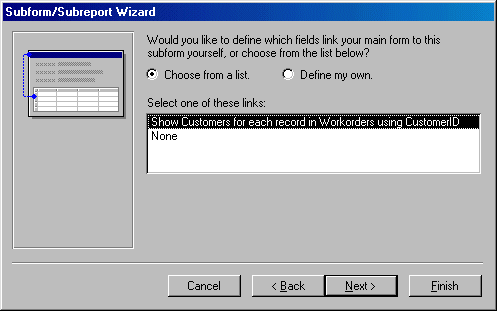
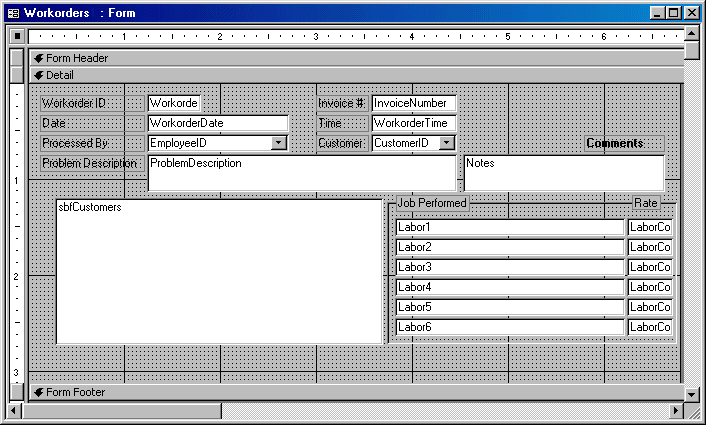
|
The Continuous Form |
|
|
|
Microsoft Access provides another type of table, sometimes
more flexible: the Continuous form. Like the Datasheet form, the Continuous
form displays as many records as the height of the form can afford. While the
fields of a Datasheet are usually “reproduced” as they would be on the source
table, the fields of a Continuous form must be (carefully) designed to play
their roles. We saw that a single form displays the values that belong to a
record and only one record displays on the form. Here is an example: |
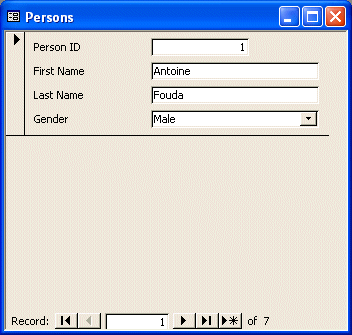
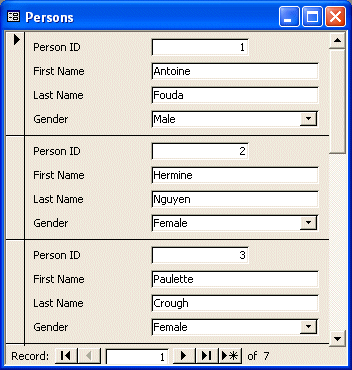
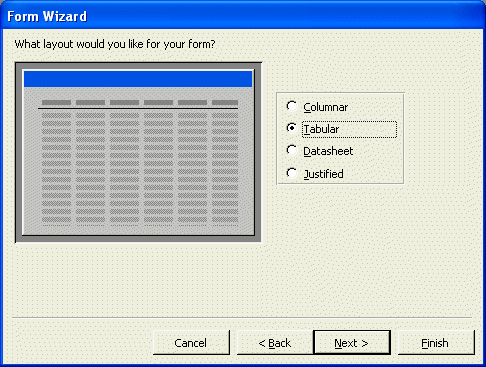
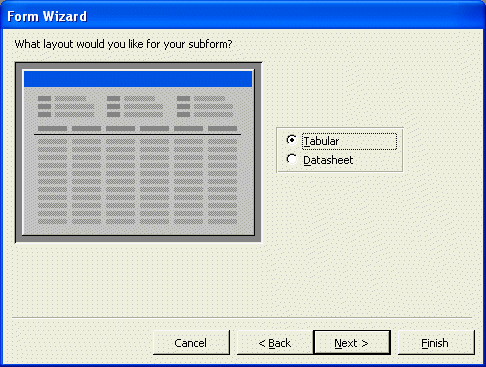
|
|
|
|
|
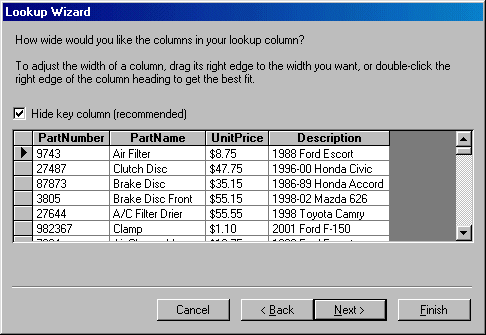
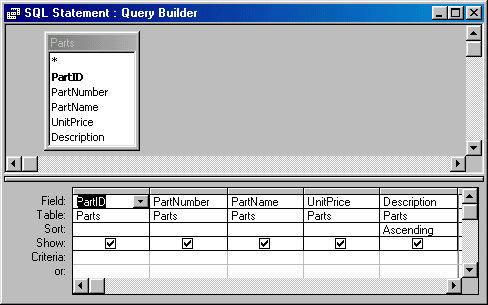

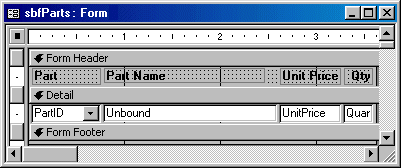

|
MOUS Topics |
|
|
|
Exercises |
|
|
|
Watts A Loan |
|
|
|
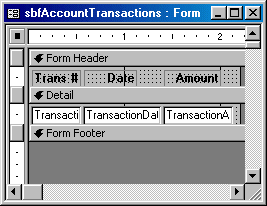
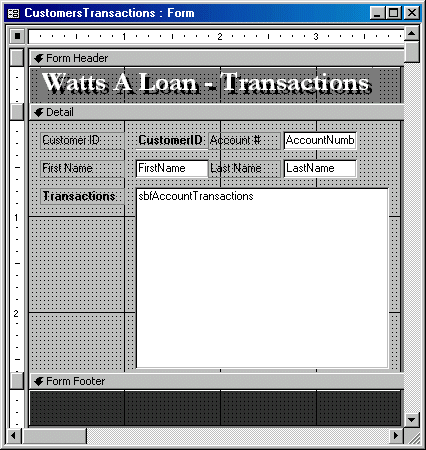
|
Yugo National Bank |
|
|
|

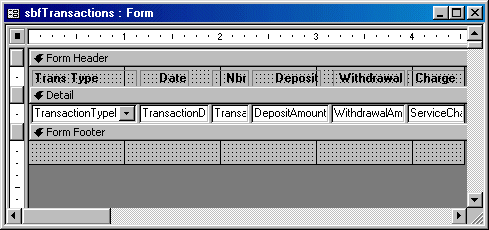
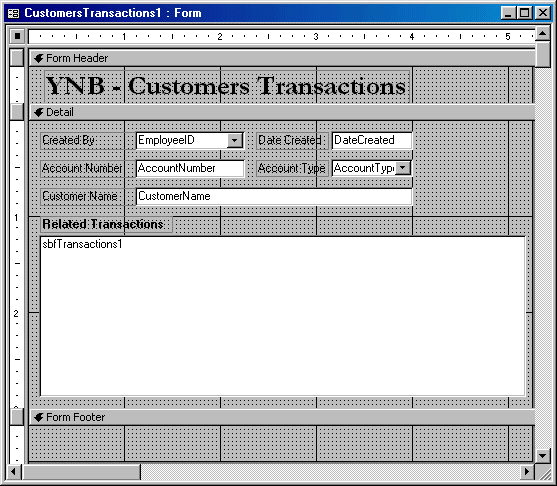
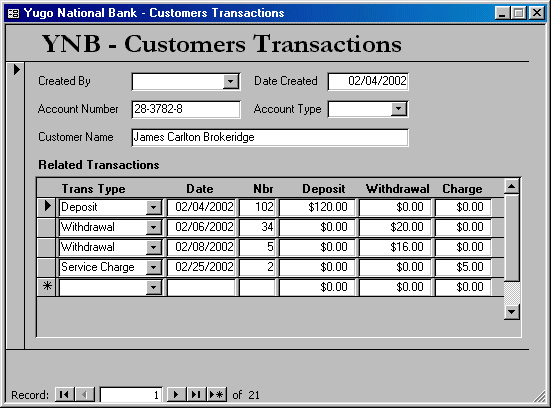
|
|
|
|
28.
|
Introduction to Expressions |
|
|
|
|
|
|
|
|
|
|
|

|
VBA and Expressions |
|
|
|
Introduction |
|
|
|
As we will see in this and later chapters, the various functions available in Microsoft Access make it a valuable application to create good functional databases. Nevertheless, Microsoft Access is not a programming environment but a good platform to visually create databases. As your experience grows, you will face some demands that become difficult to achieve. For this reason, Microsoft Access ships with a computer language called Visual Basic For Applications or VBA. Although in this book we will not explore computer programming, we will take a glimpse at what some of the code lines look like. |
|
Automatically Generated Code |
|
|
|
You may recall that when we created subforms, we selected only a few fields from the data source. This was purposely done so the user can have the handiest pieces of information about the data that the current form is related to. While the user is performing data entry, he may want to have more details about the data that is displaying. You can achieve this by calling the originating form. To implement this functionality, you can create a command button and let Microsoft Access write code that would take you straight to the related record only. |
|
|
|
|
|

|
Procedures and Functions |
|
|
|
Introduction to Procedures and Functions |
|
|
|
A procedure is a task that must be performed aside of a
table, a form, or a report, to complement it. It is like an operation or an
expression with the first difference that someone else created it and you can
just use it. Microsoft Access ships with various procedures to perform
different tasks. There are so many of them that we will review only those
that are most regularly used. ProcedureName() End This syntax is very simplistic but indicates that the minimum piece of information a procedure needs is a name. The name allows you to refer to this procedure in other parts of the database. In reality, a procedure is meant to perform a task. This task would be defined or described in the body of the procedure. In our simple syntax, the body of the procedure would start just under its name and would stop just above the End word. The person who creates a procedure also decides what the procedure can do. Following our simple syntax, if we wanted a procedure that can open Solitaire, it could appear as follows: ProcedureExample() Open Solitaire End Once a procedure has been created, it can be used. Using a
procedure is referred to as calling it. To call a simple procedure like the
above ProcedureExample, you would just type its name. ReturnType FunctionName() End The main difference, as you may see here is that a function
produces a result. This is also stated that a function returns a value. Based
on this, the result of a function can be provided for further use and
assigned (passed) to a field, a sub procedure, or another function. To
display the result of a function in a field, you can access its Control
Source property, use the assignment operator “=”, type the name of the
function, followed by its parentheses. |
|
|
Because most, if not all, of the built-in procedures you will
use in Microsoft Access are functions, from now on, we will use only the word
“function” but this refers to both types of procedures. |
|
Procedures, Functions, and their Arguments |
|
|
|
When asked to perform its task, a function may need one or
more values to work with. If a function needs a value, such a value is called
an argument. While a certain function may need one argument, another function
would need many arguments. The number and types of arguments of a procedure
depend on its goal. ReturnValue FunctionName(Argument) End Once again, the body of the function would be used to define what the function does. For example, if you were writing a function that multiplies its argument by 12.58, it would appear almost as follows: Decimal FunctionName(Argument) Argument * 12.58 End While one function may use only one argument, another function may use more than one, depending on its goal. When a function uses more than one argument, a comma separates them. A possible syntax would be: ReturnValue FunctionName(Argument1, Argument2, Argument_n) End If you were creating a function that adds its two arguments, it would appear almost as follows: NaturalNumber AddTwoNumbers(Argument1, Argument2) Argument1 + Argument2 End Once a function has been created, it can be used in other parts of the database. Once again, using a function is referred to as calling it. If a function is taking one or more arguments, it is called differently than a function that does not take any argument. We saw already how you can call a function that does not take any argument and assign it to a field using its Control Source. Here is an example:
If a function is taking one argument, when calling it, you
must provide a value for the argument, otherwise the function would not work
(when you display the form or report, Microsoft Access would display an
error).
If the function is taking more than one argument, to call it, type the values for the arguments, in the exact order indicated, separated from each other by a comma. As for the other functions, the calling can be assigned to a field in its Control Source. Here is an example:
|

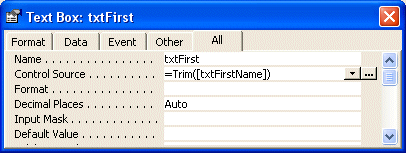

|
Default Arguments |
|
|
|
We have mentioned that, when calling a function that takes
an argument, you must supply a value for the argument. There is an exception.
Depending on how the function was created, it may be configured to use its
own value if you fail, forget, or choose not, to provide one. This is known
as the default argument. Not all functions follow this rule and you would
know either by checking the documentation of that function or through
experience. |
|
The Expression Builder |
|
|
|
There are three main ways you create expressions. If you
know, based on experience, what the expression is made of, you can just write
it in the Control Source of the field that will hold the expression. This
technique is faster but prone to error. Creating an expression is a technique
of giving a "made-up" value to a field. The field that would hold
such an expression is referred to as unbound because it is not directly
linked to any field of a table. Since the new value that constitutes the
expression is in fact "assigned" to the expression-field, you must
use the assignment operator which is "=". Therefore, the first
symbol you will use in an expression is =.
Without being particularly explicit, the syntax of the
function allows you to know the number and order of arguments of a function.
To get more information about the function, you can check its documentation
in the help files.
If you double-click the name of a function in the right list, if the function takes one or more arguments, a placeholder would be created for each argument:
You have the responsibility to supply an appropriate value for each placeholder. To do that, you have two alternatives. If you know the value that should be used in a placeholder, you can just type it. Alternatively, you can use the operator buttons or the built-in functions to fill a placeholder. We should point out that not all functions are available in the list of functions of the Expression Builder but, as long as you know that a Visual Basic function is supported and you know its syntax, you can use it. |
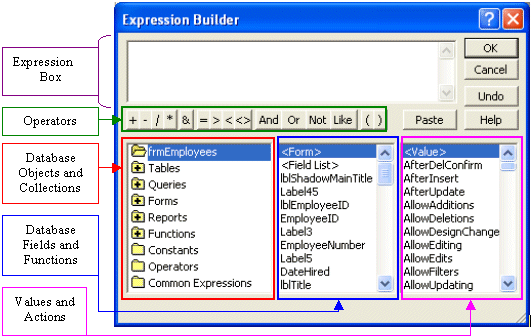
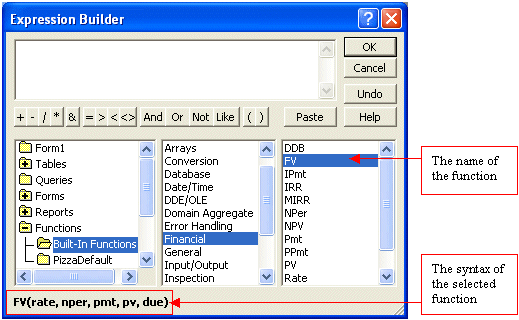
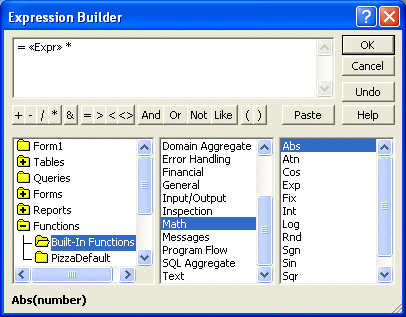

|
Introduction to Built-In Functions |
|
|
|
Overview |
|
|
|
To ease your job with database implementation, Microsoft
Access ships with many functions. These functions have been tested and are
highly reliable, so much that in this book, we will use only the built-in
functions. Because there are so many of them, they are classified in
categories and you are not likely to use all or even most of them. |
|
Page Break References |
|
|
|
In the previous lesson, we mentioned that a form could be
divided in various sections separated by a page break. Although such sections
are created in the Design View of a form, Microsoft Access does not inherently
provide a way to access them. You have two alternatives. You can use a macro
or VBA. For one thing we will not use macros in this book. For another, we
will afford to write one line of code to apply the functionality we need. |
|
Conversion Functions |
|
|
|
The first action you should take when dealing with the value retrieved from a field is to convert it to the appropriate type. There are various conversion functions adapted to the different possible kinds of values. The general syntax of the conversion functions is: ReturnType = FunctionName(Expression) The expression could be of any kind. For example, it could
be a string or value the user would have entered in a form. It could also be
the result of a calculation performed on another field or function. The
conversion function would take such a value, string, or expression and
attempt to convert it. If the conversion is successful, the function would
return a new value that is of the type specified by the ReturnType in our syntax. |
|
|||||||||||||||||||||||||||||||||
|
|
|
|
|

|
Logical Functions |
|
|
|
Introduction |
|
|
|
In the strict sense, because Microsoft Access is not a traditional programming environment, it does not provide a feature called conditional or control statement, which is used to check a condition. Instead, it provides functions you can use to check that a condition is true or false. There are various functions that can be used to create an expression as complex as an algorithm would allow. It is important to note that, although most of these functions perform conditional checking, they do not return the same type of value. For this reason, you should choose the right function. Most of these functions will also be used in combination with other functions as necessary. |
|
Immediate If |
|
|
|
The most regularly used function to perform conditional statements is called IIf. The Immediate If function, IIf(), needs three pieces of information in order to accomplish its assignment. The syntax used is: IIf(Condition, WhatToDoIfConditionIsTrue, WhatToDoIfConditionIsFalse) The first action this function performs is to evaluate a
condition. This condition could involve an operation or the result of an
operation. If the Condition is true, then the function would execute
the first expression, which is identified in our syntax as WhatToDoIfConditionIsTrue. =IIf([cboGender]="M","Boy","Girl")
|
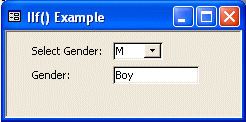
|
|
|
|
|
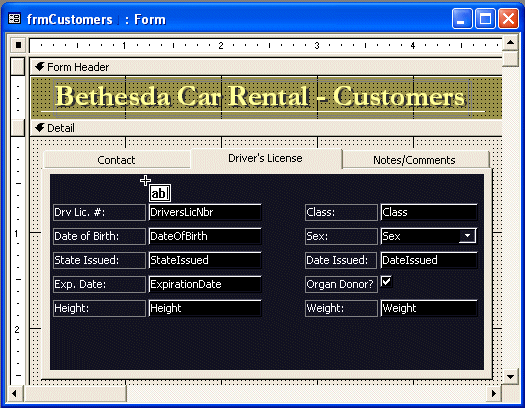
|
Field Emptiness |
|
|
|
The conversion functions we reviewed above are effective if they are supplied a value to convert. In some of your expressions, you will provide a data field as argument to use by a function. Even if you decide to convert a field to the appropriate value, you may need to first check whether the field is empty. This can be taken care of by calling the IsEmpty() function. Its syntax is: IsEmpty(Value) This function checks its argument, which could be a field or an expression. If it is a field and the field is empty, this function returns True. If the field is not empty, the IsEmpty() function returns False. |
|
|
|
|
|
|
Nullity Checking |
|
|
|
Another problem you may encounter when involving a field in an operation is to know whether the field has never contained a value. This operation is sometimes confused with that of checking whether a field is empty. Here is the difference (it is important to understand this because it is used in many other environments, including Microsoft Visual Basic and Microsoft SQL Server):
To check whether a field (or a value) is null, you can call the IsNull() function. Its syntax is: IsNull(Value) Also used on fields, the IsNull() function checks the state of a field (remember, this function does not check whether a field is empty or not; it checks if the field has ever contained a value). If the field it null, this function returns True. If the field is not null, this function returns False. |
|
Numerical Checking |
|
|
|
When the word operation is stated, most people think of a numeric value, an operator, and another numeric value. Such values must be valid in order for the operation to succeed. It certainly would not make sense to multiply a DateHired by a HourlySalary. Therefore, before involving a value or field to an operation, you should check that it contains a valid number. To perform this checking, Microsoft Access provides the IsNumeric() function. Its syntax is: IsNumeric(Value) The IsNumeric() function returns True if its argument is a valid number. Otherwise, it returns False. |
|
|
|
|
|
|
Non-Zero Checking |
|
|
|
We saw that, before performing any operation on the value held by a field, you should first convert it to the appropriate value. The conversion functions we mentioned assume that the field contains a value. Unfortunately, it is not always the case. Microsoft Access provides the Nz() function that can be used to check whether a field contains a value, whether the field is empty, or is Null. The syntax of this function is: Nz(Value, ValueIfNull) The first argument, Value is required. The second argument is optional. The pseudo-code for this function is: |
If the field contains a value
Return that valueOtherwise
Return 0
|
In other words, this function considers the value provided
as the Value argument. This could be an expression but it is usually
used on a field that is involved in a calculation. If the Value
argument or the passed field is empty, this function returns 0. If the field
contains a value, this function returns it. The beauty of this function is
that it provides a valuable safeguard for an operation. |
|
|
|
|
|
|
MOUS Topics |
|
|
|
S20 |
Use a Calculated Control on a form |
|
S31 |
Create a calculated field |
29.
|
Windows Controls and Expressions |
|
|
|
|
|
|
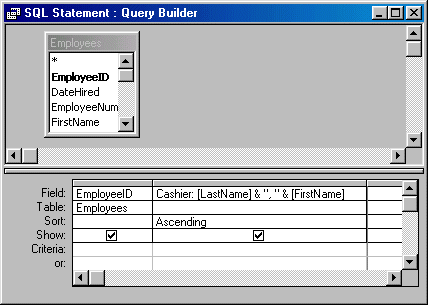
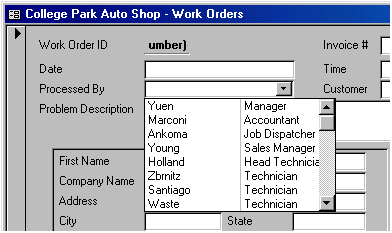


|
Command Buttons |
|
|
|
Command buttons, or simply called buttons, are the most
widely used objects to initiate actions on an application. Among other
things, they are used to close windows, to open others, to validate a user’s
choice, to present alternatives, etc. When introducing Windows controls, we
that the easiest way to create a button consisted of using the Command Button
Wizard. Indeed, when using this technique, there is a great deal of code that
Microsoft Access writes to apply the desired functionality. The lines of code
that Microsoft Access writes have already been prepared and were installed
with it in some libraries called DLL. In some cases, either Microsoft Access
is not prepared to write the exact functionality you need and it can write
only part of the code. For this reason, you will either simply modify the
code that Microsoft Access started or, if you know what to do, you can
completely write your own code. |
|
|
|
|
|
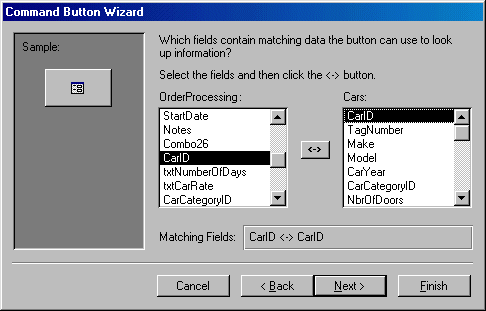
|
Radio Buttons |
|
|
|
Options buttons are used in a group, which makes it particular to refer to them. If you design your option buttons in a "normal" way, which is classically done by including them in an Option Group, to find out which option button is selected in a group, you can call the Value property of the Option Group control. The first option button has a value of 1, the second has a value of 2, etc. Imagine you have an Option Group control called fraGender that has three radio buttons and a text box called txtGender. If you want to find out what radio button is selected from the option group and display its value in the text box, in the Control Source of the text box, you can type =fraGender.Value
In the same way, if you have radio buttons on an Option
Group box, you can use the IIf() function to find out what button the
user would have clicked. If you have only two option buttons, or if you have
more than one radio button but want to consider only two possibilities, the
use of the IIf() function would be easy. You can just decide which option
button in the group would hold the necessary value. =IIf([fraGender]=1,"You are the man!","You go girl!!!")
If you want to navigate through a group of radio buttons and validate each, you would have to include IIf() functions inside of others. This is referred to as nesting. Imagine that when processing the orders of a pizza application, you want to specify the price of a pizza based on the size selected and there are three sizes. A simple IIf() function would not suffice. If the user selects the small size, you would apply the price for a small pizza. In a simple IIf() function, if the user selects another size, you would have only one price left. In a text box that holds the price according to the selected size, you could write an expression as: =IIf(fraPizzaSize=1, PriceSmall, PriceMedium) What if the user selects a large size? The only solution is to nest another IIf() function and to include it as the False part of the Condition. The pseudo code you could use is |
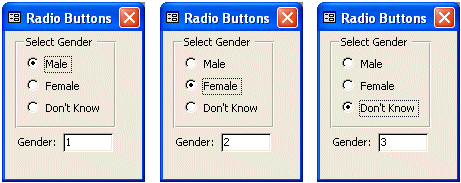
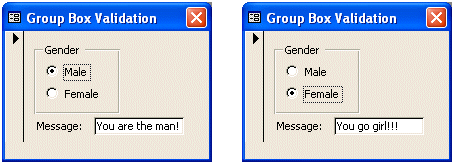
If Small Size is selected Then
Apply Small PriceOtherwise
If Medium Size is selected Then Apply Medium Price OtherwiseApply Large Price
End IfEnd If
|
|
|
|
|
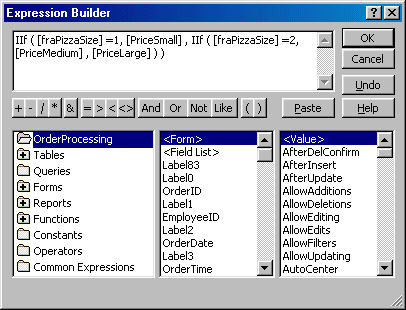
|
Toggle Buttons |
|
|
|
We defined a toggle button as a variant of a radio button or a check box. When toggle buttons come as a group and are treated as a group, they behave like radio buttons. When a toggle button is created as its own button, it behaves like a check box. To create toggle buttons that would behave like radio buttons, you should use the Option Group control. Otherwise, to create a toggle button that behaves like a check box, you can use the Toggle Button control on the Toolbox. After creating a toggle button, you can implement its functionality. As stated already, a toggle button is first of all a button. Therefore, when it is clicked, it sends a message stating that it has been clicked. You can then take the necessary action. When a toggle button is part of a group created in an Option Group control, the host (the Option Group control) can be used to take care of the action. To do this, each toggle button is represented by the Option Value property. Therefore, when implementing the Option Group, to know what button was clicked in the group, you can use a logical function like IIf (or a conditional statement like If…Else) to check the value of the clicked button. Once you know what button was clicked, you can do what you want. |
|
|
|
|
|
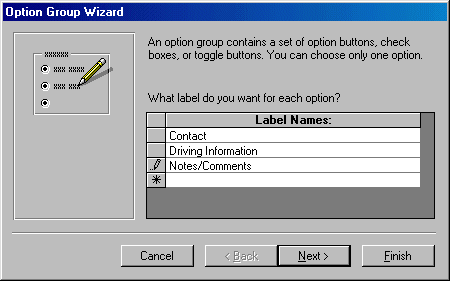
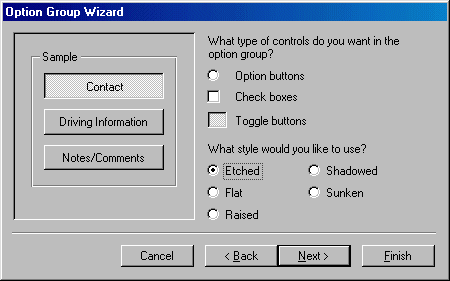

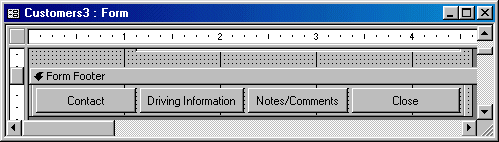
|
Check Boxes |
|
|
|
A check box can have only two states: selected or not selected. (In most programming environments, a check can actually have three states, depending on how it was created. The third state would appear as "half" checked, also referred to as gray or indeterminate. For our databases here, we will consider that a check box can only be clicked or not clicked). When a check box is selected, it has a value of True, Yes, On, or 1. When it is not clicked, it holds a value of False, No, or 0. This value can be used as you see fit. For, example, while only one option button can be selected in a group box, as many as necessary check boxes can be selected in a group. In fact, you do not have to include your check boxes in a group. You can use the IIf() function to do something if a check box is selected or do something else if the same check box is not selected. You can use the IIf() function as follows: =IIf([chkMaritalStatus],"Welcome to the club","We can't allow you")
|
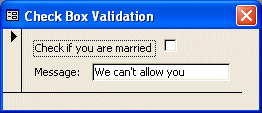
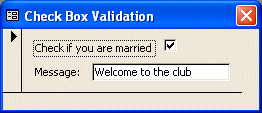
|
|
|
|
|
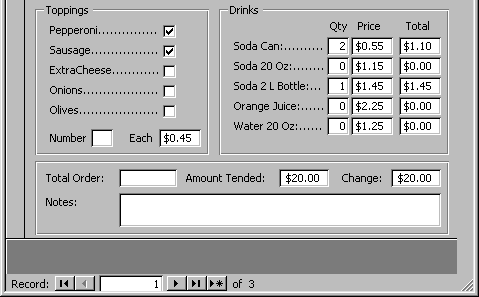
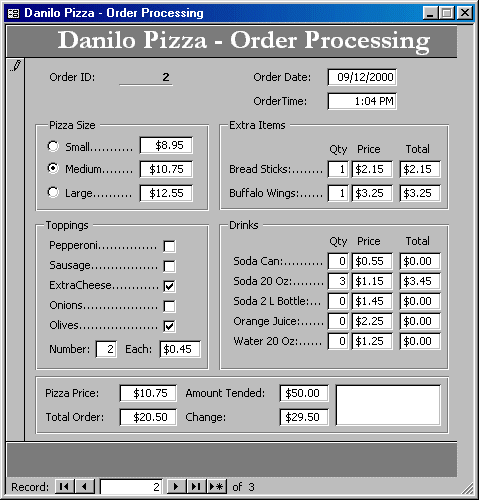
|
Combo Boxes |
|
|
|
We have learned to use or create a field whose data is available through a combo box. We also know that a combo box can be made of more than one field of data. In that case, data is organized in columns when the combo box drops. Unfortunately, a combo box can display only one field of data when it is not dropped. If you want a combo box to display more than one field, you can create an expression that combines fields from the originating table. |
|
|
|
|
|
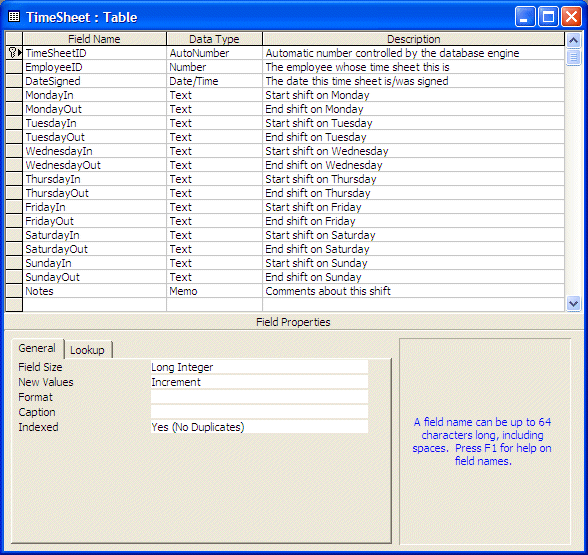
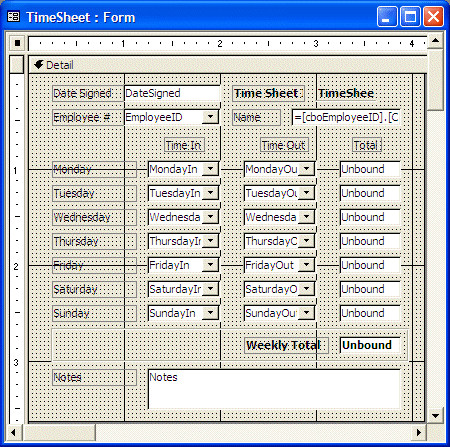
|
Page Breaks |
|
|
|
We saw that a form can be segmented in different sections to save space. This allows you to show only one group of controls at a time while still maintaining all of the controls of a large table on the same form. We also mentioned that, when using this technique, you should make sure that the user could get to the hidden controls when needed. One solution consisted of using scroll bars. If you decide to hide the scroll bars, you can use another technique to get to the other group(s) of controls. |
|
|
|
|
|

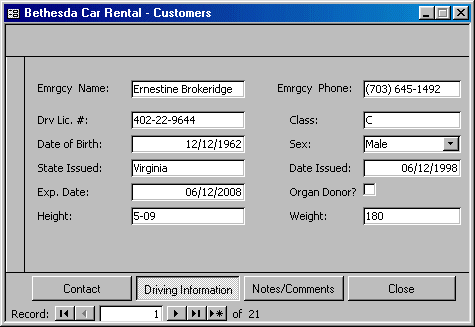
|
Subforms and Subreports |
|
|
|
Everything stated here for a subform also applies to a
report and a subreport. |
|
MOUS Topics |
|
|
|
S17 |
Use the Control Toolbox to add controls |
|
S31 |
Create a calculated field |
|
Exercises |
|
|
|
Yugo National Bank |
|
|
4.
|
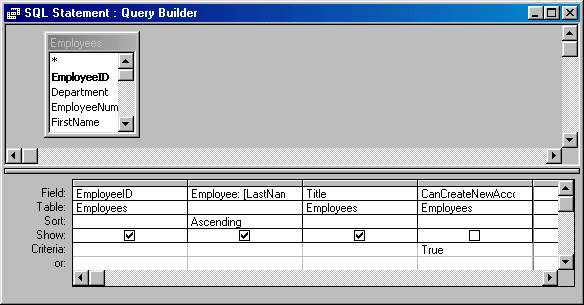
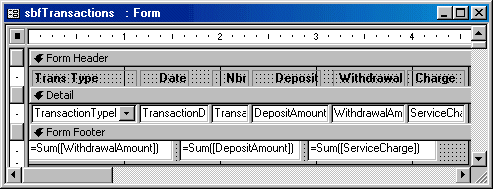
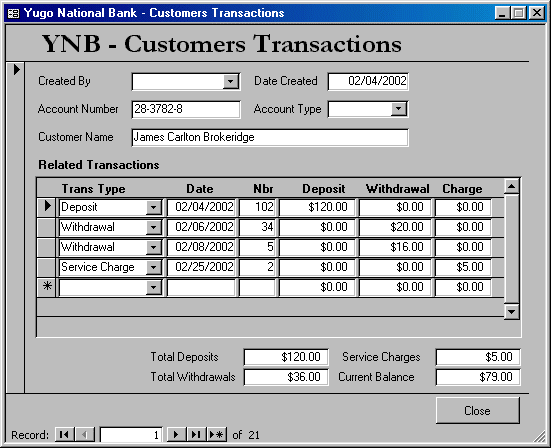
|
|
|
Watts A Loan |
|
|
|
30.
|
Built-In Functions Fundamentals |
|
|
|
|
Switch(Expression1, What To Do If Expression1 Is True, Expression2, What To Do If Expression2 Is True, Expression_n, What To Do If Expression_n Is True)
Switch(Expression1, What To Do If Expression1 Is True, Expression2, What To Do If Expression2 Is True, Expression_n, What To Do If Expression_n Is True, True, What To Do With A False Expression)
|
|
|
Arithmetic Functions |
|
|
|
The Absolute Value |
|
|
|
The decimal numeric system counts from minus infinity (-∞) to infinity (+∞). This means that a number can be usually negative or positive, depending on its position from 0, which is considered as neutral. In some operations, the number considered will need to be only positive even if it is provided in a negative format. The absolute value of a number x is x if the number is
(already) positive. If the number is negative, then its absolute value is its
positive equivalent. For example, the absolute value of 12 is 12, while the
absolute value of –12 is 12. Abs(number) |
|
The Exponential |
|
|
|
The Exp() function is used to calculate the exponential value of a number. Its syntax is: EXP(number) The argument, number, a double-precision value, represents the number to be evaluated. If the value of number is less than -708.395996093 (approximately), the result is reset to 0 and qualifies as underflow. If the value of the argument x is greater than 709.78222656 (approximately), the result is infinity and qualified as overflow. |
|
The Square Root |
|
|
|
The Sqr() function is used to calculate the square root of a double-precision number. Its syntax is: Sqr(number) This function takes one argument as a positive floating number. After the calculation, the function returns the square root of x. |
|
String Functions |
|
|
|
Character Retrieval |
|
|
|
The Chr() function is used to retrieve a character based on an ASCII character number passed to the function. It could be used to convert a number to a character. It could also be used to break a line in a long expression. The syntax of this function is: Chr(Number) Based on the table of ASCII characters, a call as Chr(65) would produce the letter A. Not all ASCII characters produce a known letter. For example, when Chr(10) is used in a string, it creates a “new line”. |
|
The Message Box |
|
|
|
A message box is a special form used to display some information to the user. As opposed to a regular form, the user cannot type anything on the box. There are usually two ways you can use a message box: You can simply display a message to the user, or you can get an answer from her. If you only want to display a message, the syntax you would use is: |
|

MsgBox(Message To Display, Flag, Caption) This function takes only one required argument, the message, and some optional arguments. You use the name of the function, MsgBox, to create a message box. Between its parentheses, type the desired message to display. An example would be: MsgBox(“Remember to submit your time sheet”) If you want to display the message box on various lines, edit the string to include a call to Chr(10). Here is an example: MsgBox(“Remember to submit your time sheet” + Chr(10) “Only time sheets received on time will be honored”, )
The message to display can also be created as an expression. After providing the message, you can display it without the other arguments. Here is an example of a message box created with MsgBox("Remember to submit your time sheet")
|

|
|
|
|
If you provide a value other than those in the list, the message box would display only the OK button. Here is an example of a message box created with: MsgBox("Do you want to submit your time sheet?",4)
Besides displaying a button, the second argument is also used to display an icon. To get an icon, you add one of the following values: |
|
|
|
||||||||||||||||||||
|
To use one of these icons, add (a simple addition) its value to that of the desired button or combination of buttons from the previous table. Here is an example created with MsgBox("Do you want to submit your time sheet?", 32 + 4)
The same as: MsgBox("Do you want to submit your time sheet?", 36)
When the buttons of a message box displays if the message
box has more than one button, one of them has a thick border. This button is
referred to as the default button. If the user presses Enter, such a button
would be activated. Besides selecting the buttons and displaying an icon, the
second argument can also be used to specify what button would have focus, that is, what would have a thick border and
would be applied if the user presses Enter, on the message box. The default
button is specified using one of the following values: |
|
|
|
|
To specify this option, add the number to the button and/or
icon value(s). |
|
|
|
|
Date and Time |
|
|
|
The Values of the Current Date and Time |
|
|
|
|
Microsoft Access provides various functions to perform date
and time related operations. These functions allow you to add dates or times,
find the difference between dates or times, or add constant values to dates
or times. |

|
|
|
|
|
|
Adding to a Date |
|
|
|
Operations on dates and times are performed using functions such as DateAdd() and DateDiff(). The DateAdd() function is used to add an interval date value to the specified date. It is used to add a number of days, weeks, months, or years to another date. The syntax of the DateAdd() function is DateAdd(Interval, Number, date) The Interval argument is required and it specifies the kind of value needed as a result. This argument is passed as a string, thus enclosed between double quotes and can have one of the following values:
The Number argument is required also. It specifies the number of units you want to add. If you set it as positive, its value will be added. If you want to subtract, make it negative. The date argument is the date to which you want to add the number. |
|
Subtraction From a Date |
|
|
|
The DateDiff() function is used to find the difference between two date or time values. It allows you to find the number of seconds, minutes, hours, days, weeks, months, or years when you supply two recognizable values. The DateDiff() function takes 5 arguments, 3 are required and 2 are optional. The syntax of the function is DateDiff(Interval, Date1, Date2, Option1, Option2) The Interval argument is required and it specifies the kind of value you want as a result. This argument is passed as a string and can have one of the following values:
Required also, the Date1 and Date2 arguments specify the date or time values that will be used when performing the operation. By default, the days of a week are counted starting on Sunday. If you want to start counting those days on another day, supply the Option1 argument using one of the following values: 1, 2, 3, 4, 5, 6, 7. There are other variances to that argument. If your calculation involves weeks or finding the number of weeks, by default, the weeks are counted starting January 1st. If you want to count your weeks starting at a different date, use the Option2 argument to specify where the program should start. For our time sheet that we want employees to use, we will use a series of combo boxes so the user can only select the time instead of typing it. This reduces the likelihood of errors. When an employee signs a time sheet, he or she can select both starting and ending shifts. We should develop a basic algorithm that can solve our problem in a simple but effective manner. We need to make sure that the start time is less than or equal to the end time. In the same way, the end time should be set higher or equal to the start time. Since we cannot prevent the user from selecting a start time that is higher than the end time or from selecting an end time that is less than the start time, we will set the result to 0 hours whenever the user selects an invalid time sequence. We will start with the following pseudo-code: IF Time Out is greater than or equal to Time In THEN We can calculate the timeOTHERWISE Set the shift value to 0END IF This translates to IF TimeOut >= TimeIn THEN Result = TimeOut - TimeInELSE Result = 0END IF Now, we need to figure out how to calculate the time difference. Because the result will be used to calculate the employee's salary using the hourly wage, we need to have this result as a number, namely a decimal number (as 0.00). If we use the DateDiff() function, we can calculate the minutes or the hours value of the difference. If both start and end times are divisible by 60, as in 09:00 AM to 05:00 PM, the difference can be easily calculated to produce the number of hours, in this case 8.00. To find out if a number is divisible by another number, we can use the Mod operator. This can be done as follows: IF (TimeOut - TimeIn) Mod 60 = 0 ' The difference is evaluated in minutesResult = TimeOut - TimeIn ' The result is calculated in hours END IF If one of either the start or end time doesn't fall on a straight hour value, the resulting time will have a decimal value of 0.50. Therefore, we need to calculate the time difference in minutes instead of hours. Since we are dealing with minutes this time, we can divide the difference by 60 to get the result in minutes. Our pseudo-code would become: IF (TimeOut - TimeIn) Mod 60 = 0 ' The difference is evaluated in minutesResult = TimeOut - TimeIn ' The result is calculated in hours OTHERWISE Result = TimeOut - TimeIn ' The result is calculated in minutes Now that we know how to calculate the time difference, we can include our pseudo-code with the original that would reset the result to 0 if the user selects a wrong time sequence.
|
|
|
|
|
- Open the Bethesda Car Rental1 assuming that
you had created the time
sheet form
- Open the TimeSheet form
- Click the total text box for Monday and, in
the Properties window, click the ellipsis of the Control Source field
- On the Expression Builder dialog box, type the
following expression:
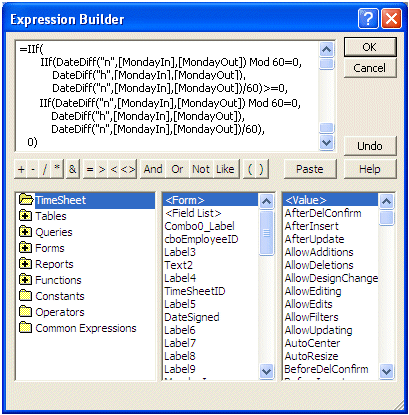
Which is:
=IIf(
IIf(DateDiff("n",[MondayIn],[MondayOut]) Mod 60=0,
DateDiff("h",[MondayIn],[MondayOut]),
DateDiff("n",[MondayIn],[MondayOut])/60)>=0,
IIf(DateDiff("n",[MondayIn],[MondayOut]) Mod 60=0,
DateDiff("h",[MondayIn],[MondayOut]),
DateDiff("n",[MondayIn],[MondayOut])/60),
0) - Click OK
- Set the Format to Fixed and the Decimal
Places to 2
- In the Properties window, right-click Control
for the same Monday total and click Copy
- Open Notepad, right-click inside of Notepad
and click Paste
- Press Ctrl + Home. On the main menu of
Notepad, click Edit -> Replace...
- In the Find What text box, type Mon and
press Tab
- In the Replace With text box, type Tues
and click Replace All
- On the Replace dialog box, click Cancel
- Right-click in Notepad and click Select All.
Right-click again and click Copy
- In Microsoft Access, click the total for
Tuesday
- In the Properties Window, right-click Control
Source and click Paste
- Set the Format to Fixed and the Decimal
Places to 2
- Use the same steps to get the total for the
remaining days
- Click the Weekly Total text box and set its
Control Source to
=Nz([txtMonday])+Nz([txtTuesday])+Nz([txtWednesday])+Nz([txtThursday])
+Nz([txtFriday])+Nz([txtSaturday])+Nz([txtSunday]) - Set its Format to Fixed and the Decimal
Places to 2
- Save the form and preview it
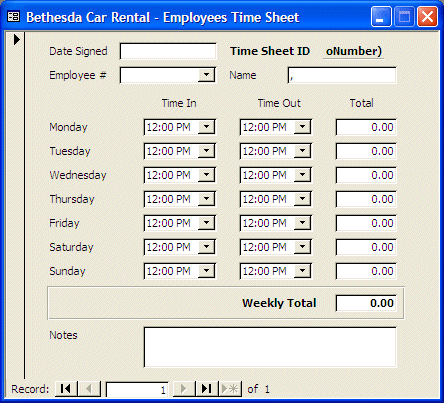
- Perform a few selections for different shifts
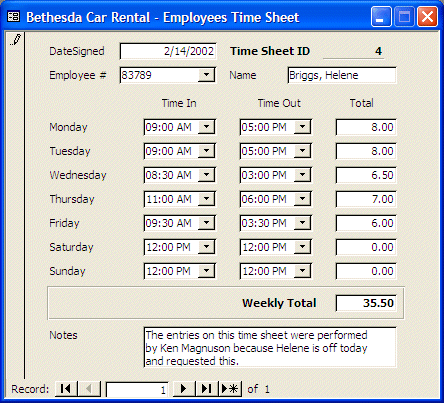
- Close the form
- Open the Bethesda Car Rental2 database
- In the Database window, click Forms and
double-click the OrderProcessing form to open it
- After viewing the form, switch it to Design
View
- On the form, double-click the text box on the
right side of Days
- In the Properties window, click the All tab
and click Control Source
Type =DateDiff("d", StartDate, EndDate) and press Enter - On the form, click the text box on the right
side of the Sub-Total label
- In the Properties window, click Control
Source. Type
=Nz(RateApplied) * Nz(txtNumberOfDays) and press Enter - Click the box to the right the Tax Amount
label and set its Control Source property to =CLng([txtSubTotal]*[TaxRate]*100)/100
- On the form, click the text box to the right
of Rent Total
- In the Properties window, set its Control
Source to
=(CLng([txtSubTotal]*[TaxRate]*100)/100) + txtSubTotal - Save and close the form
- Open the RentalRates form and open the
OrderProcessing form to display both on the screen
- Perform a few rental orders
|
|
|
|
|
|

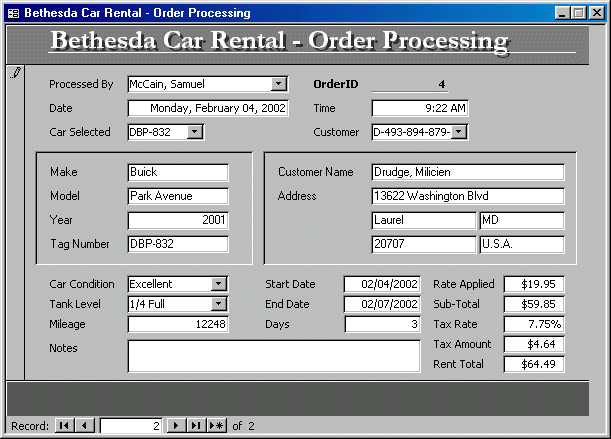
- Close both forms
|
MOUS Topics |
|
|
|
S17 |
Use the Control Toolbox to add controls |
|
S31 |
Create a calculated field |
|
|
|
Exercises |
|
|
|
Watts A loan |
|
|
3.
Save the table as LoanEvaluation and close it
|
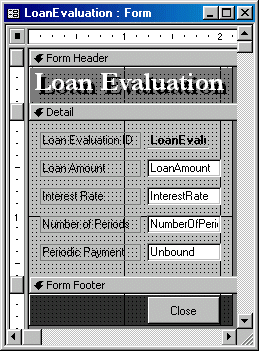
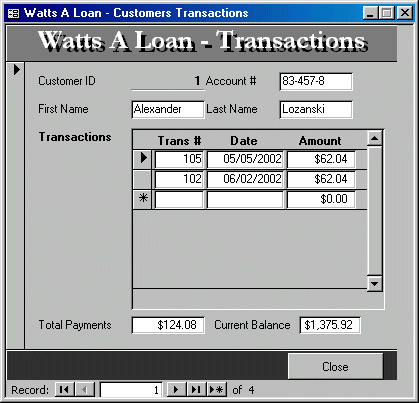
31.
|
Series-Based Functions |
|
|
|
|
|
|
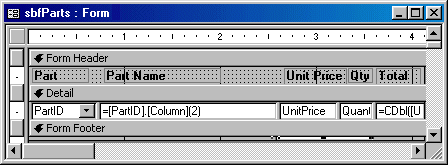

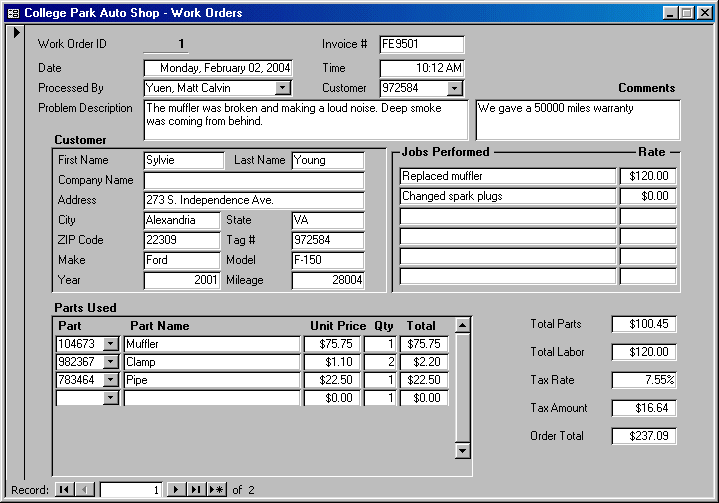
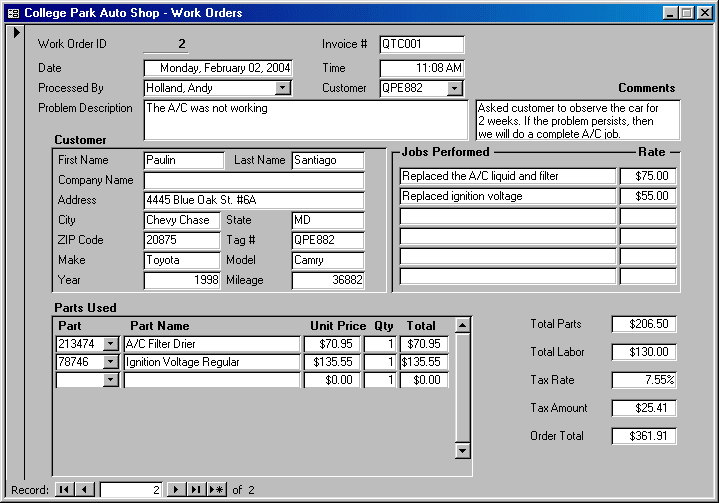
32.
|
|
Domain-Based Functions |
|
|
|

A domain-based function is used to get a value from another object and deliver it to the object in which it is being used or called. The general syntax of these functions is: FunctionName(WhatValue, FromWhatObject, WhatCriteria) To perform its operation, a domain-based function needs three pieces of information, two of which are required (the first two arguments) and one is optional (the third argument). when calling one of these functions, you must specify the value of the column you want to retrieve. This is provided as the WhatValue in our syntax. This argument is passed as a string. The FromWhatObject is the name of the object that holds the value. It is usually the name of a form. This argument also is passed as a string. The third argument, WhatCriteria in our syntax, specifies the criterion that will be used to filter the WhatValue value. It follows the normal rules of setting a criterion.
Domain First: If you want to find out what was the first value entered in the cells of a certain column of an external form or report, you can call the DFirst() function. Domain Last: The DLast() function does the opposite of the DFirst() function: It retrieves the last value entered in a column of a form or report. Domain Sum: To get the addition of values that are stored in a column of another form or report, you can use the DSum() function. Domain Count: The DCount() function is used to count the number of values entered in the cells of a column of a table. Domain Average: The DAvg() function calculates the sum of values of a series and divides it by the count of cells on the same external form or report to get an average. Domain Minimum: The DMin() function is used to retrieve the minimum value of the cells in a column of an external form or report Domain Maximum: As opposed to the DMin() function, the DMax() function gets the highest value of a series of cells in the column of an external form or report |
33.
|
Business Functions |
|
|
|
|
When an item is acquired for the first time as “brand new”, the value of the asset is referred to as its Cost. The declining value of an asset is referred to as its Depreciation. At one time, the item will completely lose its worth or productive value. Nevertheless, the value that an asset has after it has lost all of its value is referred to its Salvage Value. At any time, between the purchase value and the salvage value, accountants estimate the value of an item based on various factors including its original value, its lifetime, its usefulness (how the item is being used), etc.
The Double Declining Balance is a method used to calculate the depreciating value of an asset. To get it, you can use the DDB function whose syntax is: DDB(cost, salvage, life, period) The first argument, cost, represents the initial value of the item. The salvage argument is the estimated value of the asset when it will have lost all its productive value. The cost and the salvage values must be given in their monetary values. The value of life is the length of the lifetime of the item; this could be the number of months for a car or the number of years for a house, for example. The period is a factor for which the depreciation is calculated. It must be in the same unit as the life argument. For the Double Declining Balance, this period argument is usually 2.
Another method used to calculate the depreciation of an item is through a concept referred to as the Straight Line Depreciation. This time, the depreciation is considered on one period of the life of the item. The function used is SLN and its syntax is: SLN(cost, salvage, life); The cost argument is the original amount paid for an item (refrigerator, mechanics toolbox, high-volume printer, etc). The salvage, also called the scrap value, is the value that the item will have (or is having) at the end of Life. The life argument represents the period during which the asset is (or was) useful; it is usually measured in years.
The Sum-Of-The-Years’-Digits provides another method for calculating the depreciation of an item. Imagine that a restaurant bought a commercial refrigerator (“cold chamber”) for $18,000 and wants to estimate its depreciation after 5 years using the Sum-Of-Years’-Digits method. Each year is assigned a number, also called a tag, using a consecutive count; this means that the first year is appended 1, the second is 2, etc. This way, the depreciation is not uniformly applied to all years. Year => 1, 2, 3, 4, and 5. The total count is made for these tags. For our refrigerator example, this would be Sum = 1 + 2 + 3 + 4 + 5 = 15 Each year is divided by this Sum, also called the sum of years, used as the common denominator:
This is equivalent to 1. As you can see, the first year
would have the lowest divident (1/15 ≈ 0.0067) and the last year would
have the highest (5/15 ≈ 0.33).
To calculate the depreciation of an asset, you can use the sum of the years' digits function called SYD. Its syntax is: SYD(cost, salvage, life, period) The cost argument is the original value of the item; in our example, this would be $18,000. The salvage parameter is the value the asset would have (or has) at the end of its useful life. The life is the number of years the asset would have a useful life (because assets are usually evaluated in terms of years instead of months). The period parameter is the particular period or rank of a Life portion. For example, if the life of the depreciation is set to 5 (years), the period could be any number between 1 and 5. If set to 1, the depreciation would be calculated for the first year. If the Period is set to 4, the depreciation would calculated for the 4th year. You can also set the period to a value higher than life. For example, if life is set to 5 but you pass 8 for the period, the depreciation would be calculated for the 8th year. If the asset is worthless in the 8th year, the depreciation would be 0. |
||||||||||||||||||||||||||||||||||||||||||||||||||||
34.
|
Finance-Based Functions |
|
|
|
|
To calculate the future value of an investment, you can use the FV() function. The syntax of this function is: FV(Rate, Periods, Payment, PresentValue, PaymentType)
To calculate the number of periods of an investment or a loan, you can use the NPer() function. Its syntax is: NPer(Rate, Payment, PresentValue, FutureValue, PaymentType);
The Pmt() function is used to calculate the regular payment of loan or an investment. Its syntax is: Pmt(Rate, NPeriods, PresentValue, FutureValue, PaymentType) In the following example, a customer is applying for a car loan. The cost of the car will be entered in cell C4. It will be financed at a rate entered in cell C6 for a period set in cell C7. The dealer estimates that the car will have a value of $0.00 when it is paid off.
When a customer is applying for a loan, an investment company must be very interested to know how much money it would collect as interest. This allows the company to know whether the loan is worth giving. Because the interest earned is related to the interest rate, a company can play with the rate (and also the length) of the loan to get a fair (?) amount. The IPmt() function is used to calculate the amount paid as interest on a loan during a period of the lifetime of a loan or an investment. It is important to understand what this function calculates. Suppose a customer is applying for a car loan and the salesperson decides (or agrees with the customer) that the loan will be spread over 5 years (5 years * 12 months each = 60 months). The salesperson then applies a certain interest rate. The IPMT() function can help you calculate the amount of interest that the lending institution would earn during a certain period. For example, you can use it to know how much money the company would earn in the 3rd year, or in the 4th year, or int the 1st year. Based on this, this function has an argument called Period, which specifies the year you want to find out the interest earned in. The syntax of the IPmt() function is: IPmt(Rate, Period, NPeriods, PresentValue, FutureValue, PaymentType) The Rate argument is a fixed percent value applied during the life of the loan. The PresentValue is the current value of the loan or investment. It could be the marked value of the car, the current mortgage value of a house, or the cash amount that a bank is lending. The FutureValue is the value the loan or investment will have when the loan is paid off. The NPeriods is the number of periods that occur during the lifetime of the loan. For example, if a car is financed in 5 years, this value would be (5 years * 12 months each =) 60 months. When passing this argument, you must remember to pass the right amount. The Period argument represents the payment period. For example, it could be 3 to represent the 3rd year of a 5 year loan. In this case, the IPmt() function would calculate the interest earned in the 3rd year only. The PaymentType specifies whether the periodic (such as monthly) payment of the loan is made at the beginning (1) or at the end (1) of the period. The FutureValue and the PaymentType arguments are not required.
While the IPmt() function calculates the amount paid as interest for a period of a loan or an investment, the PPmt() function calculates the actual amount that applies to the balance of the loan. This is referred to as the principal. Its syntax is: PPMT(Rate, Period, NPeriods, PresentValue, FutureValue, PaymentType) The argument are the same as described in the previous sections.
The PV() function calculates the total amount that future investments are worth currently. Its syntax is: PV(Rate, NPeriods, Payment, FutureValue, PaymentType) The arguments are the same as described earlier.
Suppose a customer comes to your car dealer and wants to buy a car. The salesperson would first present the available cars to the customer so the customer can decide what car he likes. After this process and during the evaluation, the sales person may tell the customer that the monthly payments would be $384.48. The customer may then say, "Wooooh, I can't afford that, man". Then the salesperson would ask, "What type of monthly payment suits you". From now on, both would continue the discussion. Since the salesperson still wants to make some money but without losing the customer because of a high monthly payment, the salesperson would need to find a reasonable rate that can accommodate an affordable monthly payment for the customer. The Rate() function is used to calculate the interest applied on a loan or an investment. Its syntax is: RateE(NPeriods, Payment, PresentValue, FutureValue, PaymentType, Guess) All of the arguments are the same as described for the other functions, except for the Guess. This argument allows you to give some type of guess for a rate. This argument is not required. If you omit it, its value is assumed to be 10.
The IRR() function is used to calculate an internal rate of return based on a series of investments. Its syntax is: IRR(Values, Guess) The Values argument is a series (also called an array or a collection) of cash amounts that a customer has made on an investment. For example, a customer could make monthly deposits in a savings or credit union account. Another customer could be running a business and receiving different amounts of money as the business is flowing (or losing money). The cash flows don't have to be the same at different intervals but they should (or must) occur at regular intervals such as weekly (amount cut from a paycheck), bi-weekly (401k directly cut from paycheck, monthly (regular investment), or yearly (income). The Values argument must be passed as a collection of values, such as a range of selected cells, and not an amount. Otherwise you would receive an error. The Guess parameter is an estimate interest rate of return of the investment.
The NPV() function uses a series of cash flows to calculate the present value of an investment. Its syntax is: NPV(Rate, Value1, Value2, ...) The Rate parameter is the rate of discount in during one period of the investment. As the NPV() function doesn't take a fixed number of arguments, you can add a series of values as Value1, Value2, etc. These are regularly made payments for each period involved. Because this function uses a series of payments, any payment made in the past should have a positive value (because it was made already). Any future payment should have a negative value (because it has not been made yet). |
|
|
MOUS Topics |
|
|
|
S17 |
Use the Control Toolbox to add controls |
|
S31 |
Create a calculated field |
|
|
|
Exercises |
|
|
|
Watts A loan |
|
|
3.
Save the table as LoanEvaluation and close it
|
Examples:VB Access
|
Controls |
|
Scroll BarsàColorchanger |
|
Progress Bar àProgresClock |
|
Up DownàCD publisher |
|
Progressive Clock |
|
|
|
|
|
|
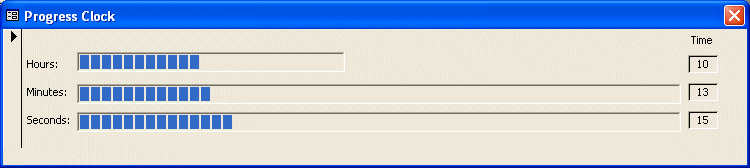
|
Introduction |
|
|
|
In this example, we will display the current time of the computer using progress bars. A dialog box will be equipped with these controls that each receives its value from the computer and displays the value graphically. |
|
|
|
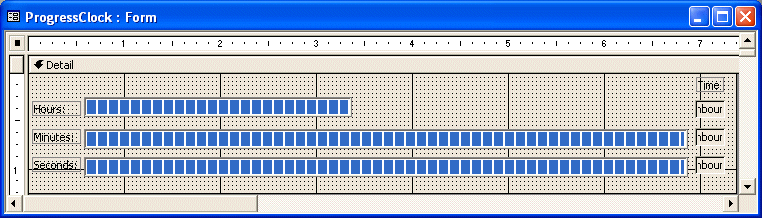
|
The Color Changer |
|
|
|
|
|
|
|
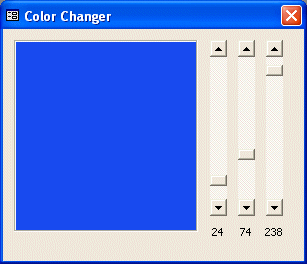
Microsoft Access (and MSVB 6) ships with two main categories of controls. Regular controls display on the Toolbox. Additional controls are available as ActiveX objects. To access these controls, you can click the More Controls button on the Toolbox and select the one you want. In this application, we will use three scroll bars to change the color of a frame. All these controls will be positioned on a form.
This application is simply used to take advantage of some ActiveX controls that accompany MS Access. Most of these controls require VBA to implement their behavior.
|
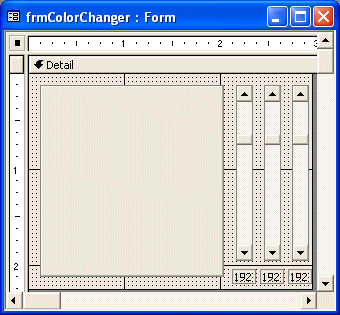
|
Tick Counter |
|
|
|
|
|
The Win32 library provides a special function used to count a specific number of lapses that have occurred since you started your computer. This information or counter is available through the GetTickCount() function. Its syntax is: DWORD GetTickCount(VOID); |
|
|
This function takes no argument. If it succeeds in performing its operation, which it usually does, it provides the number of milliseconds that have elapsed since you started your computer. Just like the timer control, what you do with the result of this function is up to you and it can be used in various circumstances. For example, computer games and simulations make great use of this function. After retrieving the value that this function provides, you can display it in a text-based control. |
|
|
|
|
|
|
|||||||||||||
|
CD Publisher |
|
||||||||||||
|
|
|||||||||||||

|
In this exercise, we will develop an application for a small CD publishing company. The owner wants the prices to be calculated so a customer would get a discount if he orders more. To attract customers and encourage them to order more, she has decided to fix the prices so that the customer would pay:
|
|
|
|
|
Printing an Invoice |
|
|
|
|
|